Read the statement by Michael Teeuw here.
{HowTo} turn on/off your monitor (Time based, PIR/Button, App)
-
@hoofta Couldn’t you use a relay (like me) but instead of disconnecting the power you just trigger the power on/off button?
-
@MadScientist I am not sure if I could or not. Could you elaborate on how you have yours setup?
-
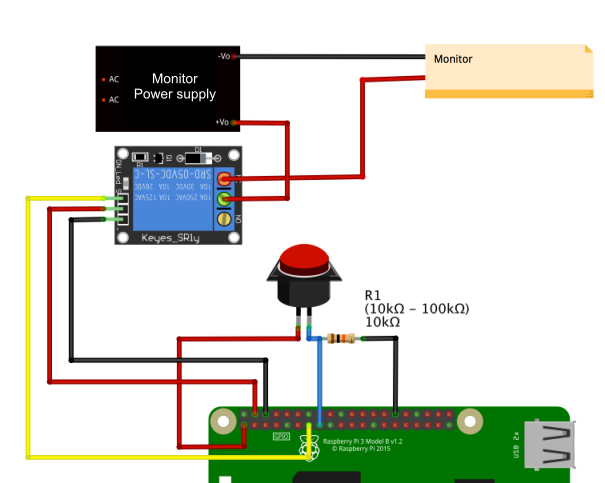
@hoofta My mirror isn’t done yet but in my case the relay will disconnect the power from the power supply to the LCD. I have no idea what TV you’re using but you could solder 2 wires to the power button of your TV and connect them to a relay, which will be triggered by a PIR motion sensor.
-
@hoofta said in {HowTo} turn on/off your monitor (Time based, PIR/Button, App):
I have attempted to use the “screen_off/on” option original provided instead of the “monitor_on/off” but it doesn’t seem to be working properly.
As described u need to use the “pir.py” script from point 2.2.
But then (and i forgot to write that) u need to change the shell script names in the script or keep the “monitor_on” as name.
Sorry for my english, i hope u understand.So, to help u out:
u already creates the “screen_on.sh” and “screen_off.sh”, right?then u need to change the following lines in the “pir.py” script like this:
def turn_on():
	subprocess.call("sh /home/pi/screen_on.sh", shell=True)

def turn_off():
	subprocess.call("sh /home/pi/screen_off.sh", shell=True)
The idea to connect the power button of the TV to a relay is a good start. So u could save much money.
But then the relay must do an impulse instead of being on or off static.
To do this u could use the normal pir.py script from point 2.2 (without any changes).
But the content of both *.sh files should look like this:nano monitor_on.sh:gpio -g write 27 1 sleep 1 gpio -g write 27 0nano monitor_off.sh:gpio -g write 27 1 sleep 1 gpio -g write 27 0chmod +x monitor_on.sh
chmod +x monitor_off.shConnect the relay with two wires parallel to the power button of your tv.
On the relay use “C” and “NO” -
@cruunnerr I did see originally where the monitor_on/off.sh needed to have the word “monitor” replaced with “screen” in the pir.py script. I am not sure I am confident enough to solder in a relay to the power switch on my TV. :-/
What script do you use to confirm your PIR is hooked up correctly and receiving the proper signal/input?
-
@hoofta said in {HowTo} turn on/off your monitor (Time based, PIR/Button, App):
What script do you use to confirm your PIR is hooked up correctly and receiving the proper signal/input?
Just use the pir.py script from the tutorial ;)
every movement will show some dots in your terminal
-
@cruunnerr Right, sorry about that. I forgot you included it. When I did that during initial setup, the dots scrolls across without stopping. Motion or not, dots keep generating.
-
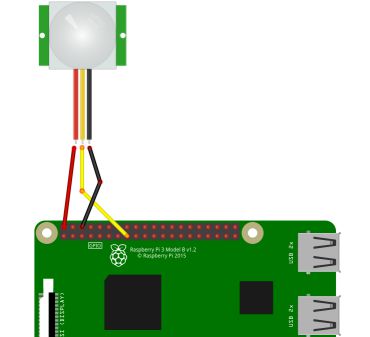
then u probably connected it wrong and the gpio which is used in the script is set to high (1). u can check this…
type
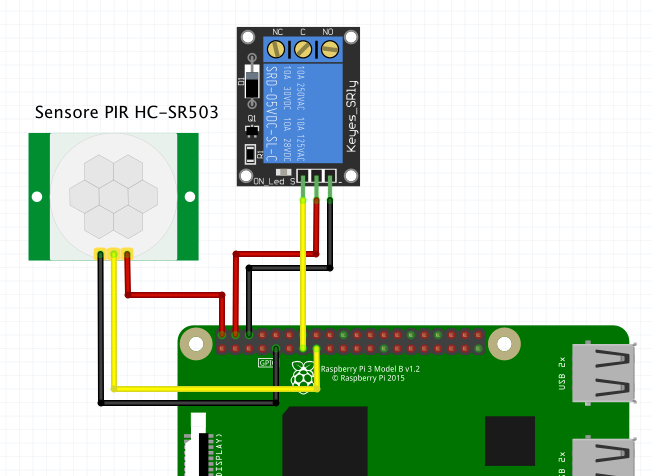
gpio readallto see the GPIO Breakout.pi@MagicMirror_Test:~ $ gpio readall +-----+-----+---------+------+---+---Pi 2---+---+------+---------+-----+-----+ | BCM | wPi | Name | Mode | V | Physical | V | Mode | Name | wPi | BCM | +-----+-----+---------+------+---+----++----+---+------+---------+-----+-----+ | | | 3.3v | | | 1 || 2 | | | 5v | | | | 2 | 8 | SDA.1 | IN | 1 | 3 || 4 | | | 5v | | | | 3 | 9 | SCL.1 | IN | 1 | 5 || 6 | | | 0v | | | | 4 | 7 | GPIO. 7 | IN | 1 | 7 || 8 | 1 | ALT0 | TxD | 15 | 14 | | | | 0v | | | 9 || 10 | 1 | ALT0 | RxD | 16 | 15 | | 17 | 0 | GPIO. 0 | OUT | 1 | 11 || 12 | 0 | IN | GPIO. 1 | 1 | 18 | | 27 | 2 | GPIO. 2 | OUT | 1 | 13 || 14 | | | 0v | | | | 22 | 3 | GPIO. 3 | IN | 0 | 15 || 16 | 0 | IN | GPIO. 4 | 4 | 23 | | | | 3.3v | | | 17 || 18 | 1 | IN | GPIO. 5 | 5 | 24 | | 10 | 12 | MOSI | IN | 0 | 19 || 20 | | | 0v | | | | 9 | 13 | MISO | IN | 0 | 21 || 22 | 0 | IN | GPIO. 6 | 6 | 25 | | 11 | 14 | SCLK | IN | 0 | 23 || 24 | 1 | IN | CE0 | 10 | 8 | | | | 0v | | | 25 || 26 | 1 | IN | CE1 | 11 | 7 | | 0 | 30 | SDA.0 | IN | 1 | 27 || 28 | 1 | IN | SCL.0 | 31 | 1 | | 5 | 21 | GPIO.21 | IN | 1 | 29 || 30 | | | 0v | | | | 6 | 22 | GPIO.22 | IN | 1 | 31 || 32 | 0 | IN | GPIO.26 | 26 | 12 | | 13 | 23 | GPIO.23 | IN | 0 | 33 || 34 | | | 0v | | | | 19 | 24 | GPIO.24 | IN | 0 | 35 || 36 | 0 | IN | GPIO.27 | 27 | 16 | | 26 | 25 | GPIO.25 | IN | 0 | 37 || 38 | 0 | IN | GPIO.28 | 28 | 20 | | | | 0v | | | 39 || 40 | 0 | IN | GPIO.29 | 29 | 21 | +-----+-----+---------+------+---+----++----+---+------+---------+-----+-----+ | BCM | wPi | Name | Mode | V | Physical | V | Mode | Name | wPi | BCM | +-----+-----+---------+------+---+---Pi 2---+---+------+---------+-----+-----+In the script the BCM pin 22 is used for the PIR. This is GPIO 3 and physically it is pin 15.
Please check if your pir is connected correctly.
Edit:
Oh, and take a look at your PIR. u can set the delay time from 0.3seconds up to 5 minutes. Maybe its set very high.
For using the soloutions of this tutorial the PIR adjust time should be set very low, as u can set the time within the script :)
https://www.mpja.com/download/31227sc.pdf -
@cruunnerr As many have said your patience and helpfulness is much appreciated. I did have the ground and the power swapped. I turned off the Pi swapped them and turned it back on and re-ran the test. Got the same thing. I grabbed another PIR and ensured I plugged it in properly. Hooray! (I guess I fried the other one by swapping PWR and GND) Your python test works and it activates MM for the proper amount of seconds after the time delay. Woohoo! Now I need to get it to go to a black screen instead of turning off since after the PIR Sensor stops sensing motion I then see the “NO SIGNAL” screensaver bounce around my TV. One step closer!
-
:)
thank you very much ^^
I am very glad u found out what went wrong. :)
So now u should be able to use the “screen_on/off” files instead of the monitor_onoffJust try out :)
