Hi all ;)
Since there were several questions in the Forum for the best way to turn off and on the monitor i wrote this tutorial and try to show the mostly used options.
The meaning of this tutorial is to get the most used options at the same place :)
So i hope it is ok for the developers of the modules/scripts when i maybe write the installation guide a second time. :D
Please keep in mind, that i wrote some parts just out of my head. I tried all options listed here some time ago and all were working. Nevertheless it could be that i forget some points, but if so don’t hesitate to hit my face :P
Many thanks to all developers, who wrote these great modules and/or scripts.
@paviro (MMM-PIR)
@Jopyth (MMM-Buttons)
@cowboysdude (pir script)
@mochman (Whitelist HowTo)
Oh…and i am open for any suggestion
So…
The very important thing is, that your monitor supports HDMI-CEC or ARC. Otherwise u will not be able to turn it on or off via HDMI.
To reassure you, most monitors do this ;)
To check if it works just go into terminal via ssh and type:
sudo tvservice -o to turn off
sudo tvservice -p to turn on
edit: for some monitors the following commands work better. Please use them if your monitor needs it:
vcgencmd display_power 0 to turn off
vcgencmd display_power 1 to turn on
We will define in several possibilities:
Using
-
Software handling via Cronjob (time based)
-
PIR-Sensor (HC-SR501)
1.module version
2.external version -
App
-
Button
1.module version
2.external version -
Relays (monitor will be totally shut down!)
1.button version (toggle function, on/off with every press)
2.PIR version -
Just turn monitor content black (monitor is still on, but u got a black screen)
1. Using Cronjobs
So lets start with the most easiest way. There is no optional hardware needed and u will be able to turn on or off the monitor at specific days and daytimes.
For your understanding how cronjobs works u should note the following:
* * * * * user executive_command
┬ ┬ ┬ ┬ ┬
│ │ │ │ │
│ │ │ │ └──── Weekday (0-7, Sunday is 0 or 7)
│ │ │ └────── Month (1-12)
│ │ └──────── Day (1-31)
│ └────────── Hour (0-23)
└──────────── Minute (0-59)
Next steps we will do as root to be sure it works. Maybe not the best way, but i am just a simple guy, who is still learning the stuff. ^^
Lets say we want to turn on the monitor every day at 6am and turn off at 8pm:
sudo nano /etc/crontab (to open the crontab)
write this into the file:
0 6 * * * root /usr/bin/tvservice -p >/dev/null 2>&1
0 20 * * * root /usr/bin/tvservice -o >/dev/null 2>&1
your crontab file should look like this:
# /etc/crontab: system-wide crontab
# Unlike any other crontab you don't have to run the `crontab'
# command to install the new version when you edit this file
# and files in /etc/cron.d. These files also have username fields,
# that none of the other crontabs do.

SHELL=/bin/sh
PATH=/usr/local/sbin:/usr/local/bin:/sbin:/bin:/usr/sbin:/usr/bin

# m h dom mon dow user  command
17 *    * * *   root    cd / && run-parts --report /etc/cron.hourly
25 6    * * *   root    test -x /usr/sbin/anacron || ( cd / && run-parts --report /etc/cron.daily )
47 6    * * 7   root    test -x /usr/sbin/anacron || ( cd / && run-parts --report /etc/cron.weekly )
52 6    1 * *   root    test -x /usr/sbin/anacron || ( cd / && run-parts --report /etc/cron.monthly )
0 6     * * *   root    /usr/bin/tvservice -o >/dev/null 2>&1
0 20    * * *   root    /usr/bin/tvservice -p >/dev/null 2>&1
#
This was simple, right?
So now we want to turn on the monitor every Mo-Fr from 6-9am and from 4-10pm. On saturday and sunday it will be turned on from 8am-10pm. That would be look like this:
0 6,16  * * 1,2,3,4,5   root  /usr/bin/tvservice -p >/dev/null 2>&1
0 9,22  * * 1,2,3,4,5   root  /usr/bin/tvservice -o >/dev/null 2>&1
0 8     * * 6,7   root  /usr/bin/tvservice -p >/dev/null 2>&1
0 22    * * 6,7   root  /usr/bin/tvservice -o >/dev/null 2>&1
Alright, thats it. Please keep in mind that this way is the easiest, but probably the most expensive because on at the predefined times even if you don’t look at your mirror.
2.1 Using PIR-Module
Probably the most used option is using a PIR and paviro’s MMM-PIR module.
cd MagicMirror/modules
git clone https://github.com/paviro/MMM-PIR-Sensor.git
cd MMM-PIR-Sensor
npm install
cd
sudo usermod -a -G gpio pi (the „pi“ at the end stands for your username)
sudo chmod u+s /opt/vc/bin/tvservice && sudo chmod u+s /bin/chvt
nano MagicMirror/config/config.js
Add the following somewhere between your existing modules:
{
	module: 'MMM-PIR-Sensor',
	config: {
	powerSavingDelay: 120 // (seconds) how long the monitor will be turned on
	}
},
Save the file by typing „ctrl+c“ and „y“
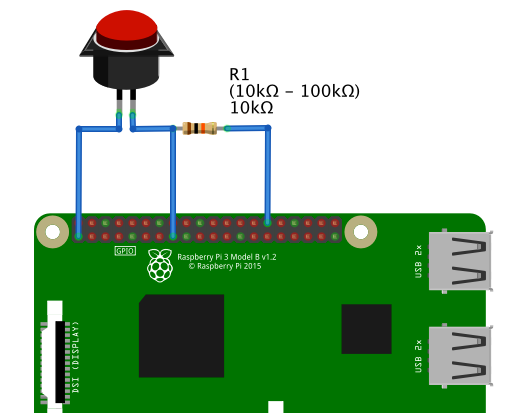
Connect your PIR as shown here:
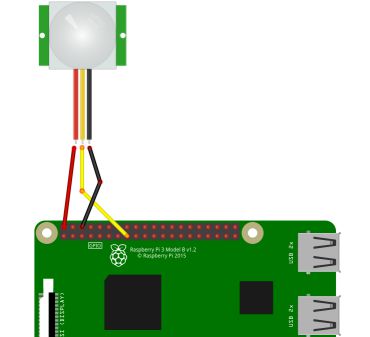
We use GPIO-Pin 22 as it is used by default in the MMM-PIR module.
For all next options in this tutorial we will use pin 22, too.
Please note: It can be that after you start your MM you have to move once through the PIR to make the module work.
2.2 Using PIR-Script
Why using an external script, when there is already a module for that?!
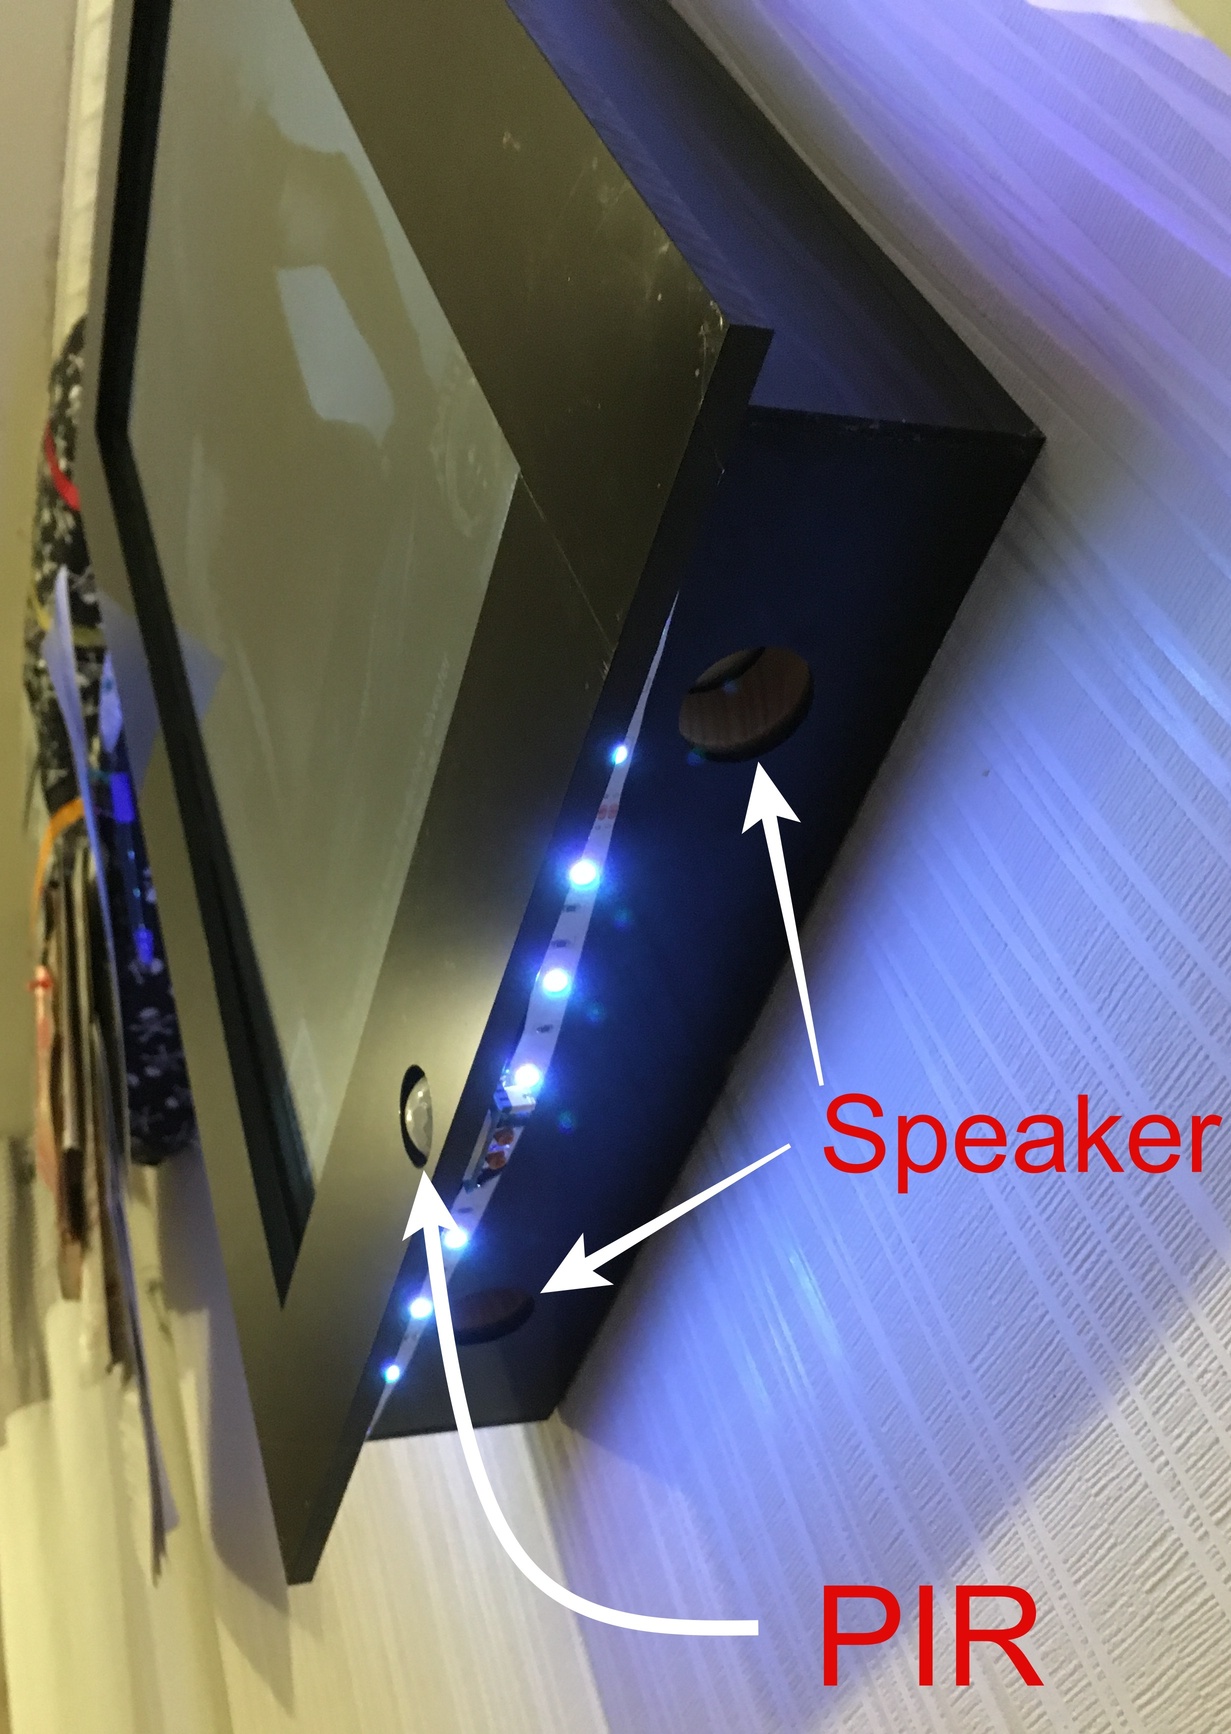
Well, in my case i use the PIR for several operations. My PIR tuns on the monitor and at the same time a LED stripe is turning on. To do this we need two shell scripts and one python script, which will be activated when booting your Pi.
cd
nano monitor_on.sh
write this in this file:
sudo tvservice -p
Save the file by typing „ctrl+c“ and „y“
nano monitor_off.sh
write this in this file:
sudo tvservice -o
Save the file by typing „ctrl+c“ and „y“
chmod +x monitor_on.sh (to make it executable)
chmod +x monitor_off.sh
If you want to do other things happen when monitor turns on or off you can simple add your commands or scripts to this file :)
So now you have two options. Write a python script to automatically start the shell scripts by using a GPIO or just put the Shell scripts into a cronjob.
Here is the first way:
nano pir.py (creates a script which executes the *.sh files via PIR or Button)
write this into the file:
#!/usr/bin/env python

import sys
import time
import RPi.GPIO as io
import subprocess

io.setmode(io.BCM)
SHUTOFF_DELAY = 120 # in seconds, how long the monitor will be on until next button press or PIR detection
PIR_PIN = 22       # 15 on the board (this needn't to be a PIR. Can be a button also)
LED_PIN = 16      # optional, don't use as Relay-PIN. It just shows detection time of the PIR without delay time

def main():
    io.setup(PIR_PIN, io.IN)
    io.setup(LED_PIN, io.OUT)
    turned_off = False
    last_motion_time = time.time()

    while True:
        if io.input(PIR_PIN):
            last_motion_time = time.time()
            io.output(LED_PIN, io.LOW)
            print ".",
            sys.stdout.flush()
            if turned_off:
                turned_off = False
                turn_on()
        else:
            if not turned_off and time.time() > (last_motion_time +
                                                 SHUTOFF_DELAY):
                turned_off = True
                turn_off()
            if not turned_off and time.time() > (last_motion_time + 1):
                io.output(LED_PIN, io.HIGH)
        time.sleep(.1)

def turn_on():
	subprocess.call("sh /home/pi/monitor_on.sh", shell=True)

def turn_off():
	subprocess.call("sh /home/pi/monitor_off.sh", shell=True)

if __name__ == '__main__':
    try:
        main()
    except KeyboardInterrupt:
        io.cleanup()
Save the file by typing „ctrl+c“ and „y“
chmod +x pir.py
You can check if your button works by simply typing python pir.py. Every time u move through the PIR or press the button it will show you several …
End the test with “ctrl+c”
now we editing the rc.local to start the script after booting the Pi:
sudo nano /etc/rc.local
write this in the file (above the “exit 0”):
python /home/pi/pir.py &
Save the file by typing „ctrl+c“ and „y“
after all it should look like this:
#!/bin/sh -e
#
# rc.local
#
# This script is executed at the end of each multiuser runlevel.
# Make sure that the script will "exit 0" on success or any other
# value on error.
#
# In order to enable or disable this script just change the execution
# bits.
#
# By default this script does nothing.

# Print the IP address
_IP=$(hostname -I) || true
if [ "$_IP" ]; then
  printf "My IP address is %s\n" "$_IP"
fi

python /home/pi/pir.py

exit 0
Here comes the second way:
Next steps are nearly the same as the first option shown in this tutorial.
Lets say we want to turn on the monitor every day at 6am and turn off at 8pm:
sudo nano /etc/crontab (to open the crontab)
write this into the file:
0 6 * * * root /home/pi/monitor_on.sh >/dev/null 2>&1
0 20 * * * root /home/pi/monitor_off.sh >/dev/null 2>&1
Save the file by typing „ctrl+c“ and „y“
3. Using App
First i need to say that this isn’t really an App. But you can make it look a like. I just know how to do it with iPhone devices so in this example i will show you how to do it with that.
We need to install the MMM-Remote-Control module:
cd MagicMirror/modules
git clone https://github.com/Jopyth/MMM-Remote-Control.git
cd MMM-Remote-Control
npm install
cd
In the next step we will add the module to our config.js. To get access to our mirror u should notice the „Whitelist HowTo“.
nano MagicMirror/config/config.js
Add the following somewhere between your existing modules:
{
    module: 'MMM-Remote-Control'
    // uncomment the following line to show the URL of the remote control on the mirror
    // , position: 'bottom_left'
    // you can hide this module afterwards from the remote control itself
},
Save the file by typing „ctrl+c“ and „y“
and restart your MagicMirror.
I suppose that you are knowing the IP-address of your Pi, otherwise u should google how to find out ;)
Lets say your Pi has this IP: 192.168.178.240
so know u should be able to get access to the Mirror by typing the following in your Safari-Browser on the iPhone:
http://192.168.178.240:8080/remote.html
You should see this:
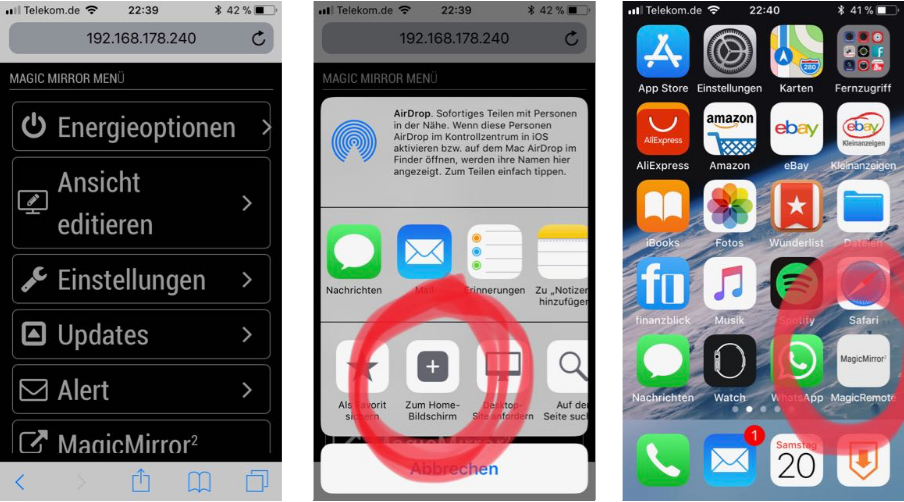
Tap the „share button“ and tap „Add to home screen“. After that a new „app“ will appear on your home screen.
If you tap on it u will get a full screen of the Remote-Control module and will be able to turn on and off your monitor :)
4.1 Using Button module
To use the MMM-Button it is totally necessary to already get the MMM-Remote-Control module running!
cd MagicMirror/modules
git clone https://github.com/Jopyth/MMM-Buttons.git
cd MMM-Buttons
npm install (this can take a while)
cd
nano MagicMirror/config/config.js
Add the following somewhere between your existing modules:
{
	module: 'MMM-Buttons',
		config: {
 		buttons: [
 		{
  		pin: 22,
 		name: "monitor_control",
		longPress: {
		notification: "REMOTE_ACTION",
		payload: {action: "MONITOROFF"}
		},
		shortPress: {
		notification: "REMOTE_ACTION",
		payload: {action: "MONITORON"}
		}
           }
        ]
    }
},
So if you press your button shortly (0 - 0,5 seconds) the monitor will turn on. A longer press (> 3 seconds) will turn off the monitor.
Connect the button like shown in the next step.
4.2 Using Button script
Why it can be necessary to use an external script i already wrote above.
And luckily the way to use a button with an external script is the same way as using a PIR.
So turn back to point 2.2 and do it exactly like described there. Maybe u want to rename the pir.py to button.py, but then you also have to change the cronjob commands or the rc.local entry ;)
Connect it like this:
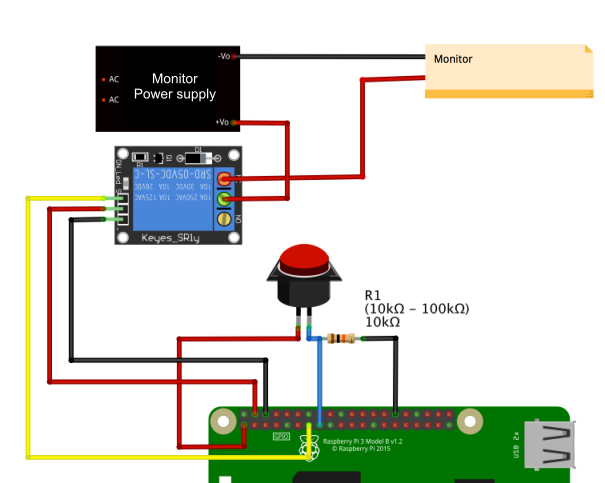
5. Relay
If you want to safe money or your monitor doesn’t support HDMI-CEC you can simply breaks off the current to your monitor by using a Relay. To keep it simple i will use the srd-05vdc-sl-c relay.
Keep in mind, that some monitors don’t start automatically by giving them power.
5.1 - Use Relay with a button:
Note: The script below toggles the output for the relay. If u want to use the relay with time delay u can use the scripts on point 5.2 and just replace the PIR with a button.
Note: Some relays are active low. That means, that they are active while the GPIO is set to “0” or “False”. in this case u need to turn the commands for turn_on and turn_off in the python script. So for monitor on u need to write “io.output(RELAY_PIN, False)” and for monitor off “io.output(RELAY_PIN, True)”
cd
nano relay.py
put this code into the file:
#!/usr/bin/env python

import subprocess
import time
import RPi.GPIO as gpio
import sys

gpio.setwarnings(False)
gpio.setmode(gpio.BCM)
BUTTON_PIN = 22
RELAY_PIN = 27


def main():
    gpio.setup(BUTTON_PIN, gpio.IN, pull_up_down=gpio.PUD_DOWN)
    gpio.setup(RELAY_PIN, gpio.OUT)
    gpio.output(RELAY_PIN, False)
    count = 0

    while True:
        gpio.wait_for_edge(BUTTON_PIN, gpio.FALLING)
        t = time.time()
        time.sleep(.3)
        gpio.wait_for_edge(BUTTON_PIN, gpio.RISING)
        count += 1

        if count > 1:
            count = 0

        if count == 0:
            print "Turn screen on"
            gpio.output(RELAY_PIN, True)
        if count == 1:
            print "Turn screen off"
            gpio.output(RELAY_PIN, False)

if __name__ == '__main__':
    try:
        main()
    except KeyboardInterrupt:
        gpio.cleanup()
Save the file by typing „ctrl+c“ and „y“
make it executable:
chmod +x relay.py
You can test by simply typing python relay.py. Every time you push the button your screen will toggle to go on or off.
So your first push turns off the screen content and your second push turns it on :)
Between every press, u need to wait 5 seconds.
its that simple…
Connect the button and the relay like this:
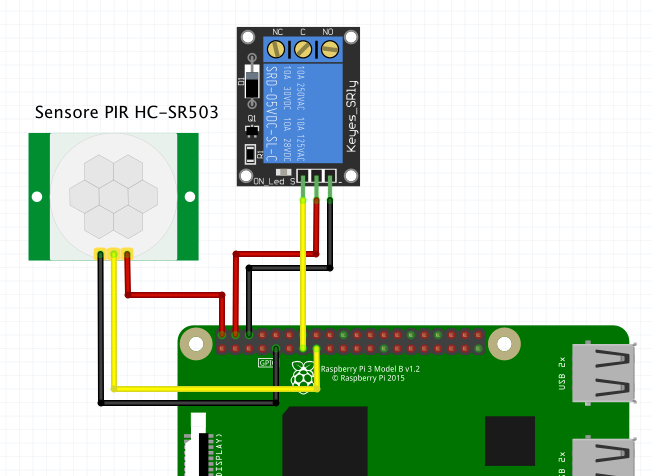
5.2 - Use Relay with a PIR:
Note: Some relays are active low. That means, that they are active while the GPIO is set to “0” or “False”. in this case u need to turn the commands for turn_on and turn_off in the python script. So for monitor on u need to write “io.output(RELAY_PIN, False)” and for monitor off “io.output(RELAY_PIN, True)”
nano relayPIR.py
put in this:
#!/usr/bin/env python

import sys
import time
import RPi.GPIO as io
import subprocess

io.setmode(io.BCM)
SHUTOFF_DELAY = 120 # in seconds, how long the monitor will be on until next button press or PIR detection
PIR_PIN = 22       # 15 on the board (this needn't to be a PIR. Can be a button also)
LED_PIN = 17    # 11 on the board (optional): It just shows detection time of PIR without delay time
RELAY_PIN = 27  # 13 on the board

def main():
    io.setup(PIR_PIN, io.IN)
    io.setup(LED_PIN, io.OUT)
    io.setup(RELAY_PIN, io.OUT)
    turned_off = False
    last_motion_time = time.time()

    while True:
        if io.input(PIR_PIN):
            last_motion_time = time.time()
            io.output(LED_PIN, io.LOW)
            print ".",
            sys.stdout.flush()
            if turned_off:
                turned_off = False
                turn_on()
        else:
            if not turned_off and time.time() > (last_motion_time +
                                                 SHUTOFF_DELAY):
                turned_off = True
                turn_off()
            if not turned_off and time.time() > (last_motion_time + 1):
                io.output(LED_PIN, io.HIGH)
        time.sleep(.1)

def turn_on():
        io.output(RELAY_PIN, True)

def turn_off():
        io.output(RELAY_PIN, False)

if __name__ == '__main__':
    try:
        main()
    except KeyboardInterrupt:
        io.cleanup()
save with “ctrl+x” and “y”
chmod +x relay.py
You can check if your button works by simply typing python relayPIR.py. Every time u move through the PIR or press the button it will show you several …
End the test with “ctrl+c”
The Shutoff delay in the script defines how long the relay will be turned on after last detection through the pir.
Connect it like this:
now we editing the rc.local to start the script after booting the Pi:
sudo nano /etc/rc.local
write this in the file (above the “exit 0”):
python /home/pi/relayPIR.py &
Save the file by typing „ctrl+c“ and „y“
after all it should look like this:
#!/bin/sh -e
#
# rc.local
#
# This script is executed at the end of each multiuser runlevel.
# Make sure that the script will "exit 0" on success or any other
# value on error.
#
# In order to enable or disable this script just change the execution
# bits.
#
# By default this script does nothing.

# Print the IP address
_IP=$(hostname -I) || true
if [ "$_IP" ]; then
  printf "My IP address is %s\n" "$_IP"
fi

python /home/pi/relayPIR.py

exit 0
6. Just turn black
Alright, for some reason you might want to be able to just set your monitor content black instead of turning it to standby.
That can be necessary, if you still want to use your monitor speaker.
We can do this nearly the same way as shown with the normally used PIR/button script shown above.
cd
nano screen_on.sh
put this into the file:
export DISPLAY=:0
xset dpms force on
Save the file by typing „ctrl+c“ and „y“
nano screen_off.sh
put this into the file:
export DISPLAY=:0
xset dpms force off
Save the file by typing „ctrl+c“ and „y“
make them executable:
chmod +x screen_on.sh
chmod +x screen_off.sh
Now at this point you got three options.
- Use it with cronjob (do it like described at section 1 & 2.2 from this tutorial)
- Use a PIR (just replace the *.sh scripts from the section 2.2 and change the shell script names in the commands within the pir.py script)
- Use a single push button
For using the push button you need to connect your button the same way as shown at section 4.2.
Alright, here comes the script:
cd
nano screenbutton.py
put in the following content:
#!/usr/bin/env python

import subprocess
import time
import RPi.GPIO as gpio
import sys

gpio.setwarnings(False)
gpio.setmode(gpio.BCM)
BUTTON_PIN = 22

#turn screen on at startup
subprocess.call("sh /home/pi/screen_on.sh", shell=True)

def main():
    gpio.setup(BUTTON_PIN, gpio.IN, pull_up_down=gpio.PUD_DOWN)
    count = 0

    while True:
        gpio.wait_for_edge(BUTTON_PIN, gpio.FALLING)
        t = time.time()
        time.sleep(.5)
        gpio.wait_for_edge(BUTTON_PIN, gpio.RISING)
        count += 1

        if count > 1:
            count = 0

        if count == 0:
            print "Turn screen on"
            subprocess.call("sh /home/pi/screen_on.sh", shell=True)
        if count == 1:
            print "Turn screen off"
            subprocess.call("sh /home/pi/screen_off.sh", shell=True)

if __name__ == '__main__':
    try:
        main()
    except KeyboardInterrupt:
        gpio.cleanup()
Save the file by typing „ctrl+c“ and „y“
make it executable:
chmod +x screenbutton.py
You can test by simply typing python screenbutton.py. Every time you push the button your screen will toggle to go on or off.
So your first push turns off the screen content and your second push turns it on :)
its that simple…
now we editing the rc.local to start the script after booting the Pi:
sudo nano /etc/rc.local
write this in the file (above the “exit 0”):
python /home/pi/screenbutton.py &
Save the file by typing „ctrl+c“ and „y“
after all it should look like this:
#!/bin/sh -e
#
# rc.local
#
# This script is executed at the end of each multiuser runlevel.
# Make sure that the script will "exit 0" on success or any other
# value on error.
#
# In order to enable or disable this script just change the execution
# bits.
#
# By default this script does nothing.

# Print the IP address
_IP=$(hostname -I) || true
if [ "$_IP" ]; then
  printf "My IP address is %s\n" "$_IP"
fi

python /home/pi/screenbutton.py

exit 0