Read the statement by Michael Teeuw here.
The latest Install Guide (MM w/ Google Assistant)
-
This guide is about how to install google assistant and magic mirror on latest raspbian.
I had some errors, so I made a video to share it, https://youtu.be/UBgH5hejYtMAnd Here is github for this, https://github.com/makepluscode/rpi-tutorial-advanced/blob/master/006-raspbian-magicmirror-google-assistant-latest/
Dependency Versions
- OS : 2018-11-13-raspbian-stretch-full.img
- MagicMirror2 : 2.5.0
- MMM-Hotword : 1.1.0
- MMM-AssistantMk2 : 2.1.2
Install
STEP1. Rasbian installation
- Download the latest image from the RazBian website. (2018-11-13-raspbian)
- Download Rufus to write images to SD card.
- Run Rufus and select the downloaded image to burn the SD card.
STEP2. Insert SD card + LCD + Power connection
- Insert SD card and keyboardㆍmouse dongle into raspberry pi.
- Connect LCD to raspberry pi on HDMI.
STEP3. First Boot
- Connect the USB power cable to the raspberry pi
- After boot is done, connect to the Internet with WIFI
- Update packages
sudo apt-get updateSTEP4. Installing a Magic Mirror
- Install the Magic Mirror using a script on the Internet
sudo apt-get install npm
sudo npm install -g npm@latest
bash -c "$(curl -sL https://raw.githubusercontent.com/MichMich/MagicMirror/master/installers/raspberry.sh)"
STEP5. Installing Magic Mirror Modules
- Go to modules directory and install the MMM-Hotword
cd ~/MagicMirror/modules/ sudo apt-get install libmagic-dev libatlas-base-dev sox libsox-fmt-all git clone https://github.com/eouia/MMM-Hotword.git cd MMM-Hotword npm install cd ~/MagicMirror/modules/MMM-Hotword/node_modules/snowboy npm install --save-dev electron-rebuild npm install nan ./node_modules/.bin/electron-rebuild- Install MMM-AssistantMk2
cd ~/MagicMirror/modules/
sudo apt-get install mpg321 libasound2-dev
git clone https://github.com/eouia/MMM-AssistantMk2
cd MMM-AssistantMk2
npm install
cd scripts
chmod +x *.sh
cd ~/MagicMirror/modules/MMM-AssistantMk2
npm install --save-dev electron-rebuild
./node_modules/.bin/electron-rebuild
STEP6. Configure Google Assistant Module
- Open the Google Action Console and create a new project
https://console.actions.google.com- Open the Google Cloud Platform Console and select the generated project
https://console.cloud.google.com- Search for the Google Assistant API and click Enable.
- Click CONFIGURE … of Credentials and put the name and e-mail.
- Generate Other credentials with the OAuth Client ID in Create Credentials
- Download generated OAuth client ID in json format
- Move the downloaded OAuth client ID to modules/MMM-AssistantMk2/credentials.json
mv ~/Download/cre.... credentials.json- Run auth_and_test.js to verify the generated client ID
node auth_and_test.js- Accept the client verification process and copy and enter your Google account key
- Move the generated token.json
mv token.json ./profiles/default.jsonSTEP7. Edit Google assistant module config
- Open the Magic Mirror configuration file with TextEditor and modify it with the contents of github
Install USB Mic. and Speaker
https://github.com/makepluscode/rpi-tips/tree/master/001-bringup-audio-and-mic
vi ~/.asoundrcpcm.!default{ type asym playback.pcm{ type hw card 0 } capture.pcm{ type plug slave.pcm "hw:1, 0" } } ctl.!default{ type hw card 0 }And, change audio output from hdmi to analog.
Test
Go to the location where the Magic Mirror is and start the application
cd ~/MagicMirror
npm start
Video Tutorial
-
Wow this is a great tutorial, and video. I am going to add this to my mirror. Can I ask where you got your USB mic and speaker combo from?
I especially liked how you showed the troubleshooting, and corrections in your video. So many people edit out the hurdles. Kudos to you my friend! A++
-
Thank you for the elaborate instructions, everything for me went well until I’ve noticed that the default modules (calendar, complements, news feed) seem to disappear after some time. Did you run into similar issues?
-
@leej00 hello mate
how did you configure the last part i.e.
STEP7. EDIT GOOGLE ASSISTANT MODULE CONFIG
Open the Magic Mirror configuration file with TextEditor and modify it with the contents of github
there is soo much information on github that needs to be added on to the config.js, which part of it did you add to your config.js? can you please share it?
I get the google icon on my mm but when I say “Ok Google” nothing happens"
Thanks.
-
A few things you can do:
Add your location inside the config.js under the module call. You can find this info inside the CONFIGURATION.md
i.e.
// — ESSENTIALS / modifying for your environment might be needed.Use: https://www.mapdevelopers.com/geocode_tool.php
deviceLocation: {
  coordinates: { // set the latitude and longitude of the device to get localized information like weather or time. (ref. mygeoposition.com)
    latitude: 00.0, // -90.0 - +90.0
    longitude: -00.00, // -180.0 - +180.0
  },
},
With MMM-Hotword, using USB mic (plughw:1) you need to use the following:
//Hotword Module
{
    module: "MMM-Hotword",
    config: {
      record: {
        recordProgram : "arecord",
        device        : "plughw:1",
      },
      autostart:true,
      onDetected: {
        notification: function (payload) {
          return "ASSISTANT_ACTIVATE"
        },
        payload: function (payload){
          return {
            profile: payload.hotword
          }
        }
      },
    },
  },
{
		module: "MMM-AssistantMk2",
		position: "bottom_bar",
		config: {
		record: {
        recordProgram : "arecord",
        device        : "plughw:1",
      },

      notifications: {
        ASSISTANT_ACTIVATED: "HOTWORD_PAUSE",
        ASSISTANT_DEACTIVATED: "HOTWORD_RESUME",
      },
deviceLocation: {
      coordinates: { // set the latitude and longitude of the device to get localized information like weather or time. (ref. mygeoposition.com)
        latitude: 00.00, // -90.0 - +90.0
        longitude: -00.00, // -180.0 - +180.0
      },
    },

}
},
It works. Thank You! I am using the PS Eye as suggested in other forms. My audio out is still set to HDMI because im staging on my TV.
LPT: Add the following to the MK2 module config so the screens dont toggle so fast:
screenDuration: 5000, //this is milliseconds -
@leej00
Testing this now to see if I get the same results.@makepluscode
Can confirm all modules disappear besides the default weather module.I have a YouTube playlist playing, and I can still hear the module playing through the speakers, but visually it is no longer there.
If I give it a keyword voice command it is listening for it will draw the modules again.
Another observation is every time I give it a voice command it starts my playlist from the top.
-
@bachoo786 say “smart mirror” or “snowboy”
You can also read more on the .umdl and how to obtain a custom .umdl here:
snowboy.kitt.aiMore particularly:
http://docs.kitt.ai/snowboy/#api-v1-train -
This post is deleted! -
@makepluscode
Hello first of all thanks for the great tutorial!
Unfortunately I’m stuck with the last step (installation of the microphone)
When I enter the command “vi ~/.asoundrc” I get the following message:
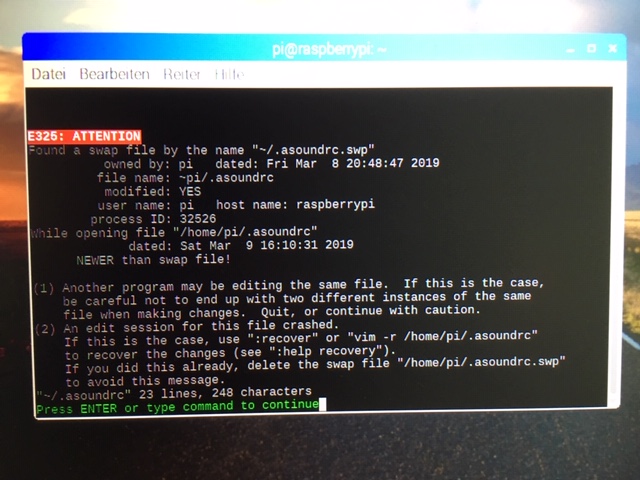
I ask for help
Greeting Fabian -
@Fabian
Type sudo nano. asoundrc in command prompt
Then paste your code there.
To save that code press ctrl+X, then Y and then enter.
You are good to go
