Read the statement by Michael Teeuw here.
Remote SSH Access to the Mirrors You Give Away
-
I do love the mirrors I have created. My creations are like my children and like most children they eventually leave the nest and go forth to enjoy lives of their own. Except for Brad. Who is never going to amount to anything if he doesn’t get a job and move out of the basement. All he does is sleep and play Fortnite instead of… but I digress.
This last mirror made me realize that I needed a way to connect to it after it was no longer in my physical control. My relatives aren’t very technical and it’s no fun for either of us to walk them through a troubleshooting session over the phone. It would be much easier if I could just remote into the mirror like I did when I was building it.
It gets complicated when you realize that anyone with a WiFi network in their house is going to have a consumer-grade firewall in place. The usual solution is to get on the router and forward a port to the Pi, but that requires you to know the internal IP address of the Pi, the external IP address of the router, and your friends have to trust you with password to their router (which may not be configured to allow remote administration). And that’s just the start.
My solution was to have the Pi reach out to a server that I control and establish a reverse SSH session. Because residential gateways allow any outbound connection by default, the Pi reaching out to the server is allowed without any extra configuration of the router. By connecting to a server outside of my home network, I didn’t have to worry about configuring my router to forward a port to my computer for the connection. And by choosing a cloud provider, I could spin the connection up & down as needed.
I had several requirements for this project. I work in an internet security company, so it’s entirely possible that I went a bit overboard on my paranoia. But my goals were:
- Secure remote access to the Pi via private/public key exchange
- Connect to the Pi regardless of what kind of firewall was in place
- No modification of target network firewalls
- No modification of my network firewall
- Portability of the mirror to different networks (Little Suzie takes the mirror with her to college and the enterprise-level gateways involved)
- Self-healing connection that requires no intervention from mirror owner
- Maximum use of open-source software, minimum use of black box code
I’ve broken the process up into a handful of steps. Links to each portion are here:
Generating Your Key Pairs
Signing Up for the Cloud
Configuring a Dynamic DNS to Your Server
Connecting the Pi to Your Server
Connecting to the Remote Pi -
Generating Your Key Pairs
In order to get remote access to your Pi, you’re going to need a secure way to have the Pi establish a connection with your server that does not require someone to enter a username & password. That means you will need a couple of key pairs.
If you haven’t worked with key pairs before, this can be confusing. There are many excellent tutorials on key pairs out there, but the relevant details go like this: Each key pair has two parts, a private key and a public key. The private key is used by the computer establishing a connection. The public key is held by the computer you are connecting to and is used to recognize the computer with the private key.
Generating the Key Pair for Your Mirror
- Log into your mirror. You can do this via SSH or directly on the mirror. Just get a terminal connection running.
- Make a directory for the SSH keys by entering
mkdir /home/pi/.ssh. Switch to that directory withcd /home/pi/.ssh. (The period beforesshmeans the folder will not be displayed on normal directory listings. It’s important, so don’t omit it) - Generate a key pair by entering
ssh-keygen. It will ask you for a location to save the key pair. I recommend giving it a useful name like “gift-mirror”. - It will ask you to enter a passphrase. Hit enter twice to save it with a blank passphrase.
- After a few seconds, it will show you some random art and give you the prompt back. At this point, it has created two files in the .ssh folder:
gift-mirrorandgift-mirror.pub. These are your private key and public key files respectively. (You may wish to rename the key togift-mirror.keyto help you keep it straight) - Copy both of these files to your home computer. Put them someplace safe.
You now have an SSH keypair that your Pi can use to establish connections. Now you need one for your home computer. This second key pair which I will call the “home key pair” is what you’ll use to connect to the cloud server. It needs to be a different key pair than the one that the Pi uses to connect to the cloud server. (* see discussion at the bottom of this post)
If you do not have a private key on your home computer, you will need to generate one. If you use Windows, there are a couple of free programs that can generate key pairs for you. PuttyGen and BitVise are two that I have experience with. There are others. Go ahead and use them to generate a private and public key on your computer.
If your home computer is a flavor of Linux (Ubuntu, Debian, whatever) then you can follow the same steps as above to create a private and public key pair for your home computer. Be sure to name it something different and something you will recognize. This key pair can have a passphrase if you wish (and I highly recommend it).
The third possibility is you can just run the above steps again, just enter a different name for the file when prompted. This will generate a second key pair which you can then copy to your home computer. That will save you having to download, install and use another program. Remember to delete this second key pair from the Pi! This is the authentication for your home computer, not the Pi. It should not leave your home computer.
Double-check - You should now have the following files:
- A private key and a public key on your Raspberry Pi in
/home/pi/.ssh. This is the “mirror key pair”. - A copy of the mirror key pair on your home computer.
- A different private key and public key on your home computer (the “home key pair”).
Once you have these, it’s time to spin up some cloud servers!
[*] Regarding two key pairs instead of just one: It is technically possible to do this with just one key pair. You can use the private key on the Pi to connect to the server and use a copy of the same key on your computer to connect to the server as well. However, you should treat private keys as you would passwords. The private key on the mirror is on a mirror that you do not physically control. It is therefore unsecured and should be used only to connect the Pi to the server. Anyone who got ahold of your private key can use that key to connect to any other server where you use it. This is what we technically call “bad”.
-
Signing Up for the Cloud
We’re going to configure a cloud server to be our Command & Control (C&C) server. The mirror will establish a connection to this C&C server that will allow us to follow it back down and access it. If you’ve never used a cloud service provider before, then this should be a fun learning experience.
I used Amazon Web Services (AWS) for this, primarily because I deal with AWS for my day job and because they have a “free tier” server class that is really cheap to use. You can use any cloud provider you wish if you don’t want to use Amazon. I would recommend looking into Vultr (because they’re cheap) and Digital Ocean (because they’re fast). I would recommend staying away from Microsoft’s Azure services only because the interface is hella complicated. You are signing up for a paid service, so you will need a credit card and an email address.
Start by navigating to Amazon’s AWS website and create an account. A new developer cloud account comes with access to their free tier of servers so you can get used to the way their cloud services function. Once you have received your confirmation email, you can log into AWS by clicking on the My Account link in the upper right. Once you do the login & password dance, you will have access to your cloud services. Before you start spinning up a computer, we will need to get your keys uploaded to Amazon’s system.
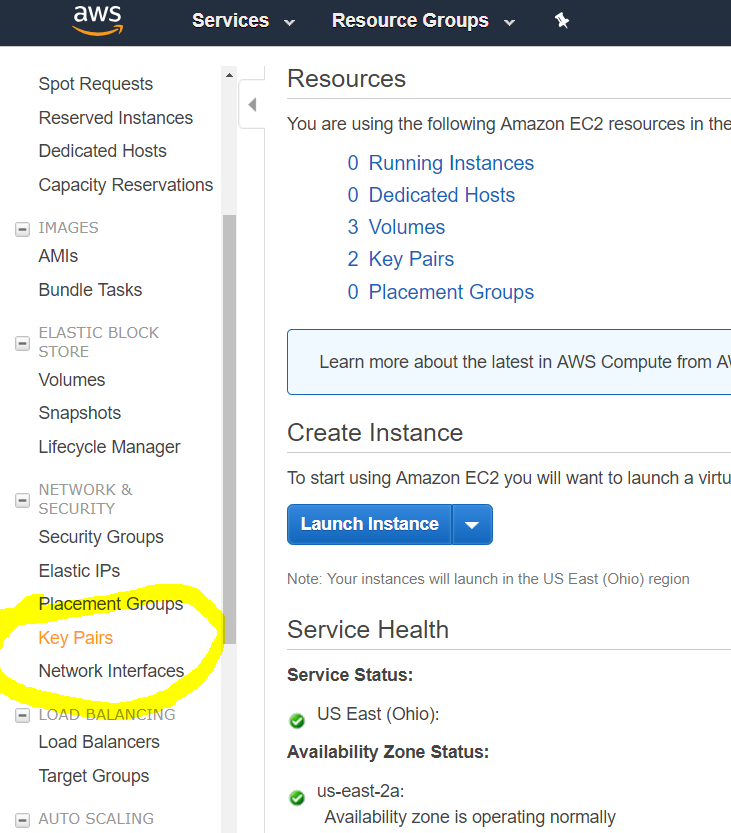
Once you have logged in, you will want to head over to the portion that controls virtual servers. In Amazon’s system, this is called “EC2”. In Digital Ocean, its is called “Droplets”. Click on theServicesmenu and then selectEC2. Amazon will show you a dashboard with a summary of your virtual servers and a list of categories down the left hand side.Before you create your server, you will want to upload the public key to Amazon’s system so that it can be inserted into the server when it is created. Click on the “Key Pairs” link on the menu on the left edge.
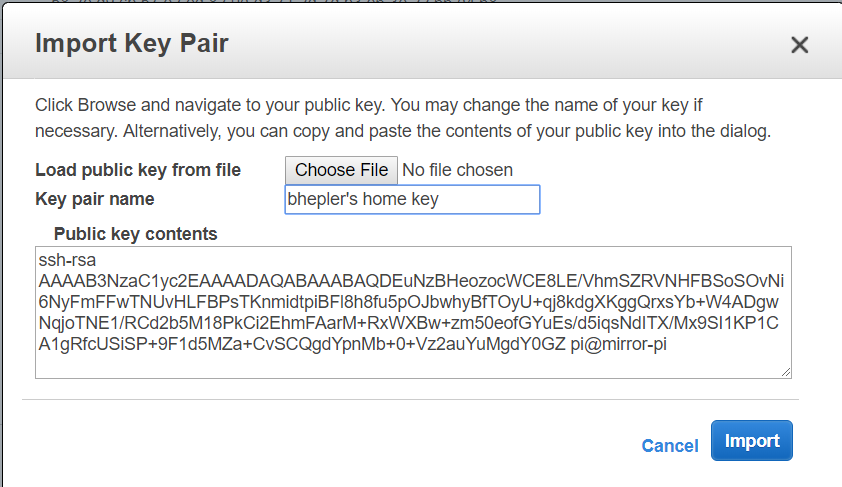
Once there, click on the big button labeled “Import Key Pairs”. You will get a large friendly pop-up dialog that will allow you to upload your public key to their system. You can do it by uploading the file directly, or you can open the public key of your key pair on your system and copy & paste the contents into the “public key contents” box. Either way works. Enter a recognizable name in the “Key pair name” box. This is what will be displayed later as you create servers on Amazon’s system. You will do this twice: Once for your home key pair and once for your mirror key pair. Remember to give them names appropriately.This part is important: Only upload the public key to Amazon’s system.
It’s time to create a server! Click on the EC2 dashboard link at the top of the categories and then click on the bright blue “Launch Instance” button in the middle. You will be given a list of possible operating systems. Click on the “Free Tier Only” checkbox to narrow down your choices. Find “Ubuntu 18.04 LTS Server” and click on the “Select” button in that row.
The next page will have a table of server sizes. One of which is going to have a green flag under it that reads “Free Tier Eligible”. Make sure the check box for that row is selected and then click on the “Next” button. This will give you the VM configuration options. Eventually, you can enable the Spot Instances, but for right now don’t do it. The details are complex, but it’s basically a way to save on the hourly price of the server. (* see note below)
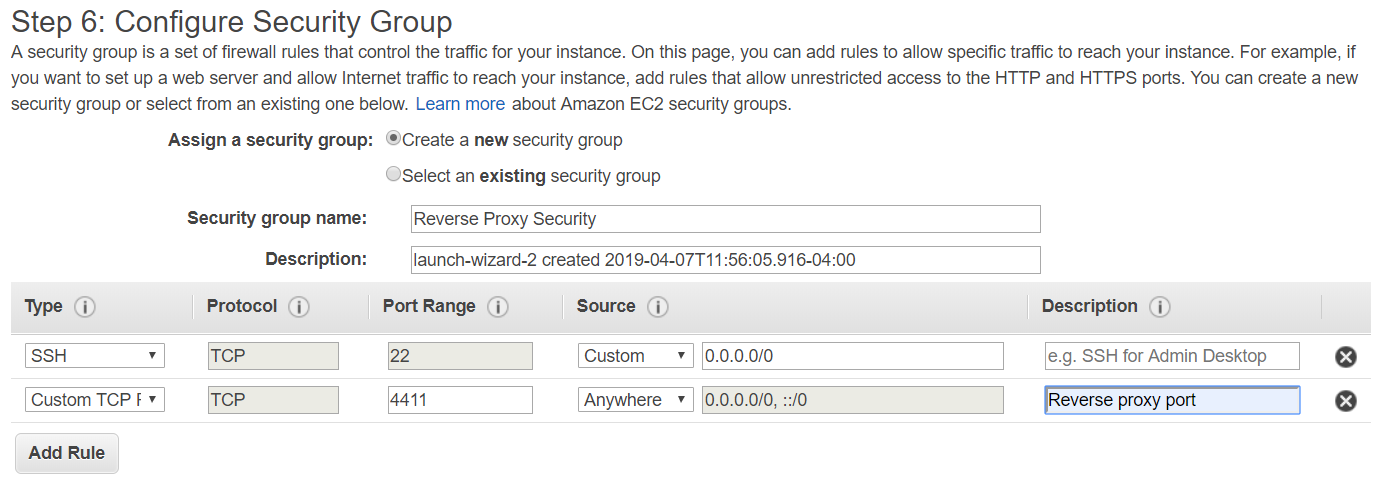
Do the same for the next two steps as you don’t need special networking and you don’t need more storage. When you get to “Configure Security Groups”, then you need to stop and do the following:
First change the name to something useful, such as “enable reverse proxy”. Then you need to pick a port that is unused by most other services. Something higher than 1000 but less than 65,000 or whatever the maximum is. Something in the 5000 range is probably good. Enable TCP on that port from anywhere by entering the port number and selecting the handy dropdown. You can give this particular rule a name, so I recommend “reverse proxy port”. Remember this port number, because you’re going to need it later.
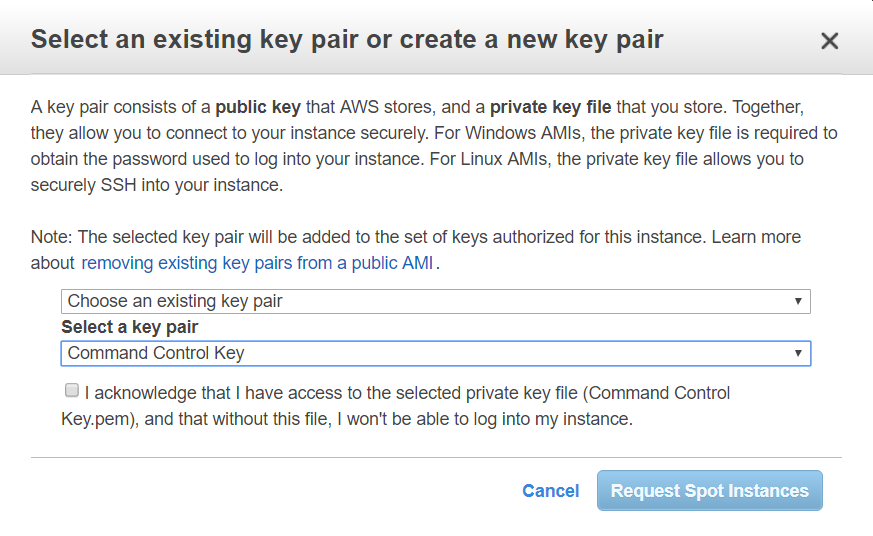
At this point, the button to continue is labeled “review and launch” so go ahead and click on it. The last step is a review of your choices, which pretty much tells you everything you just selected. So go ahead and click on the launch button. You will receive a pop up telling you to select which key to pre-install on the server. This key is how you will connect to your cloud server, so you will want to pick your home computer key pair. This is where the work we did earlier to load the keys into Amazon’s service pays off. The keys that you uploaded are selectable as existing key pairs. Pick your home server key pair.
At this point, you confirm that you want a server and Amazon will spin one up for you. In order to connect to you new server, you will need to specify that you will connect to the server using your home private key. Amazon has already loaded the home public key onto the server, which will authorize you to get command line access to the server.So now you have a server spinning up in the cloud. How exciting! Let’s connect to it. Click on the “Instances” link on the left side and it will give you a list of all of your running virtual machines. There probably is only one and it’s the one you just created. If you click on it, the details screen at the bottom will tell you the IP address of the server. Copy that IP address, because you’re going to need to connect to it.
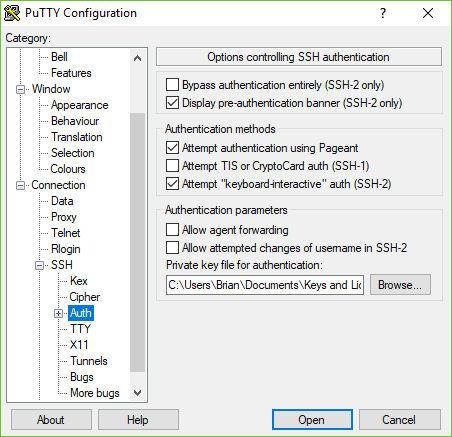
If you’re using a Windows system and you use Putty to connect to your mirror and other servers, you can follow these instructions. Basically, you specify which SSH key to use by going to Connection -> SSH -> Authorization and putting the home private key in the text field. Save your profile!
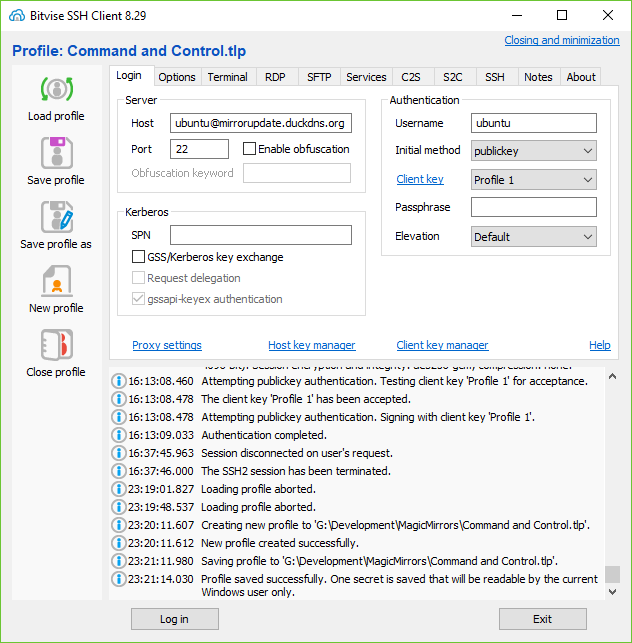
If you use Bitvise SSH, you create a profile to connect to your AWS server, click on the Client Key Manager and then import your Home Private Key into the server profile. Specify the user (ubuntu) and the IP address (from AWS console page) and the port (22). The Intial Method is “public key” and then select “Profile 1” to select the key you imported into the client key manager.
You should now be able to SSH into your cloud server! Give it a try and make sure you can connect.
Next up, we need to make sure that you can always connect to the cloud server by using a dynamic DNS.
[*] Spot Instances and server pricing: How is it that we’re trying to save money on the “free tier” of servers? Well, free comes with a catch. You get 750 hours of “free tier” server time. After that, you pay the going rate. The spot instances will lower your hourly rate at the expense of some server performance, unpredictability in IP address range and loss of data stored in memory between boot cycles. None of which we need for this application. The catch is that you can’t stop and restart a spot instance, you can only build and destroy one. So when you have everything configured the way you like, you can create an Amazon Machine Image (AMI) of your C&C server. You then use that personal AMI to create a new machine & request a spot instance. After you use up your free hours, it will save you money in the long run.
-
Setting up a Dynamic DNS for your Server
One of the unfortunate aspects of using a cloud server is that every time you switch it on, it gets a random IP address (within a certain range). The easy way to get around this is to use a dynamic DNS system. This will give your Command & Control (C&C) system a name that can be used by all of your mirrors to reach out and establish a connection. Just like www.apple.com is a friendly name that really means one of a handful of IP addresses, we’re going to configure a friendly name for your server so that your mirror will always know where to find the C&C server.First, go establish an account at a dynamic DNS service. I use www.duckdns.org because it is free, fast and has 5 free URLs. There are several Dynamic DNS providers out there and most of them will give you one to three URLs for free. You can do what you want, but I like Duck DNS.
Once you make it through the account activation at Duck DNS, log into their website and look for the “add domain” button. This is where you create the URL that your mirror will seek out to create the reverse SSH connection. This URL will have to be unique across Duck DNS service. I’ve taken a couple of the obvious ones, so you’ll have to be creative. Once you have a name in mind, enter it into the box and click on the “add domain” button. It will show up immediately below the text box and give you a place to enter an IP address. This is where you link your C&C server IP address to the domain name.
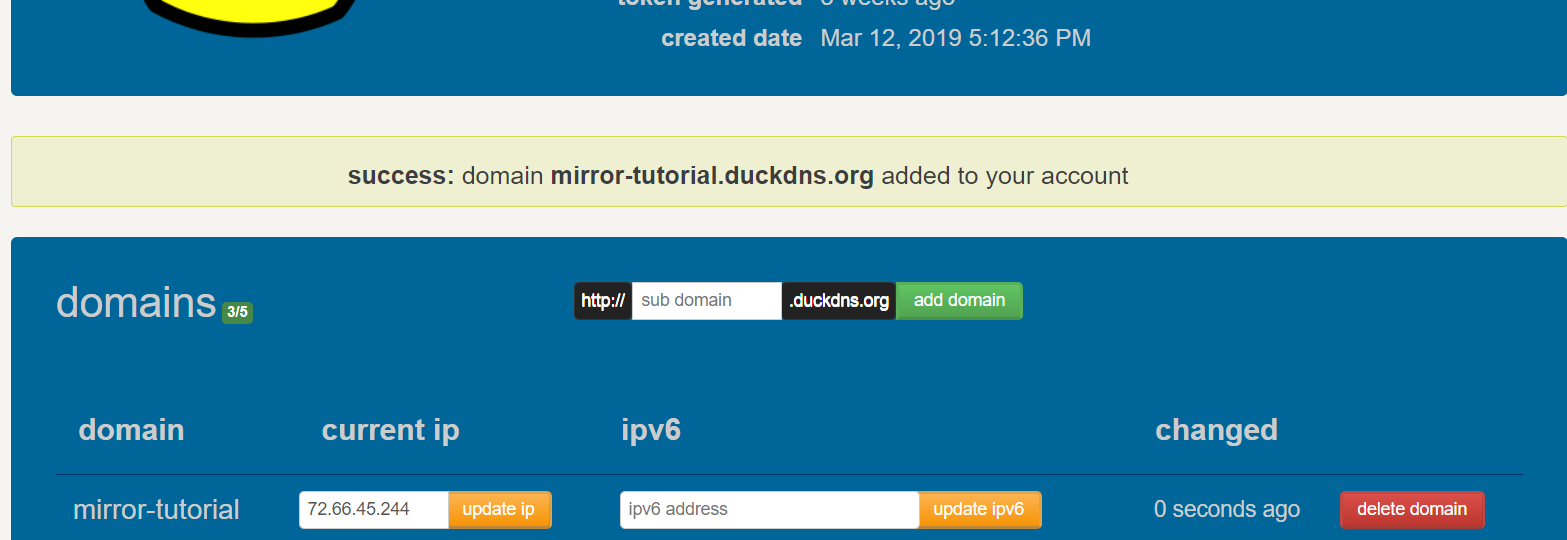
The IP address will likely default to your home network’s external IP address. You’ll want to change this to the IP address of your C&C server. It’s really simple. Just punch in the server’s IP address under “current IP” and click on the “update IP” button immediately next to it. Voila! The domain you just created now points to your C&C server.This is great, but you don’t want to have to update the DNS entry every time you spin up the C&C server. It would be much better for the server to update the DNS entry by itself. Thankfully, the Duck DNS people have created scripts to do just that. At the top of the Duck DNS page, click on the
installlink. It will give you several options as to what type of server you are using to give you specific instructions on how to automatically update the DNS record. Click on theEC2button and scroll down. There is a handful of instructions on how to configure your EC2 server to update the DNS record. Follow them, keeping in mind that all of the commands must be executed on the Command & Control server.Congratulations! You now have a Command & Control server at a known URL that will survive the destruction & recreation of the cloud server!
-
This is where the magic happens. The goal here is to open a connection from the Pi to the C&C server and then have the C&C server use that connection to get command line access to the Pi. To do this, we open a reverse SSH connection from the Pi to the C&C server.
Add the Pi’s Public Key to the C&C Server
In order for the C&C server to recognize the Pi when it connects, the C&C server must have a copy of the Pi’s public key. Amazon has already created the file where it belongs for you, you just have to add to it.Log into your C&C server and navigate to
/home/ubuntu/.ssh. There is a file in this folder calledauthorized_keysand at present it contains the public key of your Home Keypair. Edit the file usingnano authorized_keys, go to the end of the file and press enter to create a new line. On your home computer, open up thegift-mirror.pubfile in WordPad or whatever and copy the contents to theauthorized_keysfile. Save your work!Test Access via Key Exchange
First, let’s test that the key works. On your Pi, establish an SSH connection to the C&C server by enteringssh -i /home/pi/.ssh/gift-mirror.key ubuntu@mirror-tutorial.duckdns.org. This should open a connection to the C&C server, using the private key you specified with the-iswitch for authorization. Progress: key works.Test Reverse SSH Connection
Now we can open a reverse SSH connection to the C&C server. (better explanation can be found at SSH tunneling for fun and profit) Change that ssh command to add the-Rflag and let’s add the ports that we’re forwarding for the reverse connection. Do you remember that port that you opened when you configured the security on your C&C server? This is where it goes.ssh -i /home/pi/.ssh/gift-mirror.key -N -R [port number]:localhost:22 ubuntu@[mirror-DNS].duckdns.org -vSubstitute whatever port you’ve decided upon for the [port number] portion and whatever DNS name [mirror-DNS] you gave your C&C server at DuckDNS’s website. Once you hit enter, you will not get your command prompt back as you are still maintaining a connection with that user. It will stay open until you cancel it with
Ctrl+c. But we still have to test it!Open up new connection to your C&C server and log in normally. From here, you can reach the Pi by following the reverse SSH connection back to the gift mirror. You do so by opening an SSH connection to the localhost address on a specific port. Like so:
ssh pi@localhost -p [port number]which basically means “SSH into myself as the pi user on port [port number]”. You will be prompted for a password just as if you were logging into the Pi controlling your guest mirror, so go ahead and enter that password. You should get a prompt on your Pi. Progress: Reverse SSH works!You can go ahead and press
Ctrl+don the C&C server to close the connection now. And typeCtrl+con the guest mirror Pi to close the reverse SSH.Set Up AutoSSH to Persist Connection
This part comes mostly from a lot of experimenting and reading Fun and Profit with Reverse SSH Tunnels, Setup autossh script on Raspian, and a few evenings of swearing at inanimate objects.First, install autossh with
sudo apt-get install autosshand let it install the program. Once it’s ready, we can test the reverse SSH using autossh instead of the normal ssh command. Autossh takes a couple of commands, but most everything is passed through to your existing ssh binary, so it uses the same switches. Enter this into your command line prompt on your gift Pi:
autossh -M 0 -N -i /home/pi/.ssh/gift-mirror.key -R [port number]:localhost:22 ubuntu@[mirror-DNS].duckdns.org -vYou should see a few lines of text giving you a status update as your Pi establishes a reverse SSH connection to your C&C server. Quick explanation of the new switches:
-M 0turns off the connection monitoring built into autossh,-Nmeans "do not execute a command remotely on the C&C server, and-vis very verbose logging. When you enter that command, you should see something like this in return:Authenticated to [mirror-DNS].duckdns.org ([C&C IP address]:22). debug1: Remote connections from LOCALHOST:[port number] forwarded to local address localhost:22 debug1: Requesting no-more-sessions@openssh.com debug1: Entering interactive session. debug1: pledge: network debug1: client_input_global_request: rtype hostkeys-00@openssh.com want_reply 0 debug1: remote forward success for: listen [port number], connect localhost:22 debug1: All remote forwarding requests processedOnce you have a connection, you can test the reverse SSH connection just like we did in the last step. If you can get to the Pi command prompt, you’re golden. So let’s give it a go! On the C&C server, try the following command:
ssh pi@localhost -p [port number]You should get the same password challenge that you received when you opened the reverse SSH tunnel earlier. Which makes sense, as autossh wraps around the normal SSH capability. A real test would involved shutting down the C&C server via the AWS console, starting autossh and verifying it is retrying the connection and then starting up the C&C server. Ain’t nobody got time for that. Progress: autossh works.
Tweak SSH settings
Just to make sure the SSH connection behaves properly, we’re going to add a couple configuration variables to SSH and make sure it behaves. Edit the configuration file with this:sudo vi /etc/ssh/ssh_config.
Add the following variables to how SSH operates:ServerAliveInterval 30 ServerAliveCountMax 3 StrictHostKeyChecking noSave your work.
Set Autossh to Start Automatically
Okay people, home stretch. All that is left is to configure your gift mirror pi to automatically start autossh on boot. You’re going to create a service that will run autossh. That way the Pi’s operating system will handle starting it at reboot, restarting if it fails and all that.Navigate to
/etc/systemd/systemand create a file that will define your service and add.serviceto the filename. Be sure to use sudo, because this is all root stuff. Like so:
sudo vi /etc/systemd/system/autossh.service
Once in the VI interface paste the following into the file:[Unit] Description=AutoSSH tunnel service - Mirror update, port 4348 After=network.target [Service] User=pi Environment="AUTOSSH_GATETIME=0" Environment="AUTOSSH_LOGFILE=/home/pi/autossh.log" ExecStart=/usr/bin/autossh -M 0 -i /home/pi/.ssh/[gift-mirror.key] -N -R [port number]:localhost:22 ubuntu@[mirror-DNS].duckdns.org [Install] WantedBy=multi-user.targetObviously, substitute your values for the name of the private key you use to connect to the C&C server, the port number and the DNS entry of your C&C server. Save you work!
Now come three commands in rapid succession: register the service, start the service, enable the service at boot:sudo systemctl daemon-reload sudo systemctl enable autossh.service sudo service start autossh.serviceThat last command will give you a confirmation response that it has created a symlink. It will look like so:
Created symlink /etc/systemd/system/multi-user.target.wants/autossh.service → /etc/systemd/system/autossh.service
Progress: AutoSSH will start on boot and continually try to connect to your C&C server. -
Okay, now we have all the pieces. How does it work in practice? The basic routine goes like this:
- Start your C&C server
- Give the C&C server a couple minutes to update the DNS entry
- Connect to your C&C server via SSH
- Follow the SSH connection down to the gift mirror
- make your changes, update the OS, whatever
- disconnect from the gift pi and then disconnect from the C&C server
- stop the C&C server via the cloud server interface
Thanks to the cloud provider, the C&C server only exists when you need to connect to your remote mirror(s). Once you’re done, the C&C server is destroyed and nobody can log into it when you’re not looking.
So, to connect to the remote mirror, first start your C&C server. SSH into the C&C server and then check to see which remote mirror(s) have connected to it. Run
netstat -land see what ports are open. For example, mine looks like this:Active Internet connections (only servers) Proto Recv-Q Send-Q Local Address Foreign Address State tcp 0 0 localhost:domain 0.0.0.0:* LISTEN tcp 0 0 0.0.0.0:ssh 0.0.0.0:* LISTEN tcp 0 0 localhost:4548 0.0.0.0:* LISTEN udp 0 0 localhost:domain 0.0.0.0:* udp 0 0 ip-172-31-34-37.:bootpc 0.0.0.0:* raw6 0 0 [::]:ipv6-icmp [::]:* 7 Active UNIX domain sockets (only servers) Proto RefCnt Flags Type State I-Node Path unix 2 [ ACC ] SEQPACKET LISTENING 12326 /run/udev/control unix 2 [ ACC ] STREAM LISTENING 23993 /run/user/1000/systemd/private unix 2 [ ACC ] STREAM LISTENING 23997 /run/user/1000/gnupg/S.gpg-agent ... [10 lines deleted for brevity]The line
tcp 0 0 localhost:4548 0.0.0.0:* LISTENis the reverse SSH from one of my magic mirrors that has connected up to my C&C server. That gives me a port number (4548 in this case).Connecting to the pi is easy:
ssh pi@localhost -p 4548. If i need to connect to a different mirror, I look for a different port number (each mirror must use a different port to connect to your C&C server). I’ll get the prompt to enter the password to log into the Pi and then I’m issuing commands on the remote Pi.When you’re done, remember to log out of the remote mirror and again out of your C&C server with
Ctrl+d. And once you’re out of the C&C server, use the cloud provider console to stop the server so you don’t get charged for it just sitting there, burning cycles.When I build new mirrors, I can configure them to connect to the same DNS entry which will be my C&C server a couple minutes after starting it. I only pay for as long as my C&C server is operational, which is something like $0.35/hour. Each mirror will still connect regardless of whether it is in a private home, university campus or corporate lobby.
-
[THIS SPACE INTENTIONALLY LEFT BLANK]
-
@bhepler aws also provides generated keypairs.
I just created a server the other day to host an app. I have both ssh and scp’ed to that server from windows and my mirror and my Linux machine
-
I was planning on using https://www.dataplicity.com/ for my giveaway that I am working on. For the less technical of us this may be simpler and free
-
If you have an easier way to accomplish this, I highly encourage you to write up a tutorial for us all.
-
@bhepler I have no idea at this point if it works, I just didn’t want to spend cash for this. In no way was I trying to be critical of your write up. Super detailed and if I had a reason to use a cloud provider or had a bunch to administer this would be perfect for me.
My apologies if I came across any other way.
-
@motdog - It’s all good. There is a way to do this without spending any additional money. You’ll have to modify your residential gateway to forward a port, but it should be possible. It won’t work for university students or people who do not have control over their firewall. I’ll see about writing that up later as an addendum.
-
@bhepler ok thanks. The first one I am giving away is a college student thats why dataplicity seems like the way to go for me. Hopefully it works
-
-
B bhepler referenced this topic on
Hello! It looks like you're interested in this conversation, but you don't have an account yet.
Getting fed up of having to scroll through the same posts each visit? When you register for an account, you'll always come back to exactly where you were before, and choose to be notified of new replies (either via email, or push notification). You'll also be able to save bookmarks and upvote posts to show your appreciation to other community members.
With your input, this post could be even better 💗
Register Login