@cowboysdude PM me for the files if you want them. This forum won’t let me attach a ZIP file.
-Jeff
@cowboysdude PM me for the files if you want them. This forum won’t let me attach a ZIP file.
-Jeff
@cowboysdude The weather module is MMM-WunderGround with only a few tweaks. The thermometer is MMM-Nest but modified - including using the same font - to look more like the Nest’s thermostat display in the app. Gimme a sec and I’ll see if I can upload a ZIP with the changed files.
First, many MANY thanks to all of the programmers who make this project possible. I’m waiting on delivery of my screen and glass, meanwhile I’ve been doing my configurations on my laptop. I’ve modified pretty much every module’s CSS and markup to get this.
Here’s what I have so far. I can share my files with anyone who wants this but know that you’re stuck having to maintain your own versions of each of the modules – an update will overwrite the custom markup, so you’ll want to be careful if you need to update from git source.
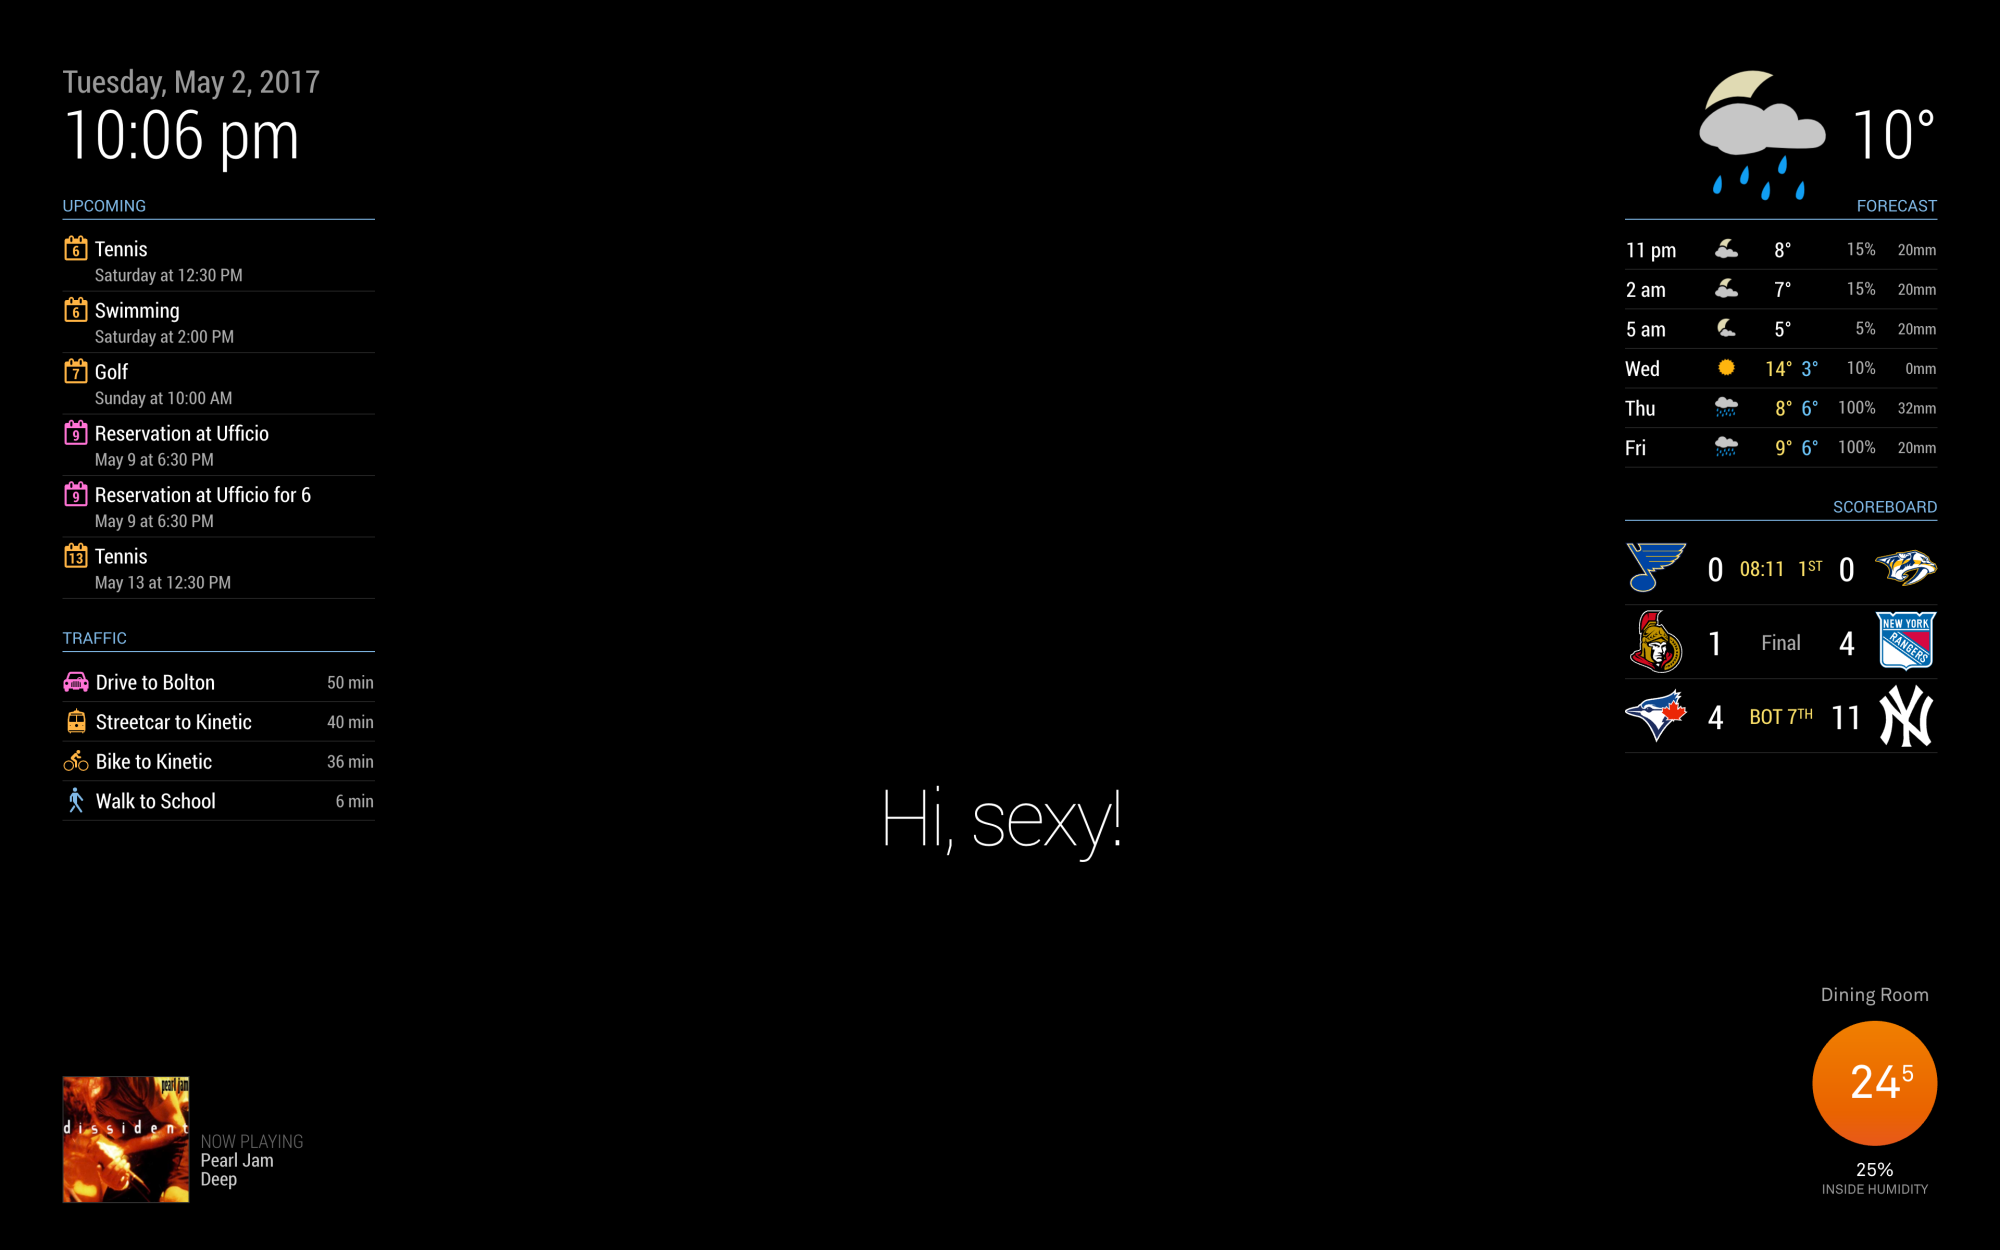
Can’t wait to get this on the wall!
@domsen123 A bit more hacking on this and I got it to work. I changed how the date comparison is done:
    var now = moment();
    var startTimeSplit = this.config.startTime.split(":");
    var endTimeSplit = this.config.endTime.split(":");

    var startTime = moment().hour(startTimeSplit[0]).minute(startTimeSplit[1]);
    var endTime = moment().hour(endTimeSplit[0]).minute(endTimeSplit[1]);

    if( now.isSameOrAfter(startTime) && now.isSameOrBefore(endTime) ){
I had to do this in three places:
start() functiongetDom() functiongetHeader() functionI’m no seasoned programmer, so I’m sure there is a better way to do this, but this at least works for me, and I can verify that Canadian addresses seem to work fine.
Any chance you can add a configuration to each destination for the travel mode? i.e.: Driving, Transit, Biking, Walking. I have two destinations currently configured, my wife’s commute, which she drives, and mine, for which I take transit. I’d like mine to show transit time, not driving time.
@domsen123 I followed your instructions and I still can’t get it to work for me.
I did a little digging into your code, and it seems like this line is evaluating to false every time:
mrx-work-traffic.js: Line 43
if( now >= this.config.startTime && now < = this.config.endTime )
(space between < and = added by me. Otherwise it broke markdown…)
I added a console.log at line 57:
else{
      console.log("====================== hiding...");
      this.hide(0);
}
and I see that in my console. It looks like now is not interpreted to be between config.startTime and config.endTime.
My config has them set as follows:
        startTime: '00:00',
        endTime: '23:59',
For the life of me, I can’t get this to work… I don’t even get the header label. Here’s what I did:
Cloned the repo into my modules directory with
git clone https://github.com/domsen123/mrx-work-traffic.git
In the new directory first I tried to run npm install but I got the error that package.json didn’t exist. So I tried to install request directly by running npm install requestbut I got the same error.
I tried creating package.json by running npm init. then I was able to install Request by running npm install request.
I requested a Google API key from here:
https://developers.google.com/maps/documentation/javascript/get-api-key
My config looks like this:
    {
      module: 'mrx-work-traffic',
      position: 'top_left',
      header: 'Traffic',
      config: {
        apikey: '*** My API Key ***',
        origin: '135 Bellefair Ave, Toronto ON M4L 3V1',
        startTime: '00:00',
        endTime: '23:59',
        destinations: [
          {
            destination: '37 Holland Dr Bolton, ON L7E 5S4',
            label: 'Mars'
          }
        ]
      }
    },
I don’t see any errors in the console. All I get on my screen is the header’s underline, but not even the label text.
I suspect that the problem is either that Request is not installed properly, or that this won’t work with Canadian addresses. Any thoughts?
Thanks!
-Jeff
I’ve hacked away at pretty much every module in order to tailor my display to my liking. While there’s a lot you can do with CSS, you’re limited when everything is laid out with tables, so I’ve found I’ve needed to change the markup in most modules. It would be nice if the modules abstracted the HTML out into a separate template file so that whenever I update a module, I don’t need to do a whole lot of reverse engineering to recreate my changes. Even better would be if you could specify an alternative template file in the module’s config. Then any subsequent update would not overwrite your customizations.
I understand this would be a significant upgrade to the current code base, but maybe something to think about for a v3 of MagicMirror.
-Jeff
Hello
This module looks freaking amazing!! I want to give this a try, but I have a few questions that I haven’t been able to find answers for.
Do you recommend I used the NoIR camera, or just the regular Pi Camera? The mirror will be in my front hall by the doorway, under what should be adequate light whenever someone will want to use it. No expectation that this should work in the dark
Where is the best place to mount the camera? My mirror will be based on a 32" TV mounted such that the top of the frame would be slightly higher than my eye level (I’m 188 cm tall), and my wife’s eye level would be at about the halfway point of the mirror. I also have two young boys, aged 8 and 6 and I’d want the camera to recognize them as well. I’m thinking of either mounting the camera on the frame at the top of the mirror, aimed slightly downward, or on one side of the frame at about the vertical center of the mirror. I’ve also read about people mounting the camera behind the mirror, but with mixed results. If that is an option, I could theoretically mount the camera right in the center of the mirror. What’s the best way to route the cable in this case? I don’t plan on having anything in the middle of the screen from the top down to about the center, so I could run the cable from the camera straight up and over the top of the screen. Suppose I would need to colour the cable black or purchase a black cable. Anyone have insight here?
Given that the Pi Camera has a relatively narrow field of view (approx 35 mm) would you suggest I use one of those phone camera wide angle attachments so that the cam can pick up a wider image and have a better chance of getting the face in the image, or do I just increase the likelihood that several faces will be in the picture, defeating the facial recognition routine?
Thanks!
-Jeff
Hello folks. I am in the research phase of my project, and I want to use a TV for my display mainly for the size. Seems the most economical way to get a larger smart mirror. But I have a couple of questions about doing so that I couldn’t find answers by searching.
Will the TV respect native power saving commands from the raspberry pi like a normal monitor? e.g.: will it go into / come out of standby via commands through the HDMI connection? Like many here I’d like to use a motion sensor to wake up the display, and then have it go back into stand by after a certain period of time. I’m planing on using libCEC to explicitly issues sleep / wake commands.
Will the TV’s native OSD be on the screen? e.g.: will I see text like “HDMI2” to indicate which input is active whenever the TV powers on from standby? When the HDMI signal is dropped, will I see “No Input Signal” on the mirror before the screen goes into standby?
Will the TV need to be in the fully powered-on state before powering up the Raspberry Pi in order for the Pi to recognize the connected display? Or - as I’m hoping will be the case - will the Pi issue a wake command to bring the display out of stand by on initial boot?
I’m considering the Samsung J5205 32" for this project, and I’ve seen a few tutorial videos that show how to access the service menu. Does anyone know if these tweaks can be only be made to affect either of the above points via the service menu or will the regular options menu cover this off?
Alternatively I’m looking at using a BenQ PD3200Q monitor, but I can’t find a definitive answer to whether the Raspberry Pi can drive it at its native resolution of 2560 x 1440. I’ve seen some info to suggest that it may work at 15 Hz, which I think is fine for this application, but if anyone has real insight on this, that would be very helpful. The monitor costs about a third more that the TV, but I think the extra money is worth it if I can make use of the higher resolution.
Thanks for any info -
-Jeff