I see quite a few threads come up with folks asking how to write CSS in order to customize this and that, and I’ve come across a few modules that have CSS written in such a way that they inadvertently affect the layout of other modules.
I thought I’d write this thread to shine some light on the following topics:
- Basics of CSS
- When one rule takes precedence over another
- How to use MagicMirror in Dev mode to inspect an element to see the CSS rules applied to a given element
- How to write good CSS in your modules so that they will not conflict with styles in another module.
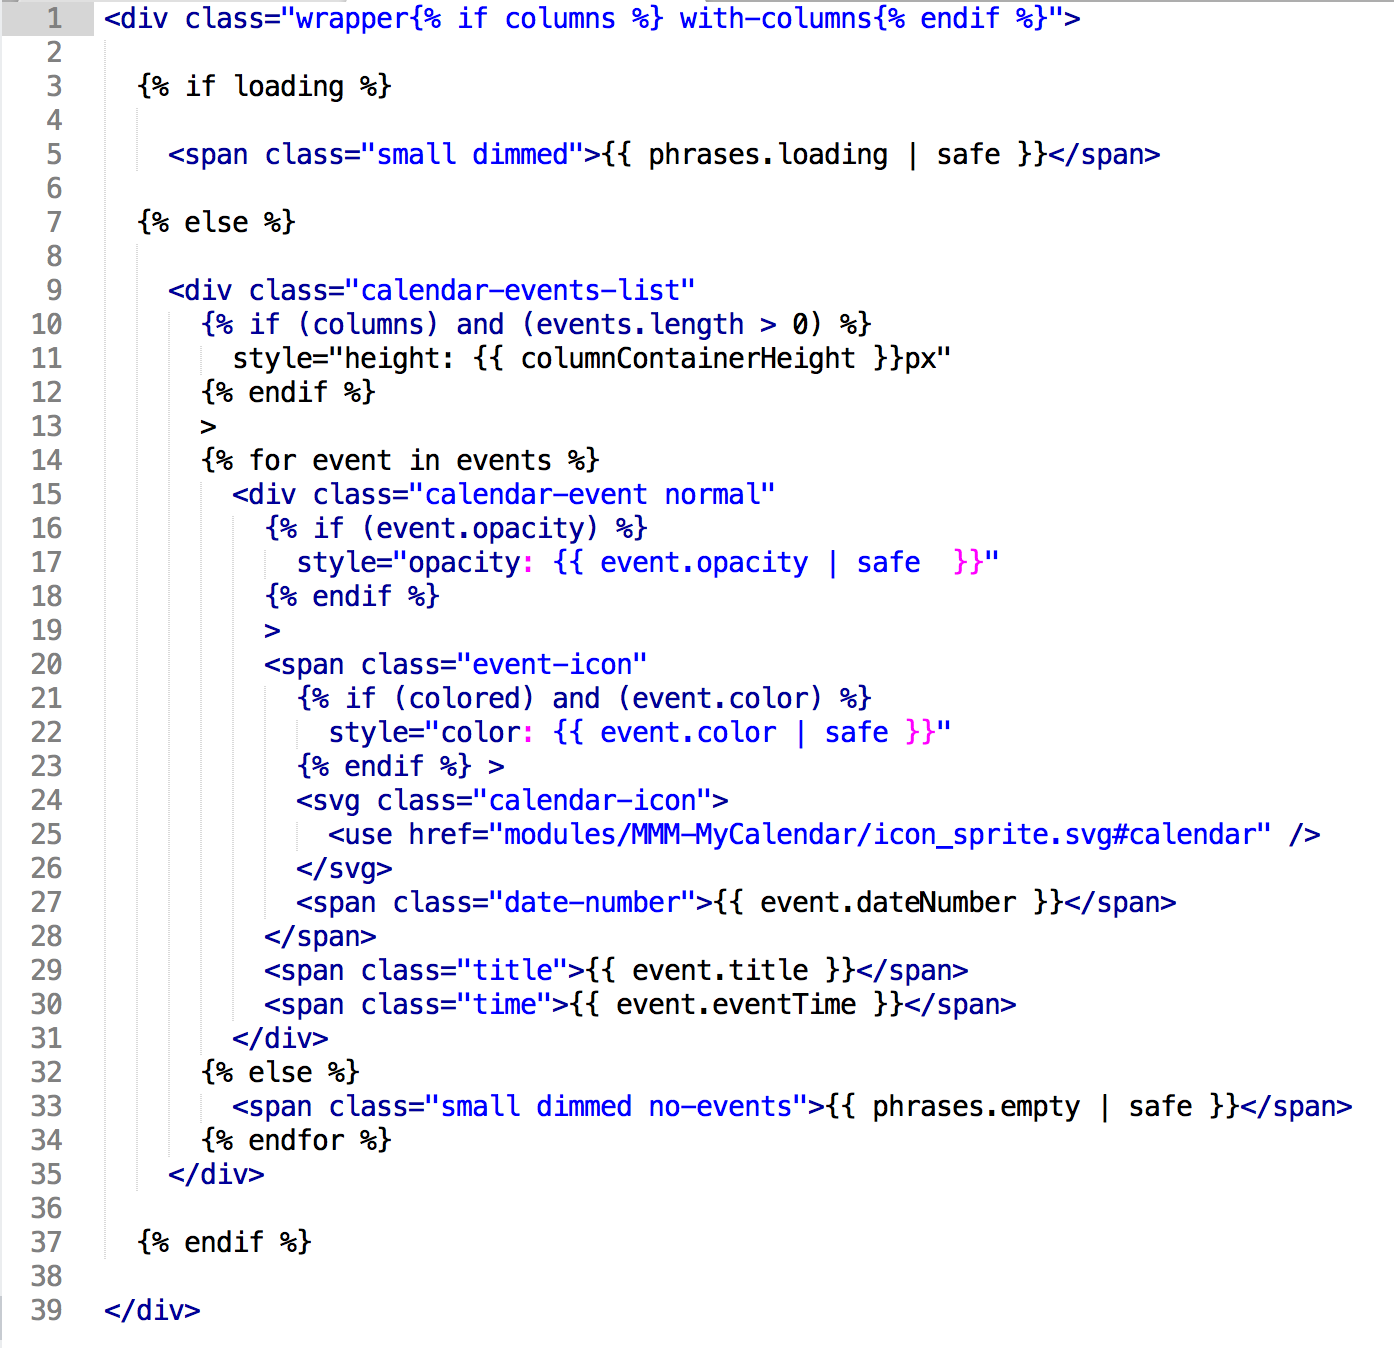
NOTE below where I’ve included HTML markup examples, you’ll notice a space between the opening bracket and the element name. This is only because there is a bug with mark down that hides the details of HTML. For example if I write
< div>
I’m referring to an HTML div element.
Basics of CSS
CSS stands for Cascading Style Sheets. They are called cascading because various style rules will be applied to given element based on a predefined set of “cascading” rules of precedence. More on rules of precedence later.
CSS works in tandem with HTML markup. In case you didn’t know, MagicMirror uses HTML for its interface. It is essentially a web page.
She has Class! She has Style!
CSS styles can be applied to HTML elements in two ways:
Inline:
< span style="background-color: red">
or through applying one or more classes to the element:
< span class="text-color-blue">
The class text-color-blue will correspond to a rule in your style sheet (e.g.: custom.css)
It is possible to combine class and style in the same element:
< span style="background-color: red" class="text-color-blue">
Assuming we’ve written a rule in our style sheet called text-color-blue that turns the text color within the element to blue, the result will be a visual element with a red background and blue text.
In our case, we’ll be dealing almost exclusively with external style sheets, so for the remainder of this tutorial I will focus on the class method of applying CSS.
CSS rules in your style sheet will look something like this:
  selector {
    property: style;
    property: style;
    property: style;
  }
A rule starts with a selector and contains one or more properties to which you want to apply a style. Properties and their respective styles are separated by the colon : character, and pairs of properties and styles are separated by the semicolon ;. Keep in mind that white space here does not matter. The above can also be written as follows:
selector{property:style;property:style;property:style;}
I use multiple lines and indentation to make my rules easier to read. You should too, but your style might vary from mine. That’s OK as long as your rules can easily be read by anyone who might need to.
A selector will specify the element you wish to target with your rule.
Elements can be targeted by name:
/*
  This will colour the text of all span elements red
*/
span {
  color: red;
}
or by class. Class names are prefixed with a dot in your CSS:
/*
  This will colour the text red for all elements with the class make-me-red:
*/
.make-me-red { /* notice the dot */
  color: red;
}
or by ID. rules targeting IDs are prefixed with the # symbol in your CSS
/*
  This will colour the text red within the element with the ID my-id:
*/
#my-id { /* notice the hash symbol */
  color: red;
}
It’s important to note that the dot for classes and the # symbol for IDs are only used in your CSS rules. The HTML markup doesn’t use these symbols:
< span id="my-id" class="make-me-red">
Selectors can be combined to make a more specific rule:
span.make-me-red#my-id {
  color: red;
}
This will apply ONLY to span elements with the class make-me-red AND the ID my-id.
Selectors can indicate element hierarchy:
.outer-class .inner-class {
  color: red;
}
This means the rule will be be applied to any element with the class .inner-class that exists inside another element with the class outer-class. This rule will NOT apply to an element with the class inner-class that is NOT a child of an element with the class outer-class.
< div class="outer-class">
  < span class="inner-class">This element gets red text colour< /span>
< /div>

< div class="inner-class">This element does not< /div>
NOTE This is the only instance where white space matters. The space between the two classes is important. These two selectors mean two very different things:
.outer-class .inner-class {
  color: red;
}
.outer-class.inner-class {
  color: red;
}
This first applies a red text colour to an element with the class name inner-class that is a child of another element with the class name outer-class. The second applies a red text colour to an element that has BOTH outer-class and inner-class classes.
It should be noted that while you can target children of elements, you cannot target the parent of an element. That is while I can target any element with the class outer-class, any element with the class inner-class or any element with the class inner-class inside an element with the class outer-class, I cannot target elements with the class outer-class that specifically contain a child element with the class inner-class.
Child elements inherit rules applied to the parent
Consider this markup:
< div class="outer-container">
  Some text here
  < span>More text here< /span>
< /div>
And this CSS rule:
.outer-container {
  color: blue,
}
The way CSS works, if you apply a rule to an element, that rule will persist down through it’s child elements. In this case, not only does the text Some text here appear blue, but so does the text More text here in the child span element. If I wanted the inner span text to be a different colour, I would need to write another rule targeting it specifically. There are some exceptions to this rule. Generally setting sizing or positioning (width, height, top, left, etc.) does not get inherited by child elements. But most content formatting properties (font-family, font-size, color, line-height etc.) do.
This is the essence of CSS – you write specific rules to target only those elements to which you wish to have styles applied, and those styles will cascade to child elements, unless you override their styling with a more specific rule.
CSS Properties and Units
there are MANY CSS properties that you can style, and several different ways you can specify quantity. I won’t get into the entire list but I’ll cover some examples of commonly used ones below. If you want to know every possible property and possible values, start here:
https://www.w3schools.com/css/
.region.top.left {
  width: 100%;
  max-width: 400px;
  min-width: 10vw;
}
In the above example, I’ve applied style rules to elements with the classes region, top, and left. Let’s examine each rule individually here:
width: 100%;
When you use percentage units, you are specifying a percentage of the width of the element’s parent.
Now consider the following example:
height: 100%;
Reasonably you might expect that this means you wish the height of the element to be 100% of the height of its parent. In practise this is seldom true… the percentage will still refer to the width of the parent. So the above rule will size the element’s height to 100% of the width of the parent element. I know… confusing… just remember when you see sizes in percentage, it almost always refers to a percentage of the parent’s width
Now lets take a look at the next property:
max-width: 400px;
When you see px this is specifying the value in pixels. This one is the most easy to understand, as it directly relates to the screen’s resolution. If you specify a width of 10px, your element will be 10 pixels wide. But also take a look at the property name:
max-width
This sets a limit for width of the element. The first property says size the element to 100% of the width of its parent. The second property says limit this the width to 400 pixels. So if they size of the parent element is 700 pixels, the targeted element will be 400 pixels. Similarly the next property sets a minimum width:
min-width: 10vw;
the metric is vw is a lesser know unit, but it is quite useful. It stands for viewport width. A value of 100vw is equal to the entire width of the browser window. If the element is within an iframe, then 100vw refers to the entire width of the iframe. The above rule states that the element shall be no narrower than 10vh, or 1/10th the width of the viewport. Similarly you can specify units in terms of viewport height:
height: 50vh;
This sizes the element to be half as tall as the viewport.
A couple of links that describe CSS units in more detail:
https://www.w3schools.com/cssref/css_units.asp
https://www.tutorialspoint.com/css/css_measurement_units.htm
So why might you use one unit versus another? A great question, and if you can fully understand this, you’ll be well on your way to mastering your designs. One thing that HTML is well suited for is adapting to any screen size. One thing that frustrates novices is HTML’s tendency to adapt to any screen size! Using pixels is easy to understand, because it directly relates to the screen’s resolution. A pixel is a pixel is a pixel (unless it isn’t… this starts to be less true when we get into dealing with high density screens such as an iPhone’s retina screen.), but 5vw, for example, is relative to the viewport’s width. Depending on the screenesize, window size, iframe size, etc, 5vw can be anything. So why would I use it instead of pixels? Well say I needed to fit a specific phrase to always fit on one line, regardless of screen size. I could write a rule such as this:
.phrase-on-one-line {
  font-size: 2vw;
}
This now sizes the text relative to the viewport’s width. As long as I have found a vw value for the text where it all fits on one line, it will ALWAYS fit on one line, regardless of the viewpoirt’s width. Of course, this can lead to text being extremely small or extremely large, so use with caution. But if you take a look at the CSS for my MMM-MyWordClock module, you’ll see that I’ve used text sized in terms of vw and vh to adapt to any 16:9 screen regardless of pixel resolution. If you were to view this module on two 32" TVs, one 720p, one 1080p, text size will be exactly the same size on each. The text will just be sharper on the 1080p screen as the screen has a higher pixel density.
There are many MANY articles that describe the benefits and pitfalls to using units other than pixels in your designs. Spend some time Googling these to get a handle on when to use one over another.
Order of Precedence
CSS rules are applied to the target element following a standard set of rules:
- A more specific rule will override a less specific rule, or the second rule of equal specificity will override the first.
- Inline styles will override styles in your CSS file.
- Styles with the !important flag will override anything, regardless of specificity
Let’s explore each of these with examples:
Rule #1
A more specific rule will override a less specific rule, or the second rule of equal specificity will override the first.
Consider this markup:
< div class="name-block">
  < span class="first-name">Mike< /span>
  < span class="last-name">Crotch< /span>
  < span class="date-of-birth">1-Jan-1975< /span>
< /div>

< div class="name-block small">
  < span class="first-name">Oliver< /span>
  < span class="last-name">Closeoff< /span>
  < span class="date-of-birth">13-Apr-1981< /span>
< /div>
Let’s first write some general rules for text size and color:
span {
  color: #000000;
  font-size: 16px;
}
This will set text in all span elements to 16 pixels in size and black colour (Don’t understand that #000000 means black? See this: https://www.w3schools.com/css/css_colors.asp).
Now let’s write some more specific rules to selectively override the above:
span.first-name {
  font-size: 24px;
}

.name-block.small {
  font-size: 12px;
}

.name-block.small span.first-name {
  font-size: 16px;
}

span.date-of-birth {
  color: #ff0000;
}
Putting it all together, our style sheet looks like this (I’ve added comments to number each rule):
/* 1. */
span {
  color: #000000;
  font-size: 16px;
}

/* 2. */
span.first-name {
  font-size: 24px;
}

/* 3. */
.name-block.small {
  font-size: 12px;
}

/* 4. */
.name-block.small span.first-name {
  font-size: 16px;
}

/* 5. */
span.date-of-birth {
  color: #ff0000;
}
Here’s how the style sheet instucts the browser to apply styling:
- Rule # 1 states that all text within
span elements should be sized to 16px and coloured black.
- Rule # 2 states that all
span elements with the class first-name shall be 24 pixels in size. This overrides rule #1 because it is more specific
- Rule # 3 states that all text should be 12 pixels in size. This overrides rule # 1 because it is more specific, and it overrides rule #2 because it is equally specific but specified second.
- Rule # 4 states that
span elements with the class first-name within an element with both the name-block and small classes shall be sized to 16 pixels. This overrides rule #3 because it is more specific.
- Rule # 5 changes the text color of
span elements with the class name date-of-birth to red. This overrides rule #1 because it is more specific.
As far as I can gather, custom.css is loaded into MagicMirror after the default style sheet. So in order to override default styles you’ll need to write styles that are at least equally as specific as the default styles for them to be applied.
The above example is a very common use case for CSS. Set a base style that will be used throughout, and then override in particular places as necessary.
Rule # 2
Inline styles will override styles in your CSS file.
Consider this markup:
< span class="small-text" style="font-size:24px">Happy Text< /span>
and this style sheet:
span.small-text {
  font-size: 12px;
}
The inline style takes precedence, and the text will subsequently be sized to 24 pixels. It doesn’t matter how specific the rule is applied in the style sheet. Inline styles always supercede styles applied through the style sheet…
…unless…
Rule # 3
Styles with the !important flag will override anything, regardless of specificity.
Let’s use the same markup as in the previous example:
< span class="small-text" style="font-size:24px">Happy Text< /span>
But this time, we’ll add a little tweak to the rule in the style sheet:
span.small-text {
  font-size: 12px !important;
}
Now text will be sized to 12px, as the !important flag overrides any font-size rule applied to the element, regardless of whether another rule is more specific or if font-size has been specified inline in the element.
Alas, this is NOT a situation you want to find yourself in very often. Ideally, you never want to be in a position where you are forced to used !important to apply your style. Here are the common reasons why people will use !important in their style sheets.
1. They can’t figure out why their style isn’t being applied.
In this case it is almost always a situation where you are trying to apply a style to which a more specific rule already applies. You need to write your rule to be even more specific. In the next section I’m going to show you how to use the inspector in the browser to figure out what styles are currently being applied so that you can confidently write a rule to override it.
2. There are inline styles in the markup that can only be overriden with the !important flag.
This is certainly a valid reason, but one that could have been avoided if the module developer had some foresight as to what the implications of using inline styles are. As a module developer, try to avoid using inline styles unless absolutely necessary. At all costs favour using classes in your style sheet instead. This makes it easier for others to customize the look of your module for their needs.
3. They are just being lazy.
To this I say short term gain, but long term pain. This leads down a slippery slope of !important flags everywhere in your style sheet. After all, you can only override !important with another !important. It also breaks the cascading nature of CSS… you ultimately end up writing more CSS instead of letting base styles cascade to your otherwise unstyled elements.
If you’ve take away nothing else from this section, it’s that you should always try to be in situation one, that is writing specific rules to target specific things. As a module developer, try not to inject inline styles in your markup unless absolutely necessary, so that those wishing to customize your module will have an easier time of it.
The Magical Inspector
If you’re really serious about customizing your CSS, then Electron’s inspector is an invaluable tool. Learning how to use it will help you write very targeted CSS rules. It also has the added benefit of allowing you to try out CSS changes and have the results appear real-time. Great if you’re trying to pixel-nudge something into the exact perfect location.
There a few ways you can make use of the inspector.
The most straightforward way is to start MagicMirror in development mode. Note that to do this, you need to have a keyboard and mouse connected to your Raspberry Pi. If MagicMirror is currently running, you’ll want to stop it first. Assuming you’ve used PM2 to manage Magic mirror, issue the command pm2 stop mm or pm2 stop MagicMirror depending on how you’ve configured it. If you’re just starting Magic Mirror manually with the npm start command, just hit ctrl-c in the terminal window from where you started it.
Now in your terminal, make sure you are in the MagicMirror directory. If you’ve used the default installation, type the following:
cd ~/MagicMirror
Now issue the following command to start MagicMirror in development mode.
npm start dev
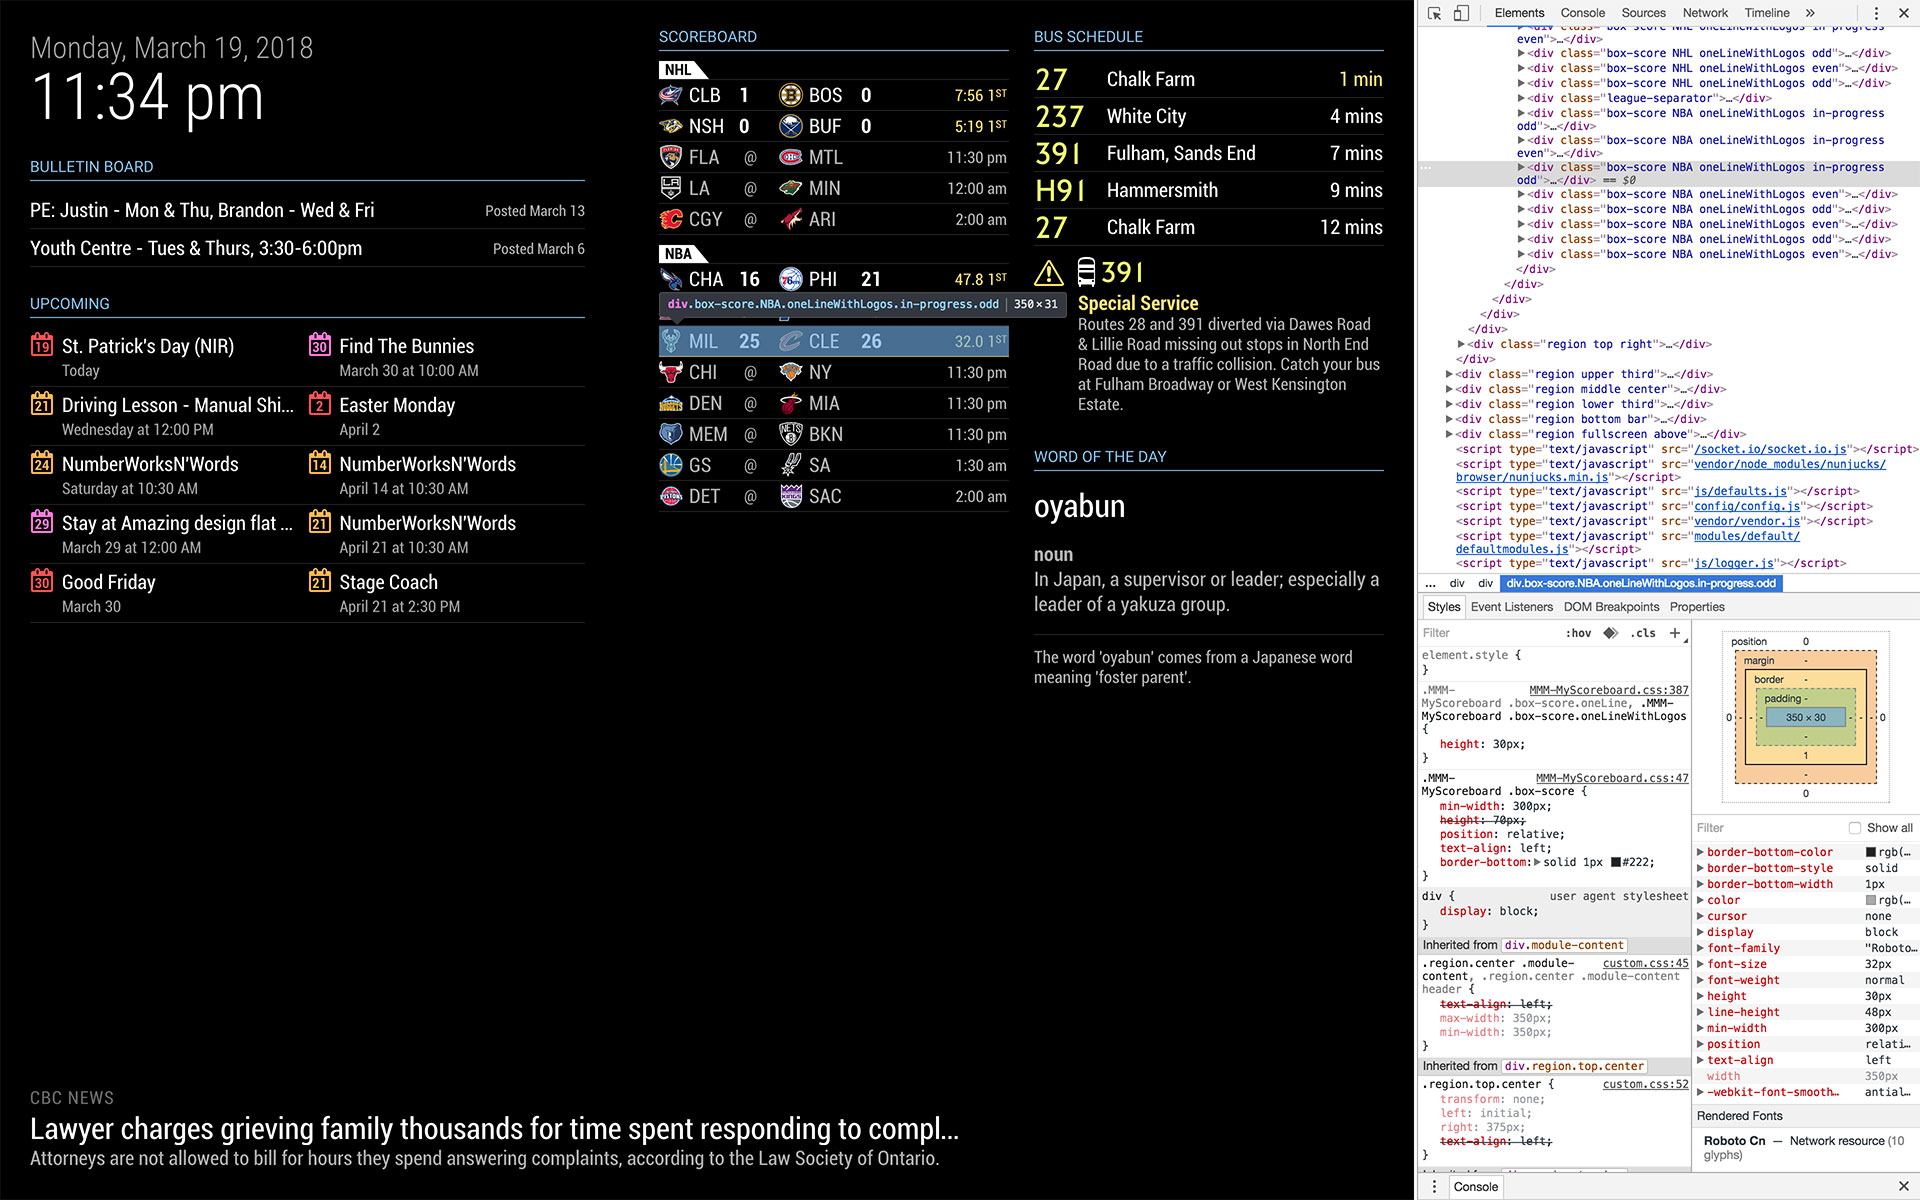
This will start MagicMirror in a split screen layout. One side will be the Magic Mirror that you know and love, the other side will be the developer tools console. There’s a whole lot going on here, but don’t be intimidated! We’re going to focus on just one part of it. By default you will be in the element inspector mode.
Familiarize yourself with the items right along the top. First you will see an icon that looks like a mouse cursor clicking in a square. Remember this icon, as we’ll come back to this one shortly. The next icon toggles the mobile toolbar. You can ignore this altogether. Finally you will see a bunch of text items: “Elements”, “Console”, “Sources” etc. You’ll only need to concern yourself with “Elements.” If you get lost and accidentally end up switching to another mode, just click on “Elements” and you’ll be right back to where you need to be.
Below these items, the developer tools are divided up into three sections:
- HTML Markup
- CSS Styles
- Error Console
Depending on how wide your dev tools window currently is, you might see HTML and CSS side-by-side, with the error console below, or you may see HTML on top, CSS in the middle, and the error console on the bottom.
We’re going to spend most of our time in the HTML and CSS sections, and if you need more space, each of the sections are adjustable by dragging the divisions between two regions. The entire dev tools window can also be resized left and right if you need more space to work. For now, let’s resize the error console to use as little space as possible.
Remember that first icon in the top right? Click it! It should turn blue. Click it again to turn it black. When it’s blue, you’ve activated a mode where you can click on items in Magic Mirror’s display to inspect them. Let’s try clicking on the icon now to turn it blue, then click on anything in Magic Mirror. Now look at the CSS section. You will see all of the CSS rules applied to the particular element you’ve clicked on. Also take a look in the HTML panel. The element you’ve clicked on should be highlighted. You can also click on things in the HTML panel to see what CSS is applied. I find it useful to click on elements directly in Magic Mirror to get close to the item I need to inspect, then I use the HTML panel to drill in to the exact element I need to inspect.
When you’re inspecting an element, it’s common to see many rules applied to it. These will be your clues to figure out how specific a rule you need to write in order to override an existing style with one of your own.
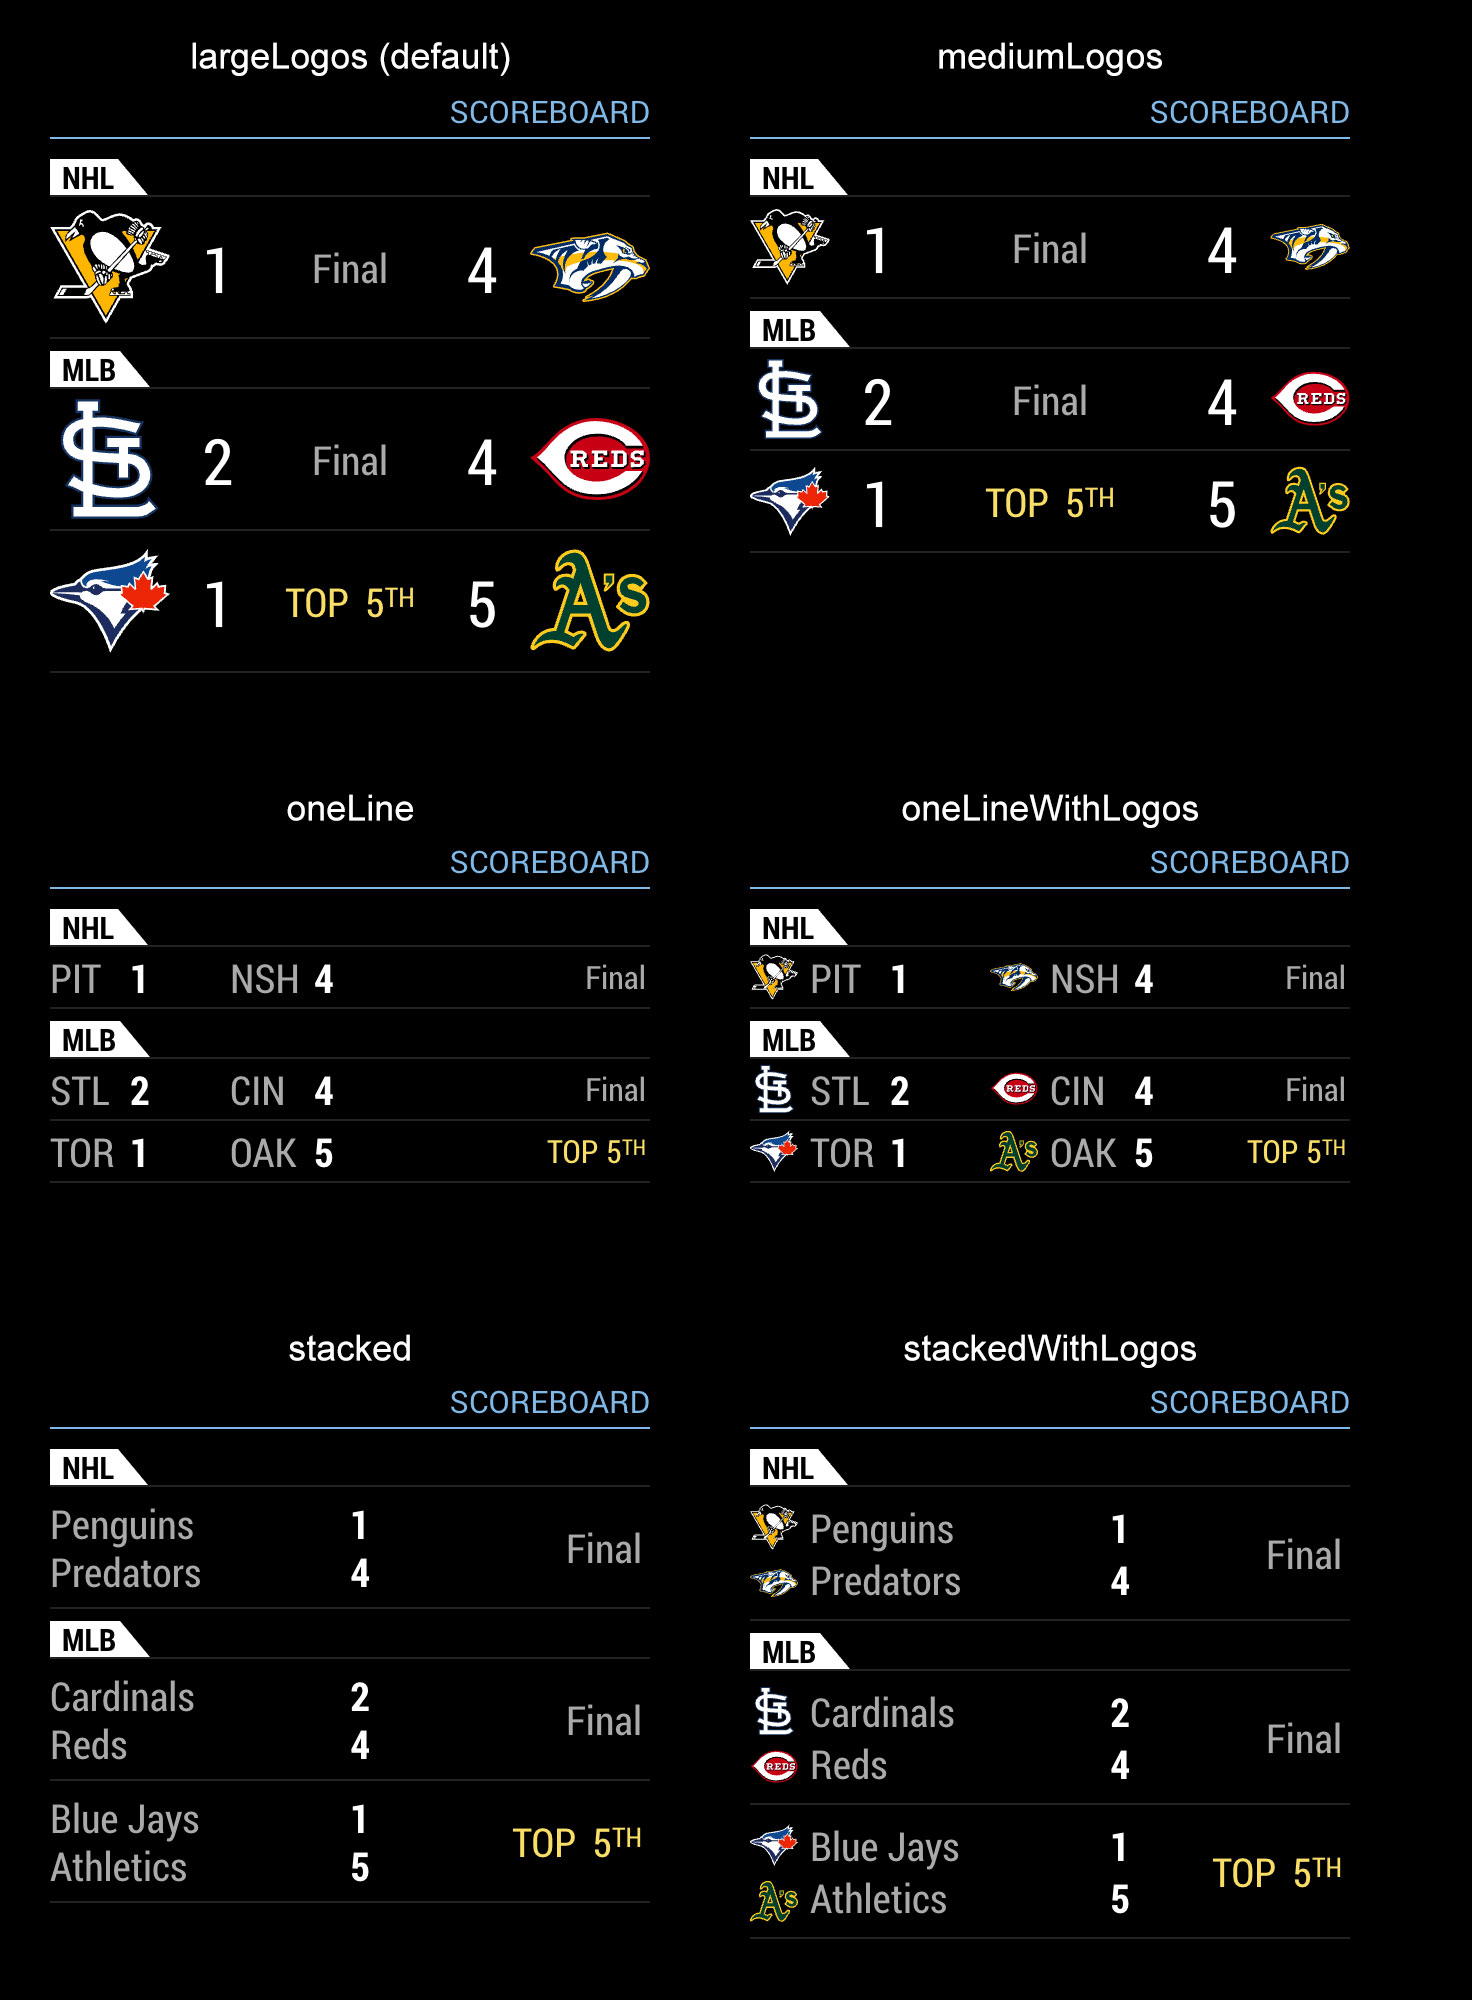
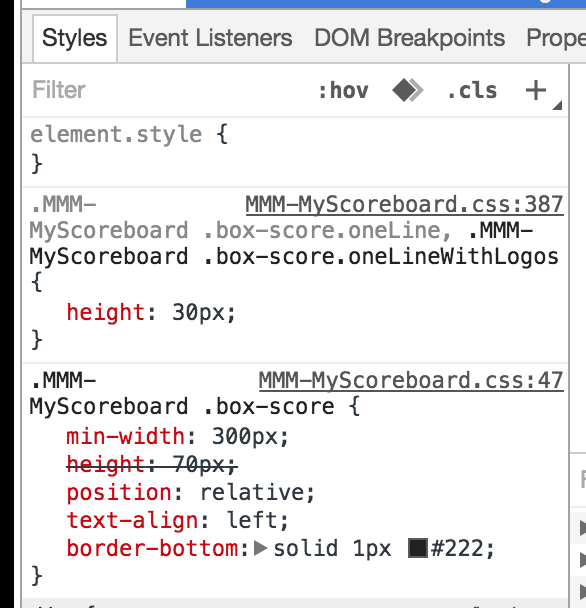
Let’s take a look at this screenshot:
I’ve clicked on one of the rows in MMM-MyScoreboard. I can see from CSS panel that following rules are being applied:
.MMM-MyScoreboard .box-score.oneLine, .MMM-MyScoreboard .box-score.oneLineWithLogos {
  height: 30px;
}

.MMM-MyScoreboard .box-score {
  min-width: 300px;
  height: 70px;
  position: relative;
  text-align: left;
  border-bottom: solid 1px #222;
}
Now there’s something new going on here that we haven’t seen before. Take a look at the first rule. It has two selectors separated by a comma. This is a technique that allows you to apply the same rule to multiple selectors! It might be easier to see what’s going on when rewritten as follows:
.MMM-MyScoreboard .box-score.oneLine,
.MMM-MyScoreboard .box-score.oneLineWithLogos {
  height: 30px;
}
This means that for elements with either box-score AND oneLine OR elements with box-score AND oneLineWithLogos that are children of an element with the class MMM-MyScoreboard will be sized to 30 pixels in height.
We’re also seeing one rule overriding another here. The first rule, being more specific, overrides the height value of that specified in the second rule. By default, box-score elements are 70 pixels tall, but when either the oneLine or oneLineWithLogos class is added, the size becomes 30 pixels.
The inspector makes this easy to see. Notice that the 70 pixel height property in the second rule is shown in strike through text? This really quickly lets you know that the height rule is being overriden by something else. You then know to look for a more specific rule to see where it’s getting its height.
So if I wanted to override the height, I’d need to write a rule that is more specific than the first rule. There are many different ways you could accomplish this. Here’s one:
Take a look at the HTML panel. You’ll see that the highlighted element is a div. We could simply add the element name to the rule to make it more specific, like so:
.MMM-MyScoreboard div.box-score.oneLine,
.MMM-MyScoreboard div.box-score.oneLineWithLogos {
  height: 50px;
}
Here I’ve increased the height to 50 pixels, and by adding the element name to the selectors, I’ve made the rule more specific. This means that it will now take precendence. Another way you could do it is to add your own custom class in config.js for the particular module, like this:
{
  module: "MMM-MyScoreboard",
  position: "top_center",
  classes: "jeff-custom", //custom class added here
  header: "Scoreboard",
  config: {
    ...
  }
}
You can add any class you want, and it will be added to the outer wrapper element of the module. So you could write a more specific rule like so:
.MMM-MyScoreboard.jeff-custom .box-score.oneLine,
.MMM-MyScoreboard.jeff-custom .box-score.oneLineWithLogos {
  height: 50px;
}
But before you jump in, the inspector has one more trick up its sleeve. You can try out CSS changes right in the browser and see the effect rendered real time! Say we knew we wanted to make the box-score element taller, but we were unsure how MUCH taller to make it, we can click on the property we wanted to change and change it. In the CSS panel, I could click on the 30px value and change it to whatever I wanted to try. Too much? I can dial in a smaller number. Getting close? I can use the arrow keys to nudge the value one pixel at a time. Not quite right? If I click at the bottom of the property list, and can type in a new property and value. Say I wanted to add a border… I’d click at the bottom of the list, and type border. Then I’d hit the tab key and type in the value 1px solid #FFFFFF.
The best part is none of this is permanenet. If you really foobar the layout, just refresh your browser and you’ll reset to what it was before you started tinkering. Changes do not become permanent until you write them in to your CSS file.
By the way, did you notice something new back there? In the example above where I’ve set a border, I specified a bunch of properties all in one go: the border width, the border style, and the border colour. This is known as shorthand. There are plenty of CSS properties where you can specify shorthand values.
Using the above example:
.MMM-MyScoreboard.jeff-custom .box-score.oneLine {
  border: solid 1px #FFFFFF;
}
this is the same as writing:
.MMM-MyScoreboard.jeff-custom .box-score.oneLine {
  border-style: solid;
  border-width: 1px;
  border-color: #FFFFFF;
}
A Better Way
I’m sure as you were following along with this you struggled with the lack of screen space, especially if your Magic Mirror install uses a monitor in vertical orientation. This is a tedious way to work…
A better way is to install Magic Mirror on your desktop PC or laptop, and do all of your CSS customization there, and then transfer it to your Raspberry Pi when you’re all done. Here’s what I find works best for me:
Follow the instructions here to do a manual install:
https://github.com/MichMich/MagicMirror#manual-installation
Don’t bother with setting up PM2 for autostart. We just want to be able to run Magic Mirror occasionally for the purpose of customizing our CSS. Once your install is done, install whatever modules you want to modify and customize as usual.
Now here’s the key: start Magic Mirror in server only mode. There’s nothing wrong with with happily typing npm start but this will start Electron and take over your display in full-screen mode. Instead, issue this command:
node serveronly
Now open Google Chrome – yes that’s right: Chrome – and point it to the following URL:
http://localhost:8080/
You should now see Magic Mirror’s familiar display. Now go to View -> Developer -> Developer Tools. Look familiar? Not quite? OK… Remember the tip I gave you before? If you ever get lost, just click on “Elements” at the top. That should start looking a bit more familiar!
The Electron browser uses the same underlying engine as Google Chrome. Anything that works in Chrome will work in Electron. Now you can adjust your CSS using the computing power of your laptop PC. Also note that for CSS changes, you don’t need to stop and start Magic Mirror. If you make a change to your custom.css file, for example, all you need to do is refresh the browser window to pick up the new changes.
Tips for Module Developers When Writing CSS
One thing that we haven’t talked about yet is that it doesn’t matter where your CSS is written, or how many files you have. To the browser, it’s all one big pile of styles. That means it’s entirely possible to write a CSS rule in your own module that affects the layout of another module. Here’s an example. Say you wanted to change the style of your module’s header:
header {
  font-size: 24px;
  color: #FFCC00;
}
The problem here is that there’s nothing here to limit your CSS to just your module. This will be applied to ALL header elements in the browser.
Luckily there’s a built-in mechanism in Magic Mirror that you can exploit to ensure your styles only apply to your own module. Automatically, the name of your module is included in the outer wrapper of your module. Say you wrote a module named MMM-Amazing-Module, you could limit the change the header to just your module as follows:
.MMM-Amazing-Module header {
  font-size: 24px;
  color: #FFCC00;
}
What this rule is saying is any header element that is a child of an element with the MMM-Amazing-Module class will have the text sized to 24px and coloured banana yellow. All other headers will be left to their own devices.
With that in mind, as a module developer, you should prefix all of your CSS rules with the class name of your module. This will ensure that any style you write will not accidentally affect any other module that just happens to use the same class name somewhere.
Something I’ve already mentioned in this article deserves a second mention. When writing modules, try to avoid using inline CSS styles whenever possible. There are specific instances where this is unavoidable. For example, in the Calendar module, you can specify a colour for a given schedule. The only way this colour can be applied is using an inline style. That is acceptable, since the colour would have been user selected, and can be customized via the config file rather than in CSS. What you should avoid doing, however, is applying a default style inline. Apply a class to the element that has the colour to be applied as the default. If there is no colour specified in the config, then do not apply any inline style. The default style can be easily overridden with a more specific rule in custom.css.
Final Thoughts
As thourough as this guide is, it only scratches the surface of what’s possible with CSS. For example it doesn’t get into some of the more advanced selector options, like this:
div.title > span::first-child + img:not(.logo) {
  ...
}
This will select an img element that does not have the class logo that is the immediate next sibling element of a span element that is the first immediate child of a div element with the class title. Got that? Don’t worry… this is an extremely rare example, but it illustrates the finely detailed power at your disposal.
We didn’t get into the various positioning models, the different box models, using pseudo classes to insert arbitray content into elements or applying alternating styles to table rows. There is lot of information in this guide that needs to sink in first. For now, have fun hacking away at your Magic Mirror. Hopefully you have just enough knowledge to be dangerous!
Have fun!