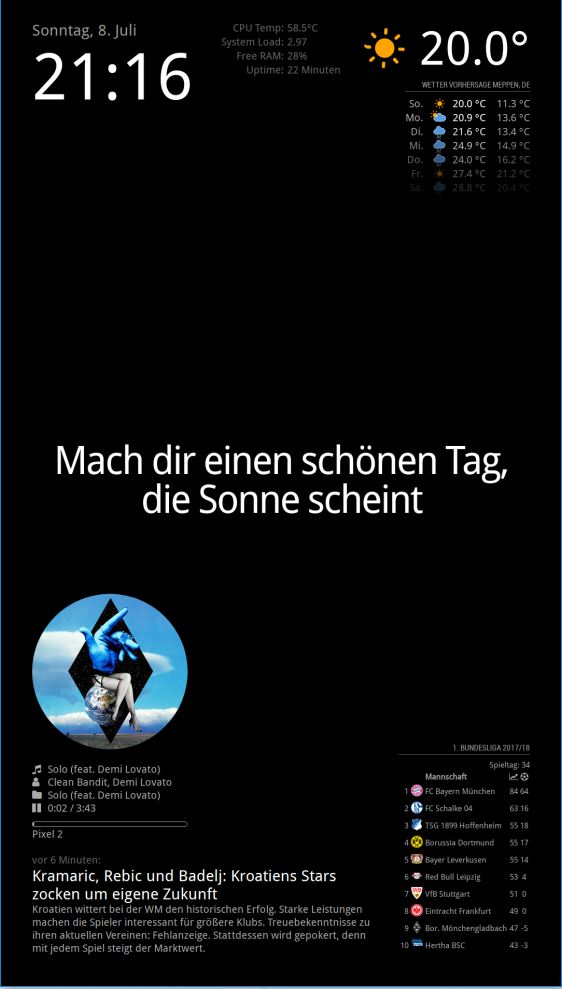
@philreis said in Changing icons of the modules Current Weather and Weather Forecast:
I have add the other icons. But not all are properly positioned yet.
And a there is no icon for fog.
In the next few weeks I will position the icon correctly.
This solution is maybe not the best but it works!Picture:
For this icons you need this icon package:
https://www.amcharts.com/free-animated-svg-weather-icons/Copy the icon from the folder “animated” to the folder “MagicMirror/css/icons”
Then you have to add this code to your “custom.css” file.
/* Aenderungen Wetter Icon */
/* Aenderungen aktuelles Wetter */

.currentweather .weathericon {
  position: absolute;
  z-index: 0;
  height: 200px;
  right: 180px;
  margin-top: -65px;
}

.currentweather .wi-day-sunny {
content: url("/css/icons/day.svg");
}

.currentweather .wi-day-cloudy {
content: url("/css/icons/cloudy-day-1.svg");
}

.currentweather .wi-rain {
content: url("/css/icons/rainy-6.svg");
}

.currentweather .wi-night-clear {
content: url("/css/icons/night.svg");
}

.currentweather .wi-night-cloudy {
content: url("/css/icons/cloudy-night-2.svg");
padding-right: 15px;
padding-top: 10px;
}

.currentweather .wi-cloudy {
content: url("/css/icons/cloudy.svg");
}

.currentweather .wi-showers {
content: url("/css/icons/rainy-7.svg");
}

.currentweather .wi-thunderstorm {
content: url("/css/icons/thunder.svg");
}

.currentweather .wi-snow {
content: url("/css/icons/snowy-6.svg");
}

.currentweather .wi-cloudy-windy {
content: url("/css/icons/cloudy-day-3.svg");
}

.currentweather .wi-night-rain {
content: url("/css/icons/rainy-6.svg");
}

.currentweather .wi-night-snow {
content: url("/css/icons/snowy-6.svg");
}

.currentweather .wi-night-thunderstorm {
content: url("/css/icons/thunder.svg");
}

.currentweather .wi-night-showers {
content: url("/css/icons/rainy-7.svg");
}

.currentweather .wi-fog {
content: url("/css/icons/cloudy.svg");
}

.currentweather .wi-night-alt-cloudy-windy {
content: url("/css/icons/cloudy-night-1.svg");
}

/* Aenderungen Wettervorhersage */

.weatherforecast .weathericon {
  position: absolute;
  left: 35px;
  z-index: 1;
  margin-top: -30px;
  height: 60px;
}

.weatherforecast .wi-day-sunny {
content: url("/css/icons/day.svg");
padding-left: 6px;
padding-top: 5px;
height: 50px;
}

.weatherforecast .wi-day-cloudy {
content: url("/css/icons/cloudy-day-1.svg");
}

.weatherforecast .wi-rain {
content: url("/css/icons/rainy-6.svg");
padding-left: 8px;
padding-top: 5px;
height: 45px;
}

.weatherforecast .wi-night-clear {
content: url("/css/icons/night.svg");
}

.weatherforecast .wi-night-cloudy {
content: url("/css/icons/cloudy-night-2.svg");
height: 50px;
padding-left: 5px;
padding-top: 7px;
}

.weatherforecast .wi-cloudy {
content: url("/css/icons/cloudy.svg");
}

.weatherforecast .wi-showers {
content: url("/css/icons/rainy-7.svg");
}

.weatherforecast .wi-thunderstorm {
content: url("/css/icons/thunder.svg");
}

.weatherforecast .wi-snow {
content: url("/css/icons/snowy-6.svg");
}

.weatherforecast .wi-cloudy-windy {
content: url("/css/icons/cloudy-day-3.svg");
height: 45px;
padding-left: 8px;
padding-top: 7px;
}

.weatherforecast .wi-night-rain {
content: url("/css/icons/rainy-6.svg");
padding-left: 8px;
padding-top: 5px;
height: 45px;
}

.weatherforecast .wi-night-snow {
content: url("/css/icons/snowy-6.svg");
}

.weatherforecast .wi-night-thunderstorm {
content: url("/css/icons/thunder.svg");
}

.weatherforecast .wi-night-showers {
content: url("/css/icons/rainy-7.svg");
}

.weatherforecast .wi-fog {
content: url("/css/icons/cloudy.svg");
}

.weatherforecast .wi-night-alt-cloudy-windy {
content: url("/css/icons/cloudy-night-1.svg");
height: 50px;
padding-left: 5px;
padding-top: 7px;
}
As I said not completely finished.
hey man, thanks a lot! this makes things much easier.
TY for sharing your work :)