@Brown19 Do you see any errors in the development console of the browser?
A New Chapter for MagicMirror: The Community Takes the Lead
Read the statement by Michael Teeuw here.
Read the statement by Michael Teeuw here.
Posts
-
RE: MMM-Temperature uncaught exception...
-
RE: MMM-Temperature uncaught exception...
I tried your script and the current version of the module in both of my setups (2.24.0 native and 2.25.0-develop container) and do not have any problems.
As i wrote already the problem looks like there is problem during communication between the node_helper.js and the frontend (either electron or the browser of your choice).
-
RE: apt upgrade question
@ankonaskiff17 Hi,
it’s basically the same but not exactly…
apt full-upgradeupgrades all packages and removes old versions of the packagesapt dist-upgradeupgrades all packages and removes old versions but it tries to figure out which upgrade is more “worthful” if there are occur conflicts cause of the upgradesapt updateupdates the locally saved list of available packages by downloading the current package list of all configured repositoriesaptis the new replacement command ofapt-get
-
RE: MMM-Temperature uncaught exception...
@Brown19 Hi,
your python script looks good to me and also the output of node_helper till the moment it tries to send the data to the frontend.
Can you provide your MagicMirror and nodejs version information to me, please? -
RE: Display image based on state or time
@chimera Hi and sure,
just tested a config which uses the values send by MQTT directly to decide which icon to display:
var mqttHook = [
    {
      mqttTopic: "magicmirror/tarrif/set",
      mqttPayload: [
        {
          mqttNotiCmd: ["energy_tarrif_value"]
        }
      ]
    }
  ];
var mqttNotiCommands = [
    {
      commandId: "energy_tarrif_value",
      notiID: "ENERGY_TARRIF"
    }
  ];

  module.exports = { mqttHook,  mqttNotiCommands};
{ module: "MMM-MQTTbridge", disabled: false, config: { mqttServer: "mqtt://my_user:my_pass@my_server:the_port", mqttConfig: { listenMqtt: true, }, } }, { module: "MMM-ValuesByNotification", position: "top_left", header: "Energy", config: { updateInterval: 10, reuseCount: 90, valuePositions: "i", valueNaPositions: "i", itemPositions: "e", groupPositions: "e", groups: [ { items: [ { notification: "ENERGY_TARRIF", valueImgIcon: "modules/MMM-ValuesByNotification/icons/tom.jpg", values: [ { jsonpath: "state", thresholds: [ { type: "eq", value: "PEAK", valueImgIcon: "modules/MMM-ValuesByNotification/icons/peak.jpg", }, { type: "eq", value: "OFF-PEAK", valueImgIcon: "modules/MMM-ValuesByNotification/icons/off-peak.jpg", }, { type: "eq", value: "NIGHT", valueImgIcon: "modules/MMM-ValuesByNotification/icons/night.jpg", }, ] }, ] }, ] }, ] }, },Explanation…
MMM-MQTTbridge:
- The module connects to the MQTT-Server
my_serverto portthe_portwith usermy_userand passwordmy_pass - As
listenMqttis set totruethe settings inmqttDictionary.jsare used which results in:- If a message to
mqttTopicmagicmirror/tarrif/setis received the message is processed by themqttNotiCmdenergy_tarrif_value - As no
payloadValueis specified the command is called independent of the message that is send to the topic - As no
notiPayloadis set in the command configuration but thenotiIDENERGY_TARRIFevery time a message is received of the specified topic a notification is send to all other modules with notification idENERGY_TARRIFand the original MQTT message as payload
- If a message to
MMM-ValuesByNotification:
- the module refreshes every ten seconds as
updateIntervalis set to10 - if no new notification is received for a configured
notificationof a item but the module refreshes it will reuse the last received value for a maximum of 90 times (reuseCount) - As
valuePositionsandvalueNaPositionsare set toionly a specified icon will be displayed instead of the value itself (which will bevor if both should be displayedvi; see Positions-Documentation for more info) - As
itemPositionsandgroupPositionsare both set toeonly the elements and no additional titles (t) or icons (i) are displayed ( see Positions-Documentation for more info) - A single group with one item which contains one value is specified
- The values of the item use the payload of the notification with id
ENERGY_TARRIF - As default icon a image for the value (
valueImgIcon) is used which has the pathmodules/MMM-ValuesByNotification/icons/tom.jpg(see Icon-Documentation for more details) - The value element selects the content with
jsonpathstateas its value. This means the payload of the notification is parsed as JSON and the value which is used in further processing is the content of thestateelement. This can be everything the HomeAssistant sends but should be eitherPEAK,OFF_PEAKorNIGHT - As there are
thresholdsspecified they are validated against the previously selectedstate- If the payload is equal to (
eq) to thevaluePEAKthe path of thevalueimgIconis changed tomodules/MMM-ValuesByNotification/icons/peak.jpg - If the payload is equal to (
eq) to thevalueOFF_PEAKthe path of thevalueimgIconis changed tomodules/MMM-ValuesByNotification/icons/off-peak.jpg - If the payload is equal to (
eq) to thevalueNIGHTthe path of thevalueimgIconis changed tomodules/MMM-ValuesByNotification/icons/night.jpg
- If the payload is equal to (
Directly after the start the MMM-ValuesByNotification module will display the default icon. Every 10 seconds it refreshes. If a message for the specified topic is received by MMM-MQTTbridge the notification is send. The next time the module refreshes it will validate the message content and changes the icon depending on the content.
- The module connects to the MQTT-Server
-
RE: Display image based on state or time
@chimera Hi and no problem, great you found a solution. My modules are much more complicated in this situation.
-
RE: Display image based on state or time
@chimera Hi, you may be able to use my MMM-ValuesByNotification for this job.
It is a little hack but i tested it and it seems to work.The basic idea of the module is to display values send by notifications of other modules
BUT
the module has the ability to display a default value (naValue) if no value has been send by any other module. It has abilities to display icons instead the value and change the icons based on thresholds (conditions). In combination with the support to define functions to format the values before the check of the conditions it will be possible to get the current time:{ module: "MMM-ValuesByNotification", position: "top_left", header: "Energy", config: { updateInterval: 60, valuePositions: "i", valueNaPositions: "i", itemPositions: "e", groupPositions: "e", formatNaValue: true, transformerFunctions: { naToImgIdent: (value) => { let curHour = new Date().getHours(); if ((curHour >= 0) && (curHour <= 6)){ //From 0 to 6 o clock return "a" } else if ((curHour >= 7) && (curHour <= 12)) { //From 7 to 12 o clock return "b" } else if ((curHour >= 13) && (curHour <= 18)) { //From 13 to 18 o clock return "c" } else { //From 19 to 23 o clock return "d" } } }, groups: [ { items: [ { notification: "ICON_DUMMY_ABC", valueImgIcon: "modules/MMM-ValuesByNotification/icons/tom.jpg", values: [ { valueTransformers: ["naToImgIdent"], thresholds: [ { type: "eq", value: "a", valueImgIcon: "modules/MMM-ValuesByNotification/icons/tom.jpg", }, { type: "eq", value: "b", valueImgIcon: "modules/MMM-ValuesByNotification/icons/tom2.jpg", }, { type: "eq", value: "c", valueImgIcon: "modules/MMM-ValuesByNotification/icons/tom.jpg", }, { type: "eq", value: "d", valueImgIcon: "modules/MMM-ValuesByNotification/icons/tom2.jpg", }, ] }, ] }, ] }, ] }, },Edit:
I should have read your question in detail first :-)
If you can provide the state via MQTT already you can for sure use this module. You will need MMM-MQTTbridge to send the value as payload of a notification. Check for the notification in MMM-ValuesByNotification and display the icon you like. -
RE: Is there a Difference between these ???
@plainbroke Hi,
please use the code ticks to post code.
Yes there is a difference, you missed a " before database in the second one.
-
RE: MMM-ValuesByNotification, CSS Advice...
@BKeyport Hi and sorry, my fault.
I added the items in the wrong order to the group.The main idea is that all items are in a row. Every time the space on the right side is not enough to display the next item a new line starts.
As the maximum width of the module is set to 700px only two items fit in a row. Thats why we get two columns here but the order of the items in the config matters.In the config i additionally add the classes
col1andcol2to the items. This way i can set the width of the titles in the first column different to the ones of the second column.I re-arranged the items to the structure of the initial post and increased the width of the titles a little bit:
{
	module: "MMM-ValuesByNotification", // https://github.com/Tom-Hirschberger/MMM-ValuesByNotification
	position: "top_center",
	config: {
		animationSpeed: 0,
		updateInterval: 3600,
		groupPositions: "e",
		itemPositions: "e",
		reuseCount: 99,
		transformerFunctions: {
			degToCompass: (num) => {
				val = ((num/22.5)+.5) | 0;
				arr = ["N","NNE","NE","ENE","E","ESE", "SE", "SSE","S","SSW","SW","WSW","W","WNW","NW","NNW"];
				res = arr[(val % 16)];
				return res;
			},
		},
		groups: [
			{
				items: [
					{
						notification: "WeatherLink",
						classes: "col1",
						values: [
							{
								valueTitle: "Temperature Outdoors",
								valueUnit: "°",
								jsonpath: "data.conditions[0].temp",
								valueFormat: "Number(${value}).toFixed(2)",
							},
						],
					},
					{
						notification: "WeatherLink",
						classes: "col2",
						values: [
							{
								valueTitle: "Indoor Humidity",
								valueUnit: "%",
								jsonpath: "data.conditions[1].hum_in",
							},
						]
					},
					{
						notification: "TempRoom",
						classes: "col1",
						values: [
							{
								valueTitle: "My Office Temperature",
								valueUnit: "°",
								jsonpath: "temperature_f",
								valueFormat: "Number(${value}).toFixed(2)",
							},
						],
					},
					{
						notification: "WeatherLink",
						classes: "col2",
						values: [
							{
								valueTitle: "Outdoor Humidity",
								valueUnit: "%",
								jsonpath: "data.conditions[0].hum",
							},
						]
					},
					{
						notification: "TempCase",
						classes: "col1",
						values: [
							{
								valueTitle: "CPU Case Temperature",
								valueUnit: "°",
								jsonpath: "temperature_f",
								valueFormat: "Number(${value}).toFixed(2)",
							},
						],
					},
					{
						notification: "WeatherLink",
						classes: "col2",
						values: [
							{
								valueTitle: "Wind Speed",
								valueUnit: "MPH",
								jsonpath: "data.conditions[0].wind_speed_last",
								unitSpace: true,
							}
						]
					},
					{
						notification: "WeatherLink",
						classes: "col1",
						values: [
							{
								valueTitle: "Utility Room Temperature",
								valueUnit: "°",
								jsonpath: "data.conditions[1].temp_in",
								valueFormat: "Number(${value}).toFixed(2)",
							},
						],
					},
					{
						notification: "WeatherLink",
						classes: "col2",
						values: [
							{
								valueTitle: "Wind Direction",
								jsonpath: "data.conditions[0].wind_dir_last",
								valueTransformers: ["degToCompass"],
							},
						]
					},
				],
			},
		],
	},
}
.MMM-ValuesByNotification{ width: 700px; } .MMM-ValuesByNotification .vbn .groupWrapper { border-radius: 0px; border-style: none; } .MMM-ValuesByNotification .vbn .itemsWrapper { flex-direction: row; flex-wrap: wrap; column-gap: 30px; justify-content: space-around; } .MMM-ValuesByNotification .vbn .itemWrapper { flex-direction: row; justify-content: unset; } .MMM-ValuesByNotification .vbn .valueWrapper { flex-direction: row; column-gap: 10px; justify-content: unset; } .MMM-ValuesByNotification .vbn .col1 .valueWrapper { min-width: 310px; } .MMM-ValuesByNotification .vbn .col2 .valueWrapper { min-width: 285px; } .MMM-ValuesByNotification .vbn .wrap1 { justify-content: flex-start; } .MMM-ValuesByNotification .vbn .valueTitle { text-align: left; } .MMM-ValuesByNotification .vbn .col1 .valueTitle { min-width: 220px; } .MMM-ValuesByNotification .vbn .col2 .valueTitle { min-width: 210px; } -
RE: MMM-ValuesByNotification, CSS Advice...
@BKeyport Hi,
thank you for the config. There was a main difference in yours and mine. You added the last four values in one item, i had single items.
There was a problem with the column definitions in you config, but i think i figured the things out.
Its a little bit messy but i think it will work:custom.css
.MMM-ValuesByNotification{
  width: 700px;
}

.MMM-ValuesByNotification .vbn .groupWrapper {
  border-radius: 0px;
  border-style: none;
}

.MMM-ValuesByNotification .vbn .itemsWrapper {
  flex-direction: row;
  flex-wrap: wrap;
  column-gap: 30px;
  justify-content: space-around;
}

.MMM-ValuesByNotification .vbn .itemWrapper {
  flex-direction: row;
  justify-content: unset;
}

.MMM-ValuesByNotification .vbn .valueWrapper {
  flex-direction: row;
  column-gap: 10px;
  justify-content: unset;
}

.MMM-ValuesByNotification .vbn .col1 .valueWrapper {
  min-width: 290px;
}

.MMM-ValuesByNotification .vbn .col2 .valueWrapper {
  min-width: 260px;
}

.MMM-ValuesByNotification .vbn .wrap1 {
  justify-content: flex-start;
}

.MMM-ValuesByNotification .vbn .valueTitle {
  text-align: left;
}

.MMM-ValuesByNotification .vbn .col1 .valueTitle {
  min-width: 210px;
}

.MMM-ValuesByNotification .vbn .col2 .valueTitle {
  min-width: 200px;
}
config.js:
{
	module: "MMM-ValuesByNotification", // https://github.com/Tom-Hirschberger/MMM-ValuesByNotification
	position: "top_center",
	config: {
		animationSpeed: 0,
		updateInterval: 15,
		groupPositions: "e",
		itemPositions: "e",
		reuseCount: 99,
		transformerFunctions: {
			degToCompass: (num) => {
				val = ((num/22.5)+.5) | 0;
				arr = ["N","NNE","NE","ENE","E","ESE", "SE", "SSE","S","SSW","SW","WSW","W","WNW","NW","NNW"];
				res = arr[(val % 16)];
				return res;
			},
		},
		groups: [
			{
				items: [
					{
						notification: "WeatherLink",
						classes: "col1",
						values: [
							{
								valueTitle: "Temperature Outdoors",
								valueUnit: "°",
								jsonpath: "data.conditions[0].temp",
								valueFormat: "Number(${value}).toFixed(2)",
							},
						],
					},
					{
						notification: "TempRoom",
						classes: "col2",
						values: [
							{
								valueTitle: "My Office Temperature",
								valueUnit: "°",
								jsonpath: "temperature_f",
								valueFormat: "Number(${value}).toFixed(2)",
							},
						],
					},
					{
						notification: "TempCase",
						classes: "col1",
						values: [
							{
								valueTitle: "CPU Case Temperature",
								valueUnit: "°",
								jsonpath: "temperature_f",
								valueFormat: "Number(${value}).toFixed(2)",
							},
						],
					},
					{
						notification: "WeatherLink",
						classes: "col2",
						values: [
							{
								valueTitle: "Utility Room Temperature",
								valueUnit: "°",
								jsonpath: "data.conditions[1].temp_in",
								valueFormat: "Number(${value}).toFixed(2)",
							},
						],
					},
					{
						notification: "WeatherLink",
						classes: "col1",
						values: [
							{
								valueTitle: "Indoor Humidity",
								valueUnit: "%",
								jsonpath: "data.conditions[1].hum_in",
							},
						]
					},
					{
						notification: "WeatherLink",
						classes: "col2",
						values: [
							{
								valueTitle: "Outdoor Humidity",
								valueUnit: "%",
								jsonpath: "data.conditions[0].hum",
							},
						]
					},
					{
						notification: "WeatherLink",
						classes: "col1",
						values: [
							{
								valueTitle: "Wind Speed",
								valueUnit: "MPH",
								jsonpath: "data.conditions[0].wind_speed_last",
								unitSpace: true,
							}
						]
					},
					{
						notification: "WeatherLink",
						classes: "col2",
						values: [
							{
								valueTitle: "Wind Direction",
								jsonpath: "data.conditions[0].wind_dir_last",
								valueTransformers: ["degToCompass"],
							},
						]
					},
				],
			},
		],
	},
}
Edit: Maybe i have time to search for an easier solution at the weekend.
-
RE: MMM-ValuesByNotification, CSS Advice...
@BKeyport Hi,
tested some things. You want it to look something like this, right:
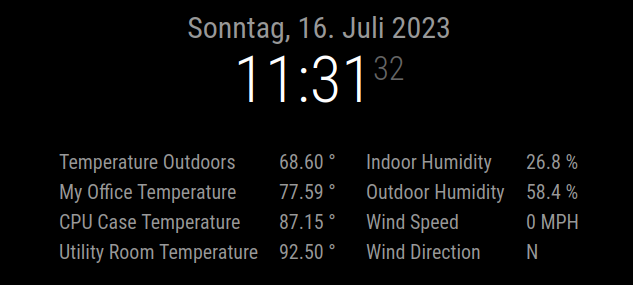
I used these special config options:
- As you do not display any group or item title i set the positions to “e” only. Which means only elements, nothing else.
- As the titles of the first and second column are very different (the second column has shorter titles) i decided to add the classes “col1” and “col2” to the items.
- As i did not want to setup a complete environment i set the “naValue” of each value to the values of your screenshot. Please skip that step!
{
			module: "MMM-ValuesByNotification",
			position: "top_center",
			//header: "Module-1",
			config: {
				updateInterval: 3600,
				groupPositions: "e",
				itemPositions: "e",
				unitSpace: true,
				groups: [
					{
						items: [
							{
								notification: "TEST1",
								classes: "col1",
								values: [
									{
										valueTitle: "Temperature Outdoors",
										naValue: "68.60",
										valueUnit: "°"
									},
								]
							},
							{
								notification: "TEST2",
								classes: "col2",
								values: [
									{
										valueTitle: "Indoor Humidity",
										naValue: "26.8",
										valueUnit: "%"
									},
								]
							},
							{
								notification: "TEST3",
								classes: "col1",
								values: [
									{
										valueTitle: "My Office Temperature",
										naValue: "77.59",
										valueUnit: "°"
									},
								]
							},
							{
								notification: "TEST4",
								classes: "col2",
								values: [
									{
										valueTitle: "Outdoor Humidity",
										naValue: "58.4",
										valueUnit: "%"
									},
								]
							},
							{
								notification: "TEST5",
								classes: "col1",
								values: [
									{
										valueTitle: "CPU Case Temperature",
										naValue: "87.15",
										valueUnit: "°"
									},
								]
							},
							{
								notification: "TEST6",
								classes: "col2",
								values: [
									{
										valueTitle: "Wind Speed",
										naValue: "0",
										valueUnit: "MPH"
									},
								]
							},
							{
								notification: "TEST7",
								classes: "col1",
								values: [
									{
										valueTitle: "Utility Room Temperature",
										naValue: "92.50",
										valueUnit: "°"
									},
								]
							},
							{
								notification: "TEST8",
								classes: "col2",
								values: [
									{
										valueTitle: "Wind Direction",
										naValue: "N",
										valueUnit: " "
									},
								]
							},
						]
					},
				]
			},
		},
I then set the following custom.css options:
.MMM-ValuesByNotification{ width: 700px; } .MMM-ValuesByNotification .vbn .groupWrapper { border-radius: 0px; border-style: none; } .MMM-ValuesByNotification .vbn .itemsWrapper { flex-direction: row; flex-wrap: wrap; column-gap: 30px; } .MMM-ValuesByNotification .vbn .itemWrapper { flex-direction: row; justify-content: unset; } .MMM-ValuesByNotification .vbn .valueWrapper { flex-direction: row; column-gap: 10px; justify-content: unset; } .MMM-ValuesByNotification .vbn .col1 .valueWrapper { min-width: 277px; } .MMM-ValuesByNotification .vbn .col2 .valueWrapper { min-width: 213px; } .MMM-ValuesByNotification .vbn .valueTitle { text-align: left; } .MMM-ValuesByNotification .vbn .col1 .valueTitle { min-width: 210px; } .MMM-ValuesByNotification .vbn .col2 .valueTitle { min-width: 150px; } -
RE: MMM-ValuesByNotification, CSS Advice...
@BKeyport Hi and sure I will try to help.
I think a possible way would be to set somemin-width.
Can you share your module config?
It’s easier for me to setup a test environment with it. -
RE: RPI4 Dual Monitor blanking
@grantc66
There are ways to move windows to a specific screen on the bash. But it is complicated.
Maybe one of the solutions in this thread solves your problem. -
RE: RPI4 Dual Monitor blanking
@grantc66 Hi,
it may be a timing issue.
Maybe a sleep 1 between the two xrand commands helps. -
RE: How can you use external device (esp32cam, etc.) In magicmirror?
@MarkV
Hi,as @MMRIZE wrote already there are plenty of ways to interact with ESP or Arduino boards.
I use a couple of them in my house to provide i.e. temperature values and control some led strips. One of them has a radar sensor connected which signals user presence to my mirror.I started by connecting two Arduinos to my Raspberry hosting the mirror by serial console and reacted to messages send by gesture sensors (turn on/off display, increase/decrease volume, play radio, etc. with MMM-Serial-Notifications).
As i started playing around with ESP boards i changed to make HTTP calls to the boards i.e. by MMM-CommandToNotification and wrote my first temperature module MMM-Temperature.
My first user presence detection used the HTTP API of MMM-Remote-Control to send notifications to my MMM-Screen-Powersave-Notification. The notification got triggered by a simple HTTP call of the ESP. My current presence detection uses MQTT to publish the values to the mirror.
I added more and more ESP boards to my setup and ended up using MQTT to both control the boards and get values of them. In consequence i took over the ownership of MMM-MQTTbridge, wrote a module to control led strips connected to ESP boards (MMM-LEDStripControl) and wrote a universal module to display values of any notification (MMM-ValuesByNotification).
As i build a house the last two years and added KNX-Bus home automation to it i now use a installation of Node-Red to control my bus devices, convert values of ESP boards, control my Christmas decoration and a lot of more stuff.
My cameras are connected to my Synology NAS thats why i build MMM-SynologySurveillance which is able to display simple MJPEG streams of ESPCams (i.e. flashed with this sketch https://github.com/arkhipenko/esp32-cam-mjpeg-multiclient), too.
As an alternative MJPEG streams can by displayed with my MMM-EmbedURL module by using aimgembed element.
I use MMM-EmbedURL to embed my whole Node-Red dashboard at one profile/page of my mirror.
I added some touch enabled icons with my MMM-TouchButton to my mirror to be able to switch on some lights if i see movement on my camera.Soooo. As a conclusion i can say there are a lot of ways to integrate ESP boards but as there are many different ways there are no complete walk-through tutorials.
Most of my modules have some examples checked in so you maybe want to give it a try.
I strongly suggest to setup a MQTT Broker (i.e. Mosquitto) to interact with the boards. -
RE: Scale website in MMM-EmbedURL
@gerbenvs Interesting…
Maybe the page you want to display does not support properly.
Does it scale down automatically if you display the page in a normal browser, resize the browser window and refresh the page? -
RE: Axis camera display
@plainbroke
Hi, if the stream works wit MMM-Webview you can use MMM-EmbedURL to either embed one ore more streams. If you want to embed the streams at different positions the module supports multi instance by default. -
RE: Scale website in MMM-EmbedURL
@gerbenvs Hi, I think it might be possible if you add a width and height to the attributes of the webview:
{
                        module: "MMM-EmbedURL",
                        position: "bottom_left",
                        header: "P1 Monitor",
                        config: {
                                updateInterval: 120,
                                embedElementType: "webview",
                                basicElementType: "div",
                                embed: [
                                {
                                        attributes: [
                                                "frameborder=0",
                                                "scrolling=no",
                                                "width=600px",
                                                "height=400px",
                                        ],
                                        embed:  [
                                                "http://p1monitor/main-1.php"
                                        ]
                                },
                                ]
                        },
                },
I do not have a chance to test it at the moment but you may want to give it a try.
-
RE: MMM-PIR-Sensor-Lite modification
@bugsounet Hi,
sorry but at the moment a do not have plans to maintain more modules than i already do.
In addition i do not see a reason why there should be a need for a additional screensave module.
Most of the features are present in the exiting ones. I do not like the idea of putting the GPIO logic and screensave logic into the same module and had problems with it in my setup in the past. Thats why i created the two separted modules.
I forked MMM-Screen as i wanted to check if there is a easy way to implement the CEC logic to my screensave module. I do not think it would be a big deal. The problem is that i do not have a CEC aware monitor at the moment and do not have the time to build a dev environment with my tv.