Read the statement by Michael Teeuw here.
Display different Roomtemperature on MagicMirror
-
Hey, im completley new here and im trying to find an easy way to display different Roomtemperatures (and humidity) on my MagicMirror.
I guess it doesn´t work, to just by an Temperature-Sensor on Amazon and add a Module in my Config file, or does it?
The best case would be an Thermometer connected to the SmartLife App (via this Modul: https://github.com/slametps/MMM-TuyaSL). But i don`t know if the Module can display the Temperature and Humidity.
After some research I think there a two ways:
-
Buy an already Working smart thermometer like this here: https://www.amazon.de/gp/product/B08W1HM4WV/ref=ox_sc_act_title_1?smid=A2IT6QWJ19LHT0&psc=1 and connect it to the MagicMirror via the SmartLife- or TuyaApp. And i can read the data directly from the Thermometer.
-
Build something like this:
With a Module like this: https://github.com/balassy/MMM-RemoteTemperature
Im not sure if i can do this myself (I can´t Code). But its cheaper i guess
I know there are already exsisting modules to hook up a sensor direct to your Raspberry Pi, but this wont work for me, i need more than 3 Sensors that are connectet over WiFi.
Sooo that´s it, I hope someone can help me, i just need an easy solution :).
-
-
@Xilef
Hi,
did a lot of research to this topic in the last view years.Things depend heavily on your needs.
Do you plan to power the devices with a power supply or do they need to run on battery?I can`t suggest Tuya devices as they changed the firmware in newer devices to do not allow local connections anymore. Most of the modules i found need to connect directly to the devices which is blocked now.
Last week i replaced two of my Tuya smart plugs with ones of Shelly cause they are not supported by tuyalib anymore and a was not able to integrate integrate them into my installation.Personally i ended up providing the temperature and humidity values with BME280 or HTU21 sensor connected to ESP8266 or ESP32 micro controllers.
My MMM-Temperature module contains some examples and i can provide some more if needed.
The easiest way is to start a webserver on the ESP controller that sends the data as JSON string if somebody connects. The main disadvantage is that the controller needs to run all the time and wait for new connections. It is hard to realize authentication mechanism, too.
I suggest to use a MQTT-Broker (like Mosquitto) and send the data via MQTT to the broker which forwards the data to the mirror. You then can use my MMM-ValuesByNotification the sensor data and much more.
If needed the ESP controller fall a sleep for some time and i.e. send data only every 30 minutes. There are a lot of possibilities and i tried a lot of them.I provide scripts to send the data of Miflora flower sensors (which provide temperature as well) to a MQTT broker, too. The scripts (MMM-CommandToNotification script or system service read the data via bluetooth and send it to the broker.
As a third alternative you can sensors that are supported of Zigbee2MQTT, buy a supported Zigbee usb stick like this one and configure Zigbee2MQTT to send the data to the MQTT broker.
-
@wishmaster270 Thanks for your reply.
@wishmaster270 said in Display different Roomtemperature on MagicMirror:
Do you plan to power the devices with a power supply or do they need to run on battery?
Mostly on power supplys
In general, I would think your solution would work for me, but the big problem is, if i buy like an EPS8266/ESP32 and BME280/HTU21 sensor, i can solder them together, but i have no idea how to set up the software.
Im glad that i managed it to run Weather, Calendar and an RSS-Feed on my Mirror. But I don’t know much more than that. If there were step-by-step instructions, I would definitely be able to do it, but I don’t think there is one for exactly my needs.
I would definitely try to do it, but i need help i guess. -
@Xilef esp8266, see the instructables.com site
also download the Arduino ide to create and load sw on the device.
I capture the temp and push it to a local server running and http server. you can also use Matt to push
-
@sdetweil no idea what you are talking about after Arduino ide xD but thanks anyway
I think I will first order an ESP8226 and see if I can set it up/play a sample program on it, with the help of an YT Tutorial. And then Im trying to connect it with the sensor and display the data on the Mirror using an http server
and it would be cool if someone would upvote my posts so that they arent dumped into the moderation queue
-
@Xilef https://docs.arduino.cc/software/ide-v2/tutorials/getting-started/ide-v2-downloading-and-installing
that’s for programming the ESP8266
-
@sdetweil thx
-
@Xilef
ESP8266 is a good choice. I prefer ESP32 cause it has more power but does not need that much more energy. You have a lot more GPIOs with a ESP32 than a with the ESP8266.I can provide you a ESP32 sketch which is ready to flash and only needs the Wifi-SSID, Wifi-Password and the MQTT parameters configured.
I use the Arduino IDE to flash the boards. -
@wishmaster270 thanks
As I understand it, something like this is my target:
And i would need:
- ESP32
- DHT11-Sensor Problem with this Sensor is the accuracy i think, but if it works I can swap them out I guess
- BreadBoard
And as Powersupply something with 5V and 1-1,5A right?
I would probably do it like this guy on youtube https://www.youtube.com/watch?v=ebJpXs2-WgM&list=PLUwa0e4GQGhS6KCSbLAQGog4_Z7eIWOm3&index=3
And from the ESP32-Website the MagicMirror should be able to read the data and display it
-
@Xilef
You need a ESP32 ( I use a D1 Mini but nearly everyone should be fine)
You need a Temperature and Humidity Sensor (BME280 and HTU21 are a lot more accurate and use I2c to communicate with the controller.
A Power supply with 5V 1A should be more than enough.That’s how I display my values…
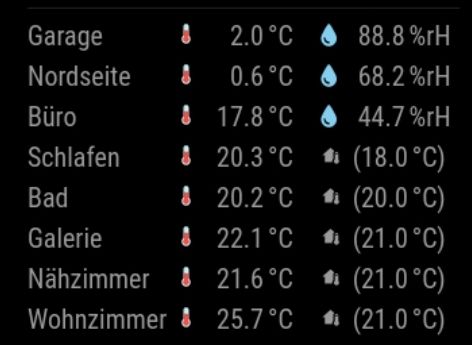
The first three are ESP32 the others my thermostats.
-
nice…
-
@wishmaster270 Thats exactly what i had in mind
The BME280 sensors on amazon are a litte expensive so Im think Im order 3 form this shop They have 5 Pins but I think this will work to, on Aliexpress its even cheaper but i have no experience with the shop, and 1-3€ difference is ok i guess
And I wanted to ask what power supply you use e.g. just a cell phone charger?
I think im gona go with this one and hope that it doesnt explodeSo if I have everything right this is my shopping list:
ESP32
BME280
Power Supply
BreadBoardAnd then I just have to figure out the programming
-
Edit: With Power Supply i mean this one: https://www.amazon.de/gp/product/B08LMFBV55/ref=ox_sc_act_title_2?smid=A1XVC08L2WVJCV&psc=1
-
@Xilef Hi, the list sounds good. I use old mobile chargers to power the boards. I have heard that some had problems with mobile chargers but I had no problems for years now.
-
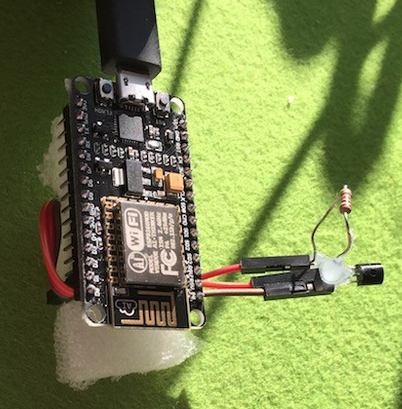
Hey im back @wishmaster270
my parts arrived, and after 5 hours of Troubleshooting i was able to achieve this: (with the help of this tutorial)
Now i need just a little bit help to display the Temperature and Humidity on my mirror
-
@Xilef
Hi,
thats great news.
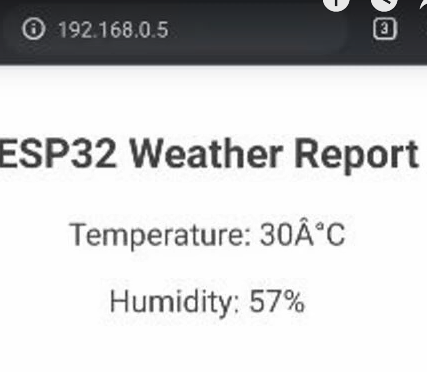
The screenshot shows that you setup the ESP32 and the sensor correctly.
The main problem is that the ESP now displays a webpage.
There are two possible ways now. Either you embed the webpage (as it is) into the mirror with a module like MMM-EmbedURL or to get the ESP to display the data machine readable.
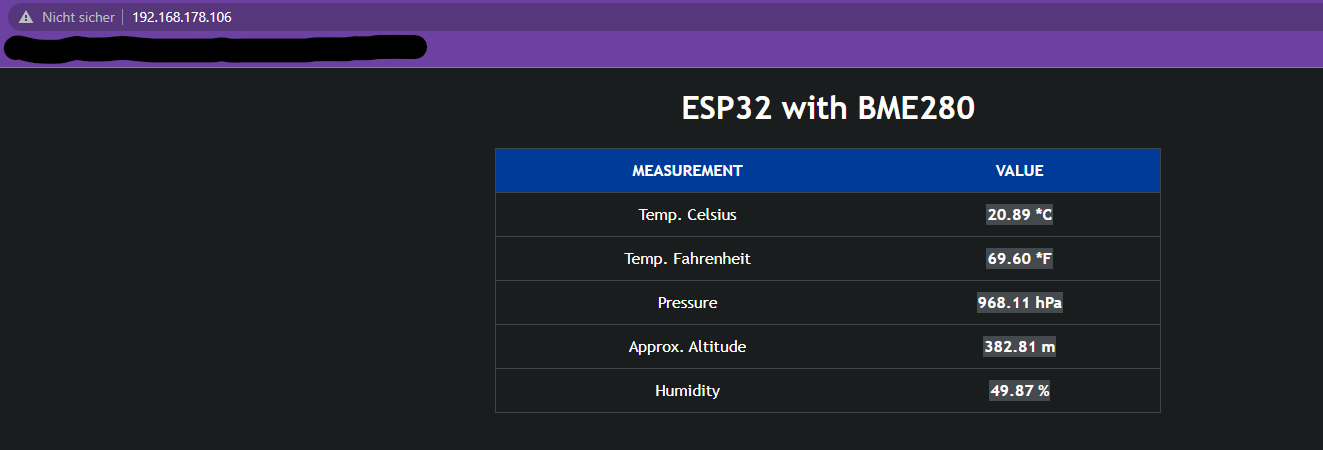
Maybe the sketch you flashed to the ESP already contains a way to read the data in a different format? Which one did you use?Edit: I think it is this one, am i right? Then there is no easy way.
I think i can provide a sketch that is more “mirror friendly” but you will need to set a static IP for the ESP. Is this ok for you?You will need to change to your needs:
- ##ADD_WIFI_SSID_HERE
- ##ADD_WIFI_PASSWORD_HERE
- IPAddress local_IP(192, 168, 0, 2);
- IPAddress gateway(192, 168, 0, 1);
- IPAddress subnet(255, 255, 255, 0);
- IPAddress primaryDNS(192, 168, 0, 1);
#include <WiFi.h>
#include <Wire.h>
#include <Adafruit_Sensor.h>
#include <Adafruit_BME280.h>

const char* ssid     = "##ADD_WIFI_SSID_HERE";
const char* password = "##ADD_WIFI_PASSWORD_HERE";

//ENTER STATIC IP OF THE ESP32 BOARD HERE
IPAddress local_IP(192, 168, 0, 2);
IPAddress gateway(192, 168, 0, 1);
IPAddress subnet(255, 255, 255, 0);
IPAddress primaryDNS(192, 168, 0, 1);
IPAddress secondaryDNS(8, 8, 8, 8);

Adafruit_BME280 bme;

WiFiServer server(80);

void setup()
{
  Wire.begin();
  Serial.begin(115200);

  if (!WiFi.config(local_IP, gateway, subnet, primaryDNS, secondaryDNS)) {
    Serial.println("STA Failed to configure");
  }

  Serial.print("Connecting to ");
  Serial.println(ssid);

  WiFi.begin(ssid, password);

  while (WiFi.status() != WL_CONNECTED) {
    delay(500);
    Serial.print(".");
  }

  Serial.println("");
  Serial.println("WiFi connected!");
  Serial.print("IP address: ");
  Serial.println(WiFi.localIP());
  Serial.print("ESP Mac Address: ");
  Serial.println(WiFi.macAddress());
  Serial.print("Subnet Mask: ");
  Serial.println(WiFi.subnetMask());
  Serial.print("Gateway IP: ");
  Serial.println(WiFi.gatewayIP());
  Serial.print("DNS: ");
  Serial.println(WiFi.dnsIP());

  if (!bme.begin(0x76);) {
    Serial.println("Couldn't find sensor!");
    while (1);
  }

  server.begin();
}

void loop()
{
  float temp = bme.readTemperature();
  float tempf = temp * 1.8 + 32;
  float rel_hum = bme.readHumidity();

  WiFiClient client = server.available();
  if (client) {
    Serial.println("New Client.");
    client.println("{");
    client.print("  \"temperature_c\": ");
    client.print(temp);
    client.println(",");
    client.print("  \"temperature_f\": ");
    client.print(tempf);
    client.println(",");
    client.print("  \"humidity\": ");
    client.print(rel_hum);
    client.println(",");
    client.println("  \"error\": false");
    client.println("}");
    client.stop();
    Serial.println("Client disconnected.");
    Serial.println("");
  }
  delay(100);
}
You can use netcat to fetch the data:
/bin/nc -w3 THE_IP_OF_THE_ESP 80And the result will be something like:
{
   "humidity": 32.61236572265625,
   "temperature_c": 25.50150878906249,
   "temperature_f": 77.9027158203125,
   "error": false
}
This kind of JSON object then can be read by my MMM-Temperature module.
-
@wishmaster270 I created a sketch for my 8266, which is a json get. returns current temp and humidity.
then I just fetch it when I want, similar to what u did
-
@sdetweil Hi Sam, i was to slow with editing my post. The Sketch i provided does exactly that.
-
@wishmaster270 i think thats a good way to to it
@wishmaster270 said in Display different Roomtemperature on MagicMirror:
but you will need to set a static IP for the ESP
So i need to set it manually in the router settings?
@wishmaster270 said in Display different Roomtemperature on MagicMirror:
#include <WiFi.h>…
Thats what i need to flash on the esp , right?
@wishmaster270 said in Display different Roomtemperature on MagicMirror:
/bin/nc -w3 THE_IP_OF_THE_ESP 80
idk what that’s supposed to be for
and you have to explain to me in more detail what I should add to the IPs
-
@Xilef
You can but do not have to set the ip in the router. You either need a free address in the range that is NOT used by your routers DHCP server or maybe there is a setting to provide the device always with the same IP in your router. You then can set this IP for the ESP (as it is not used for any other DHCP device in the future then.- the
local_ipin the sketch is the IP you choose for the ESP (attention the numbers are separated with,and NOT.. - the
gatewayis the IP of your router - the
subnetdepends on your network but255,255,255,0will be fine in the most cases - the
primaryDNSis usually the IP of you router
yes the “include …” part is the one to be flashed to the ESP.
After you flashed the new Sketch to the ESP and booted it you can use the
nccommand to fetch the data from the shell of the mirror. The temperature module uses this command to get the data so you can make sure to see if it works without the need to install the module first. - the
Hello! It looks like you're interested in this conversation, but you don't have an account yet.
Getting fed up of having to scroll through the same posts each visit? When you register for an account, you'll always come back to exactly where you were before, and choose to be notified of new replies (either via email, or push notification). You'll also be able to save bookmarks and upvote posts to show your appreciation to other community members.
With your input, this post could be even better 💗
Register Login