its not a module. Its just a background. Take a look here, i described it a little further down
Read the statement by Michael Teeuw here.
Posts
-
RE: Changing the length of the line under the header
-
RE: Speaker for the Raspberry Pi3
Well, i just ordered these two:
https://www.amazon.de/gp/product/B012W70XH8/ref=oh_aui_detailpage_o02_s00?ie=UTF8&psc=1
I removed the speaker from it’s body and screw big holes in my mirror. The speaker also got a physical volume control. Not really good to hear music, but for alexa and the podcast module it will be absolutely enough.
The Audio adapter works out of the box for microphone. To enable speaker port u need to select it in raspberry as standard port.
-
RE: Downgrade Magic Mirror?
great :)
first i tried it with “192.168.178.0/24”, too but couldn’t get it work. i read something about disabling IPv6 would help etc.
but however i am glad u got it working
-
RE: Display a .png saved on the raspberry pi hard drive
afaik this isn’t possible with Easy-Pix. (please correct me)
But maybe u give MMM-ImagesPhotos a try. With that u can set an update interval. Just put your only Photo in the directory
-
RE: MMM-NOAA - Another Weather Module
if u use pm2, u should check
pm2 logsand check the errors. Other way is to start MM with develop mode:npm start devor with ssh:DISPLAY=:0 npm start devOr start it with Firefox on your pc and use Firebug
-
RE: {HowTo} turn on/off your monitor (Time based, PIR/Button, App)
@MadScientist said in {HowTo} turn on/off your monitor (Time based, PIR/Button, App):
Unable to determine hardware version. I see: Hardware : BCM2835
Huh… a quick google search tells, that this could be several causes. Some wrote to update or downgrade the kernel., some wrote to update wiring pi and so on.
So its not a problem of the module at all. I’m sorry but for the first u should try to google.Maybe start with this: https://www.raspberrypi.org/forums/viewtopic.php?f=28&t=182191
However you should start a new thread if you cannot get to target :(
-
RE: config.js docent work anymore
@fischi87 said in config.js docent work anymore:
{
module: “updatenotification”,
position: “top_bar”,
config: {
},
},There is a comma too much.
line 22…should look like this:
                {
			module: "updatenotification",
			position: "top_bar",
			config: {
			}
		},
Oh, and there is no " ], " at the end…
should look like this:], paths: { modules: "modules", vendor: "vendor" } };so try it with this one:
/*************** AUTO GENERATED BY REMOTE CONTROL MODULE ***************/ var config = { electronOptions: { }, address: "0.0.0.0", port: 8090, ipWhitelist: ["127.0.0.1", "::ffff:127.0.0.1", "::1", "192.168.178.26", "192.168.178.53"], language: "de", modules: [ { module: "alert", config: { } }, { module: "updatenotification", position: "top_bar", config: { } }, { module: "clock", position: "top_center", config: { } }, { module: "calendar", header: "Kalender", position: "bottom_left", config: { calendars: [ { url: "", symbol: "calendar" }, { url: "", symbol: "recycle" }, { url: "", symbol: "eur" }, { url: "", symbol: "scissors" }, ], timeFormat: "absolute", dateFormat: "Do MMM", maximumEntries: "5", } }, { module: "currentweather", position: "top_left", config: { location: "Strehla,Germany", locationID: "2826033", appid: "", iconTable: { "01d": "wi-day-sunny", "02d": "wi-day-cloudy", "03d": "wi-cloudy", "04d": "wi-cloudy-windy", "09d": "wi-showers", "10d": "wi-rain", "11d": "wi-thunderstorm", "13d": "wi-snow", "50d": "wi-fog", "01n": "wi-night-clear", "02n": "wi-night-cloudy", "03n": "wi-night-cloudy", "04n": "wi-night-cloudy", "09n": "wi-night-showers", "10n": "wi-night-rain", "11n": "wi-night-thunderstorm", "13n": "wi-night-snow", "50n": "wi-night-alt-cloudy-windy" } } }, { module: "weatherforecast", position: "top_left", header: "Wettervorhersage", config: { location: "Strehla, Germany", locationID: "2826033", appid: "", iconTable: { "01d": "wi-day-sunny", "02d": "wi-day-cloudy", "03d": "wi-cloudy", "04d": "wi-cloudy-windy", "09d": "wi-showers", "10d": "wi-rain", "11d": "wi-thunderstorm", "13d": "wi-snow", "50d": "wi-fog", "01n": "wi-night-clear", "02n": "wi-night-cloudy", "03n": "wi-night-cloudy", "04n": "wi-night-cloudy", "09n": "wi-night-showers", "10n": "wi-night-rain", "11n": "wi-night-thunderstorm", "13n": "wi-night-snow", "50n": "wi-night-alt-cloudy-windy" } } }, { module: "MMM-EasyPix", header: "Wlan-Code", position: "bottom_right", config: { picName: "qrcode.png", maxWidth: "150px", header: "Wlan", } }, { module: "MMM-MovieListings", position: "top_left", config: { apiKey: 'cee87e81c99b368b7aa611763b37fada', region: 'DE', language: 'de-DE', interface: 'poster', } }, { module: 'MMM-MyCommute', position: 'middle_right', header: 'Weg zur Arbeit', config: { apikey: 'AIzaSyAfVoBUzZmIRxFiKtfgw882SrvOBzMYKpk', origin: 'Melchior-Tatzen-Weg 24, 01616 Strehla', showSummary: true, destinations: [ { destination: 'Peschelstraße 33, 01139 Dresden', label: 'ElbePark', mode: 'driving', alternatives: true, } ] } }, ], paths: { modules: "modules", vendor: "vendor" } }; /*************** DO NOT EDIT THE LINE BELOW ***************/ if (typeof module !== 'undefined') {module.exports = config;} -
RE: Displaying data from MySQL database
Don’t know if it helps and i am trying to keep it short…
I build an Oiltank measurement system with another raspberry pi.
The results will be written to a mysql database and to a JSON file, which will be uploaded to my NAS.
On the NAS i run the database and a web server.
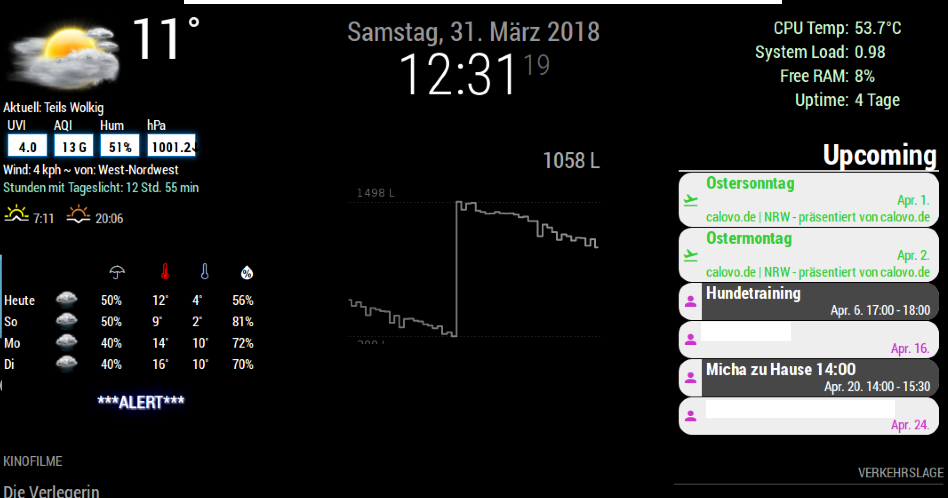
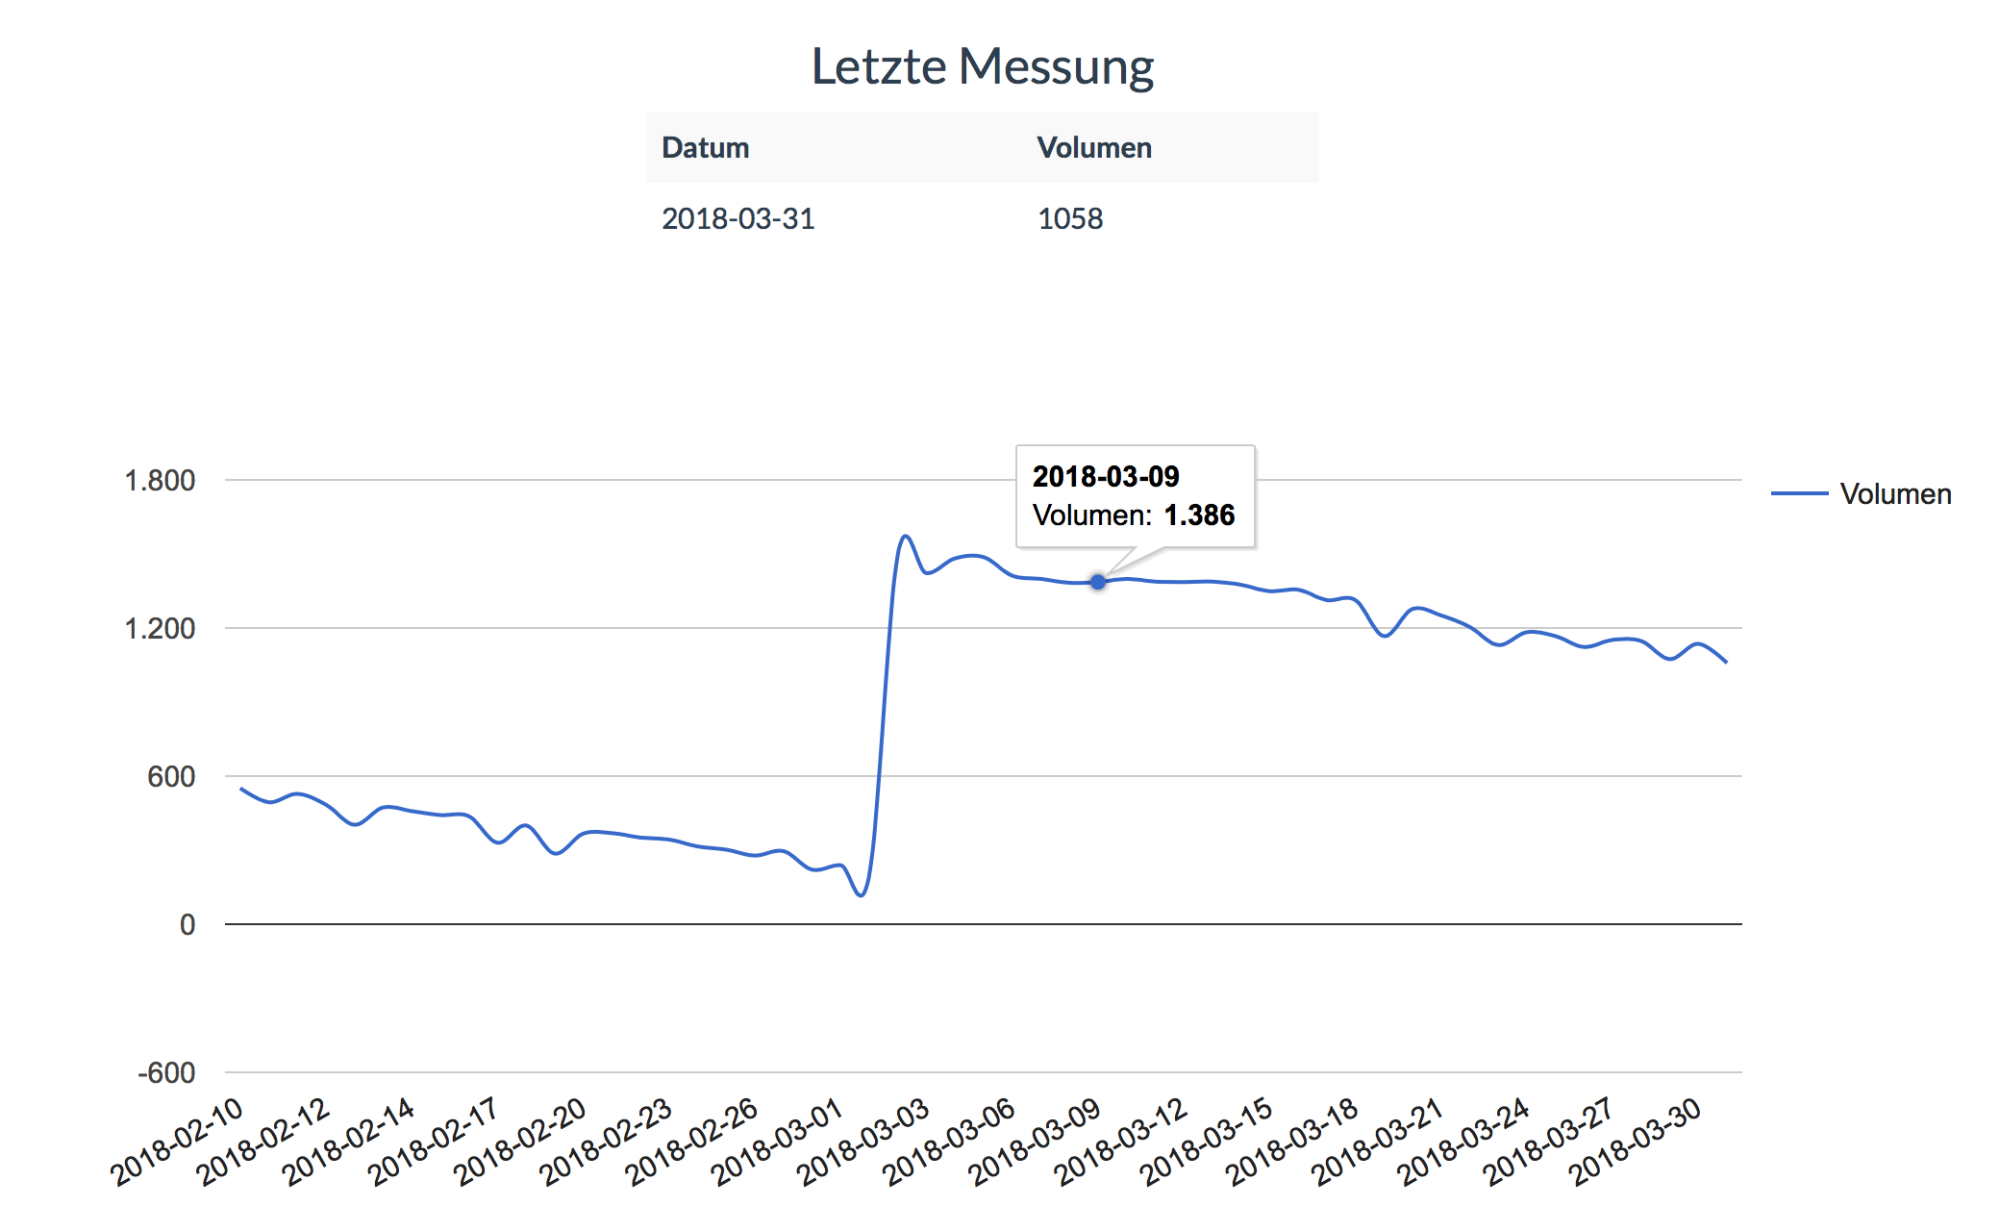
To Display the results on a webpage i used this php script: https://github.com/cruunnerr/OilTank-Graph-WebPageTo display the results on my MM i got some very much help from our user @doubleT
He wrote this module for me: https://github.com/cruunnerr/MMM-Oiltank
The module grabs the data from a JSON file and shows it on the MM.Maybe this could help :/
MagicMirror:

Web Page:

-
RE: [MMM-Buttons] Connect multiple buttons to send configurable notifications
@AxLed said in [MMM-Buttons] Connect multiple buttons to send configurable notifications:
i also have a problem with MMM-Buttons, that Buttonpress is only sometimes recognized if i press twice or triple.
Maybe play around with the min and max Presstime.
connected between 1: GND an BCM26; 2: GND and BMC20
I tested the buttons with a python script an they are recognizedWondering that this works with the module… when u press the Button the gpio would be set to low which is equal to 0.
- Do Buttons on GND work or do i have to put them on +3,3V with a resistor instead?
- how do i use
activeLowin MMM-Buttons Configuration? … activeLow: true ?
Afaik this isn’t possible through the module. Maybe u find a solution in the web, fo how changing the input state detection.
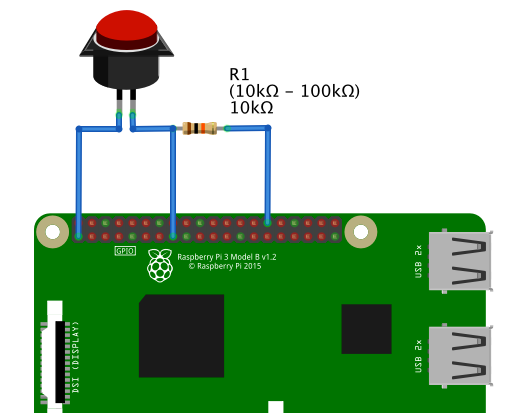
And yes, u should use resistors for giving the GPIO a defined state when not pressing. When u don’t want to connect them physically (but i recommend) u could use the internal resistors (check below on this site http://wiringpi.com/the-gpio-utility/)
So normal way (or the way i used) is to connect the button like this:

-
RE: {HowTo} turn on/off your monitor (Time based, PIR/Button, App)
@MadScientist
Alright…Because your relay turns on i think you did everything right. Probably there is a problem with your Module installation… but thats just a guess. Maybe u didn’t give the module the rights to turn on gpio’s?
sudo usermod -a -G gpio pi(the „pi“ at the end stands for your username)If u did that and it doesn’t work at all you can try to do it with an external script. Follow these steps:
cd
nano monitor_on.shput in this:
gpio -g mode 27 out
sleep 0.2
gpio -g write 27 1
save with “ctrl+x” and “y”
nano monitor_off.shput in this:
gpio -g mode 27 out
sleep 0.2
gpio -g write 27 0
save with “ctrl+x” and “y”
chmod +x monitor_on.sh(to make it executable)
chmod +x monitor_off.shnano pir.pyput in this:
#!/usr/bin/env python

import sys
import time
import RPi.GPIO as io
import subprocess

io.setmode(io.BCM)
SHUTOFF_DELAY = 120 # in seconds, how long the monitor will be on until next button press or PIR detection
PIR_PIN = 22       # 15 on the board (this needn't to be a PIR. Can be a button also)
LED_PIN = 16      # optional

def main():
    io.setup(PIR_PIN, io.IN)
    io.setup(LED_PIN, io.OUT)
    turned_off = False
    last_motion_time = time.time()

    while True:
        if io.input(PIR_PIN):
            last_motion_time = time.time()
            io.output(LED_PIN, io.LOW)
            print ".",
            sys.stdout.flush()
            if turned_off:
                turned_off = False
                turn_on()
        else:
            if not turned_off and time.time() > (last_motion_time +
                                                 SHUTOFF_DELAY):
                turned_off = True
                turn_off()
            if not turned_off and time.time() > (last_motion_time + 1):
                io.output(LED_PIN, io.HIGH)
        time.sleep(.1)

def turn_on():
	subprocess.call("sh /home/pi/monitor_on.sh", shell=True)

def turn_off():
	subprocess.call("sh /home/pi/monitor_off.sh", shell=True)

if __name__ == '__main__':
    try:
        main()
    except KeyboardInterrupt:
        io.cleanup()
save with “ctrl+x” and “y”
chmod +x pir.pyYou can check if your button works by simply typing python pir.py. Every time u move through the PIR or press the button it will show you several …
End the test with “ctrl+c”The Shutoff delay in the script defines how long the relay will be turned on after detection through the pir.
If that works u can add the script to the rc.local to start it automatically when booting up.