MagicMirror Forum

    • Register
    • Login
    • Search
    • Recent
    • Tags
    • Unsolved
    • Solved
    • MagicMirror² Repository
    • Documentation
    • Donate
    • Discord
    1. Home
    2. Meidlmarkus
    • Profile
    • Following 0
    • Followers 0
    • Topics 2
    • Posts 18
    • Best 9
    • Controversial 0
    • Groups 0

    Meidlmarkus

    @Meidlmarkus

    19
    Reputation
    241
    Profile views
    18
    Posts
    0
    Followers
    0
    Following
    Joined Last Online

    Meidlmarkus Unfollow Follow

    Best posts made by Meidlmarkus

    • Frameless Bathroom Mirror - Part 1: Software and Preparations

      Edit: the glass has arrived, pls find details and pictures on the actual build here in part 2:
      https://forum.magicmirror.builders/topic/12392/frameless-bathroom-mirror-part-2-hardware-and-build


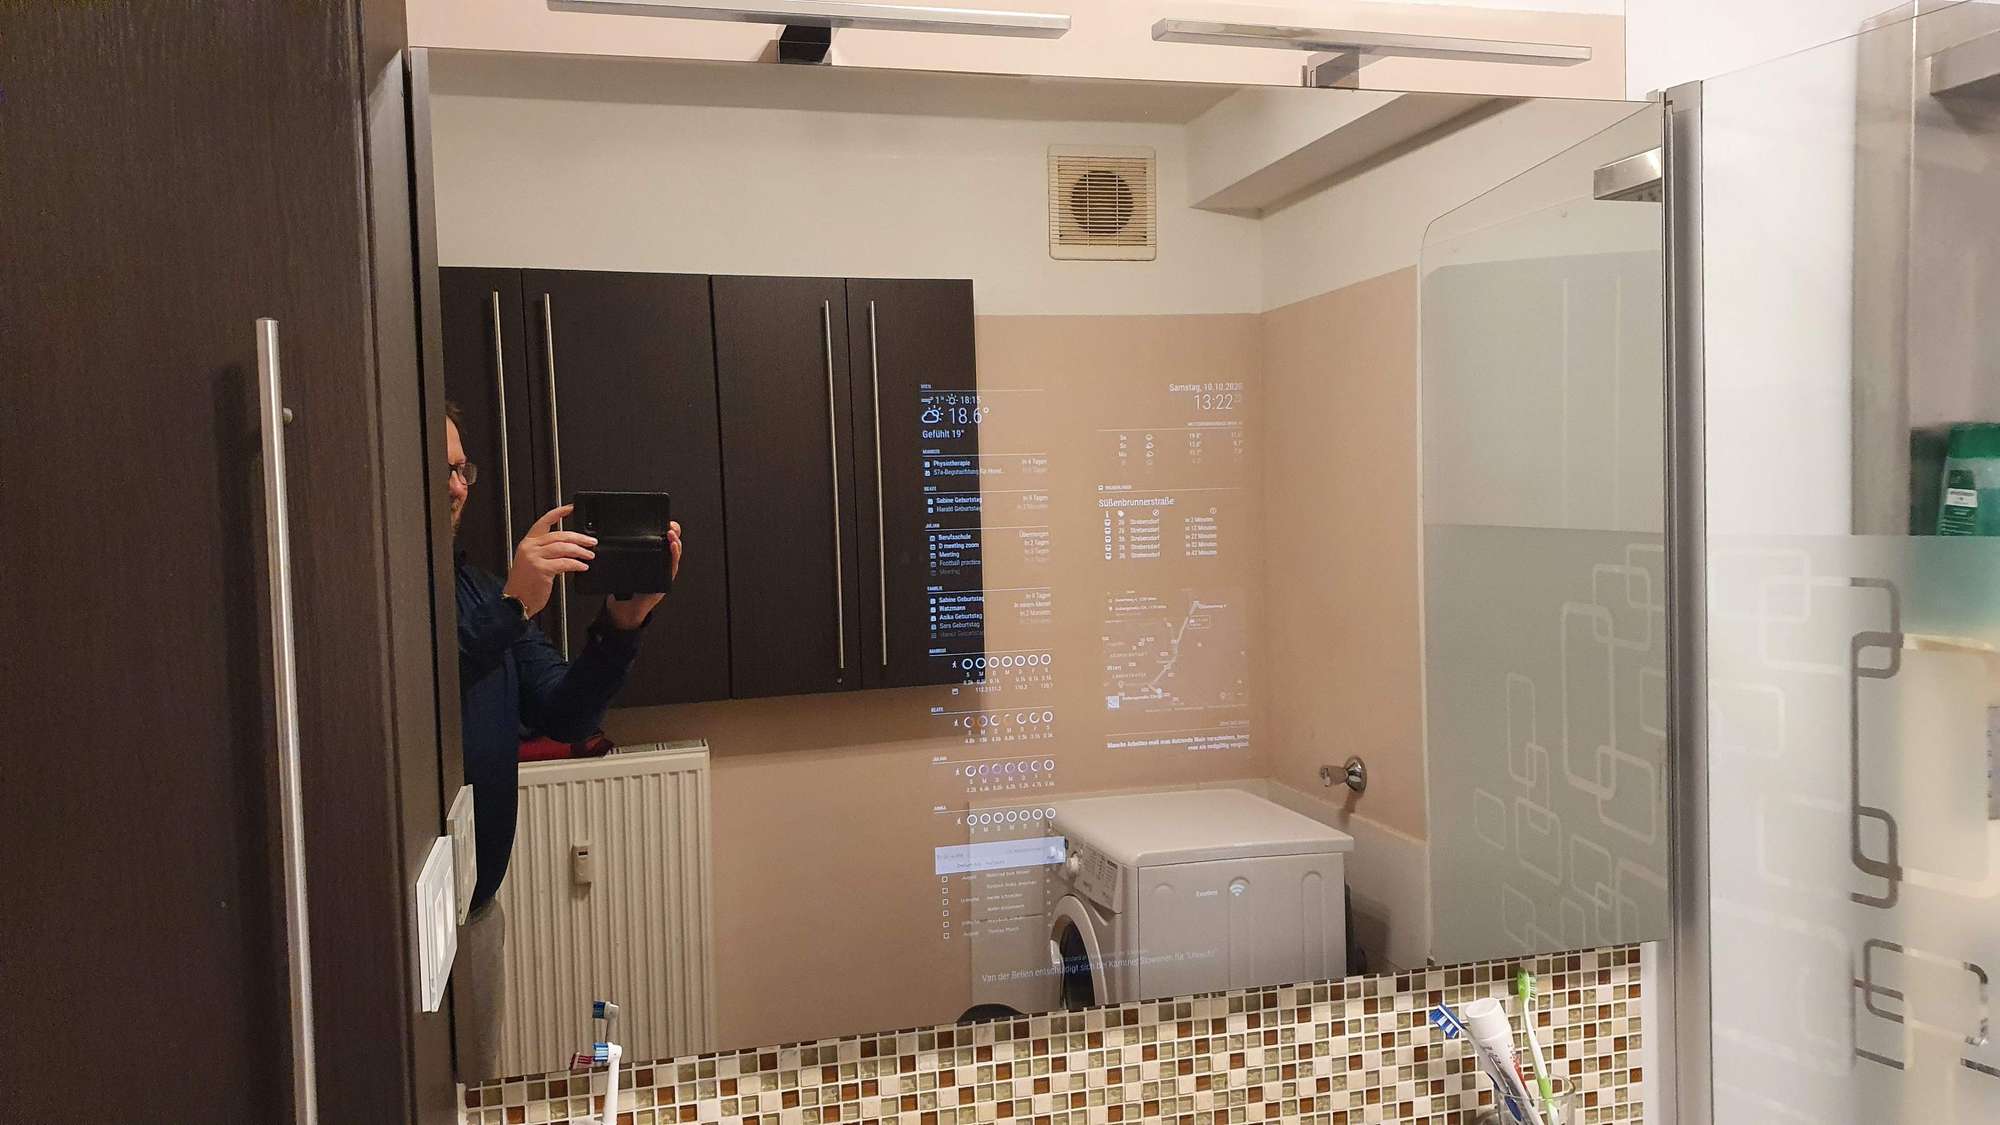
      I hope you guys don’t mind, I only got screengrabs so far. Here are the pics:

      https://ibb.co/Np8dtsy
      https://ibb.co/r6HDVtT

      Materials used:
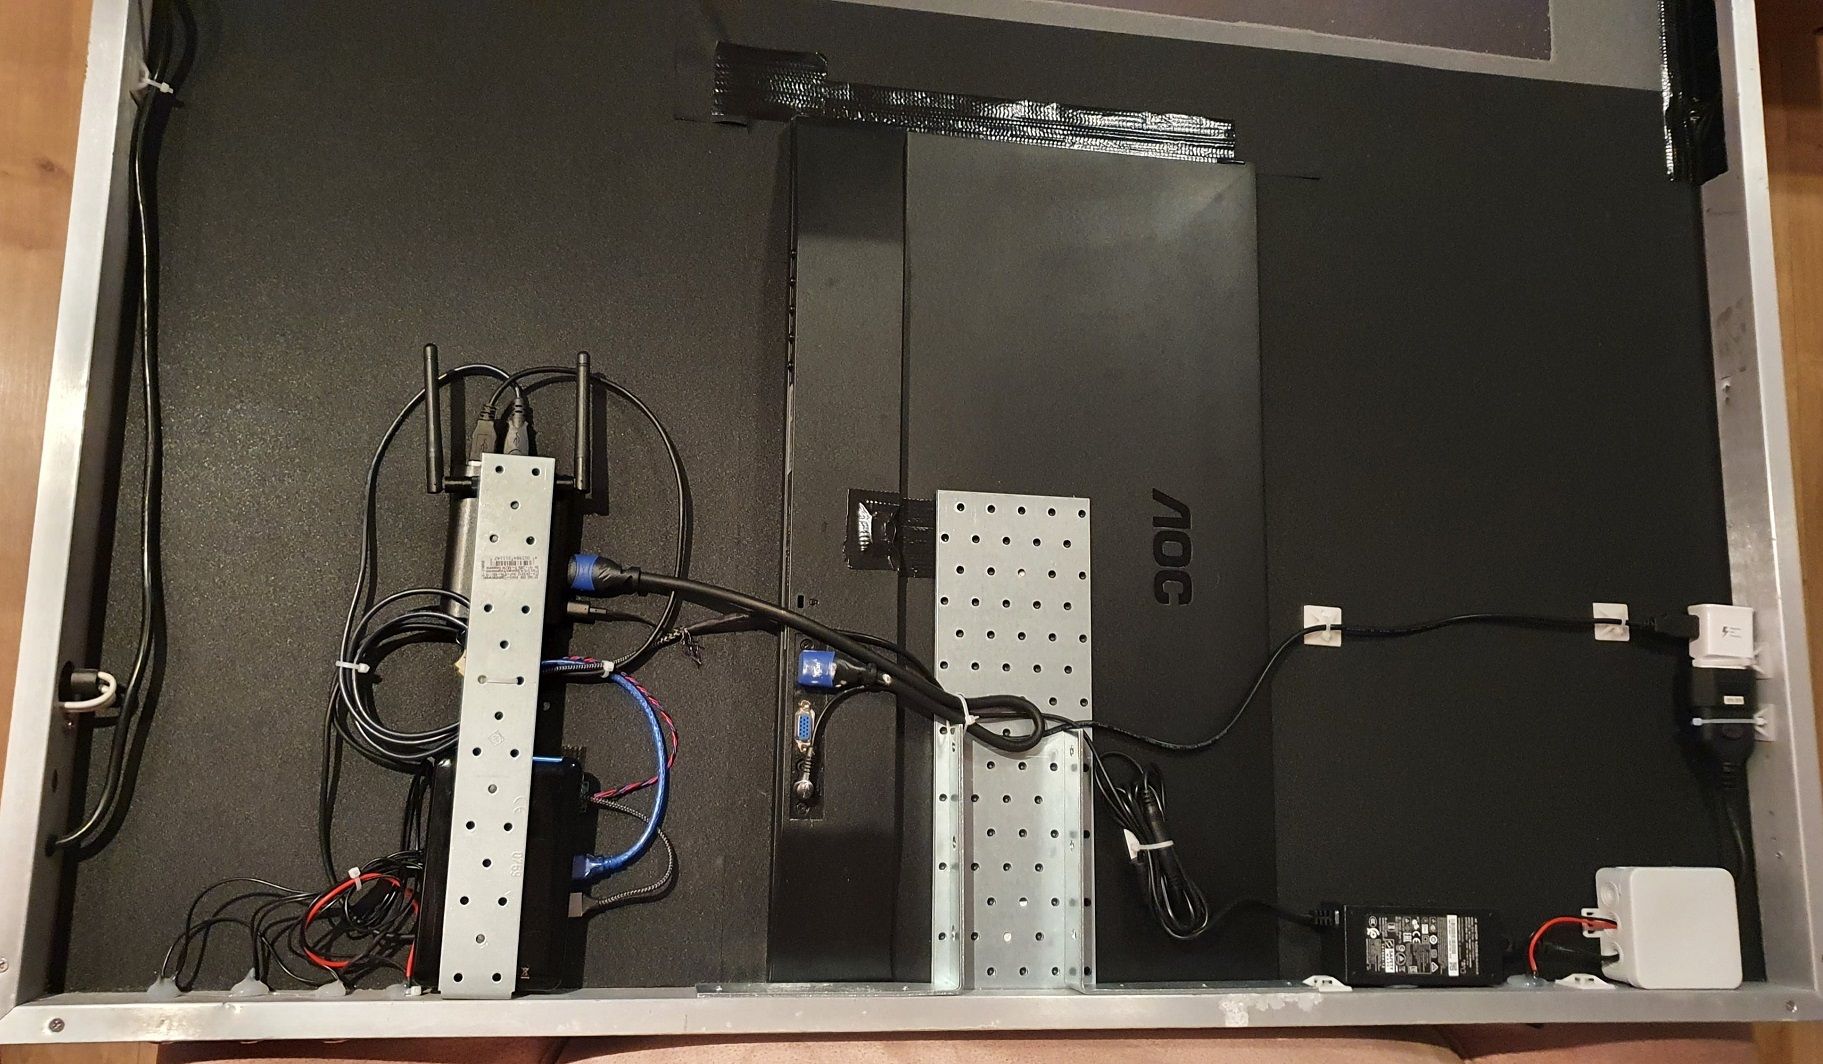
      80x110cm metal frame from my current bathroom mirror
      4mm Pilkington Mirropane from glas-star.de
      Raspberry 2
      Benq 24" monitor
      DollaTek microwave sensor (as PIR replacement to work behind the glass)
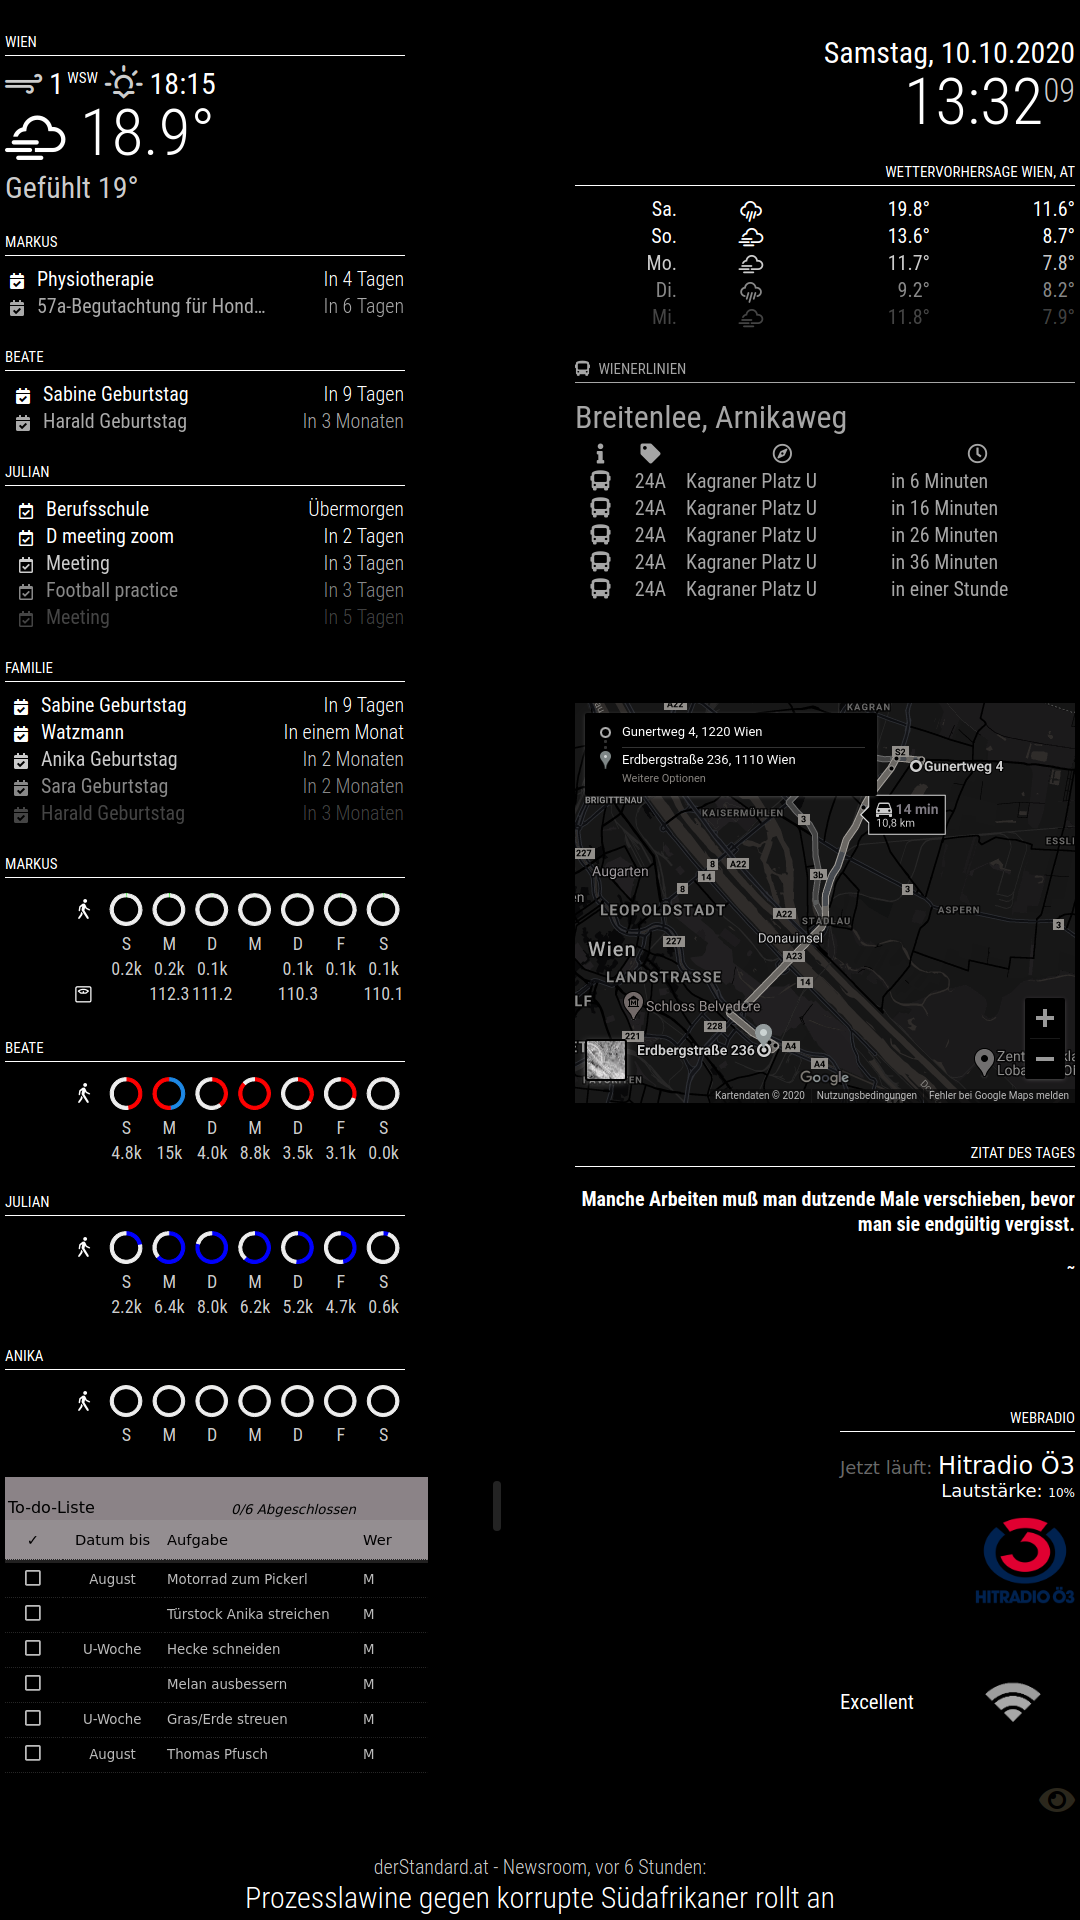
      Modules used:
      clock
      calendar
      MMM-GoogleFit
      currentwheather
      wheatherforecast
      MMM-WienerLinien
      MMM-iFrameReload
      MMM-GQuotes
      newsfeed
      MMM-network-signal
      MMM-Screencast

      I have done a bit fiddling and playing around with some modules settings, hope it’s ok to share a bit of my journey 😉

      For the calendars, I have created a family google-calendar, which I have made accessable to the family members. Every member can add events to this calendar, and they are then displayed in this first instance of the calendar module. The rest are 3 more instances for myself and the other family members (excluding my teenage daughter who doesn’t want to share her calender for whatever reason…)

      For the GoogleFit modules, I have created 4 instances for all family members, bought a bluetooth scale, connected it up to each mobile (except for my wife who doesn’t want to show the weight for whatever reason…) and linked each instance to each google accounts. I modified the colors of the steps-rings (which display the percentage of the reached goal) to match each family member’s color.

      For the WienerLinien module (public transport of Vienna), it turned out that the width was constantly changing depending on the name of the destination, taking with it the widths of the other modules on the right side. So I found the option to create a custom.css, where I set a fixed width (which is very likely very clear for the most of you, it did take me a bit searching though - I hadn’t registered to this nice forum at that time yet)

      I’m a bit proud of the next module to be honest. I used the iFrameReload module to display a google maps frame showing the way from my home to my current workplace. It refreshes every 10 minutes and shows how long it currently takes me to get there by car (at the time of the screengrab it was 11 min.). To have it appear in a matching style I used filter:greyscale 100% plus invert 100% within the js of the module. This way I managed a quite decent google display without the need of an API key.

      The rest is pretty standard. The screencast is showing a youtube video on the second screengrab.
      Thanks for taking the time to read, very looking forward for the glass so I can hopefully soon show you the real thing!

      posted in Show your Mirror
      Meidlmarkus
      Meidlmarkus
    • Frameless Bathroom Mirror - Part 2: Hardware and Build

      This is part 2 of my bathroom mirror build, part 1 is here:
      Frameless Bathroom Mirror - Part 1
      I hope it is ok to use 2 threads.

      First of all, here is me with the final product 🙂
      et voila

      Last month, the glass has arrived from https://www.glas-star.de/

      package

      The basis of this project was my original bathroom mirror. It consisted of a 110 x 80 cm frame of 2 x 4 cm aluminium profiles and the mirror glass glued to the frame with double-sided mirror tape. In the next picture I freed the frame from the old mirror.

      frame with shards
      and here cleaned and tidied up for the fitting of the spy glass. For this I used a hot air gun and a untility knife blade.
      clean frame
      You can see here that the old mirror had some electric wiring (for an in-built neon tube lighting), which I salvaged for the magic mirror project.

      After glueing the new glass to the frame with 2-K-epoxy-glue, I covered the parts of the mirror that would later not be covered by the monitor.
      I used black window film for this, here is an amazon link:
      https://www.amazon.de/gp/product/B0785D9LCM/ref=ppx_yo_dt_b_asin_title_o01_s00?ie=UTF8&psc=1
      glass covered

      Since the frame only leaves 4cm space, I had to disassemble the monitor, so that the display and the electronics would fit.
      I used tinsnips to dismantle the housing of the monitor’s electronics and soldered extensions to the led backlights.
      controls for monitor

      I screwed brackets for the display panel and the monitor electronics into the aluminum frame and used power tape to support. I used adhesive bases and zipties to tidy up the wirings. I used a junction box for the mains connections (to which I later added additional lighting)
      frame with display and mains box

      I have adapted the MMM-buttons module to read a toggle switch to switch on and off the MMM_Webradio module, 3 momentary switches are used to control the volume and select the next radio station, you can see them in the next picture, here is a link to the buttons that I used:
      https://www.amazon.de/gp/product/B07RXK544N/ref=ppx_yo_dt_b_asin_title_o02_s00?ie=UTF8&psc=1
      radio buttons
      You can also see the microwave sensor here, which I use to detect people in front of the mirror from behind the glass.

      Finally, I have added 2 additional LED lamps. The reason for this is that the original neon light was not strong enough to shine through the tinted glass. (For the neon light I had left out a stripe in the mirror foil, which I then covered with frosted glass film.)
      mirror with LED lamps

      Things I changed during the build:
      It turned out that the wlan dongle whith which I had tested was too weak and slow once the mirror was monted on the wall. Therefore I got a 5GHz Wlan dongle, which works fine, no drivers required for the raspberry:
      https://www.amazon.de/gp/product/B00LLIOT34/ref=ppx_yo_dt_b_asin_title_o08_s00?ie=UTF8&psc=1

      Behind the glass lamps are too weak to give proper light. Instead, I added these to the mirror:
      https://www.amazon.de/gp/product/B07YD5NGVJ/ref=ppx_yo_dt_b_asin_title_o07_s00?ie=UTF8&psc=1

      In addition to what I described in part 1 (link), I have added a bluetooth dongle to stream the webradio to a bluetooth speaker:
      https://www.amazon.de/gp/product/B0096Y2HFW/ref=ppx_yo_dt_b_asin_title_o02_s01?ie=UTF8&psc=1

      Final thoughts on the glass: The reflection is absolutely fine, albeit a little less bright and clear than a “real” mirror. The visibility of the text is ok, but you should set the monitor to the brightest level. The look and feel of the glass comes really close to an ordinary mirror.

      posted in Show your Mirror
      Meidlmarkus
      Meidlmarkus
    • RE: Frameless Bathroom Mirror - Part 2: Hardware and Build

      Since my Magic Mirror went live, it received 2 major upgrades:

      The monitor died and was replaced

      Still not sure on how it died. I suspect that the button control caused a short circuit with the metal casing of the monitor control box. Or maybe it was moisture that got into it after all.
      Anyway, I replaced it with a much slimmer monitor of the same size. Another advantage was that it had a well sealed external power brick instead of the somewhat sketchily mounted power board of the original monitor.
      This is what I got:
      https://www.amazon.de/gp/product/B07C4B1ZXC/ref=ppx_yo_dt_b_asin_title_o02_s00?ie=UTF8&psc=1
      Very cheap, very slim, way lighter, way better sealed and brighter than the first monitor I head

      The Raspberry is now running from HDD

      The raspberry 2 kept crashing. All the time, every other day at least. Checked and changed power supply, no improvement. Re-wrote image on sd-card, no improvement. Updated os and mm, no improvement. I even set up a cron job to reboot once per night. Nothing helped.
      So I investigated and read a lot on how an sd card isn’t really suitable to run an os over a long time (at least that is what I made of it). So I decided to run it from a hdd. Was originally planning to go for an sdd, but decided well I don’t want to spend another 50-100 EUR, including an usb adapter. So I digged up a 2.5’’ HDD which I had laying around (to be precise: being uselessly sticked to the back of my tv). Looked up a bunch of tutorials on how to run a raspberry 2 from HDD. (Note: it actually still boots from sd, but hands over control to HDD immediately after startup). It involves:

      • burning a new raspberry os image on the HDD and on the sd card
      • attaching the HDD and starting up the pi
      • with sudo blkid getting and writing down the PARTUUID of the rootfs partition of the HDD
      • replacing the PARTUUID of the sd card with the one written down in the previous step in both:
      • the /boot/cmdline.txt, and also in the /etc/fstab

      After that you should expand the size of the filesystem on the HDD, since it has initially only the size of the image you burned on it. Note, this can’t be done with raspi-config, but with fdisk

      It looks like (and honestly is) quite some task to get it to run (at least it was for me, a half-experienced Linux user). I found it worth to investigate though, educate myself about Linux, the file system, and other aspects and spend some time with trial and error.
      You will find plenty of instructions on the internet, some more useful than others, but you will find your way through it, too.

      Finally it is running really fine now. I had no crashes since (and it is over a week running now), so I guess it is worth the effort. 🙂
      Sure, I could have thrown out the Raspberry pi 2 and replaced it with a 4, seeing if that helps, but I really wanted to see if I can make it work with the good old pi2.

      So I ended up installing the mm from scratch (now on HDD), thereby getting the latest version, fetching the latest versions of the modules I use, redoing the modifications I did to them, re- and re- and rearranging the modules until I finally had it running as I wanted it to.

      Here is a pic with the new monitor, the HDD and some cleaning up:
      back_medium.jpg

      And here is the front, one more time:
      20201010_132227.jpg

      Here is a current snapshot from the browser (with the webradio running):
      2020-10-10-133211_1080x1920_scrot.png

      Cheers!

      posted in Show your Mirror
      Meidlmarkus
      Meidlmarkus
    • RE: New screen after configuring MM --> can't see edges

      Don’t change the resolution, change the overscan setting in /boot/config.txt.

      In your case I assume you will have to play with
      overscan_right
      and
      overscan_bottom

      hope it helps, good luck!

      posted in Troubleshooting
      Meidlmarkus
      Meidlmarkus
    • RE: Frameless Bathroom Mirror - Part 1: Software and Preparations

      @bhepler yes exactly 🙂
      It is “Life on Mars” - a terrific rendition, I find.

      posted in Show your Mirror
      Meidlmarkus
      Meidlmarkus
    • RE: Frameless Bathroom Mirror - Part 1: Software and Preparations

      @Lx said in Glass on the way, but still eager to share my first try:

      Would you mind sharing the module’s code from your config file, as well as the modified MMM-iFrameReload.js ?

      Absolutely no problem, glad if I can help 🙂

      Here is the MMM-iFrameReload configuration in config/config.js:

      {
      			module: 'MMM-iFrameReload',
      			position: 'top_right',	// This can be any of the regions.
      			config: {
      				url: "https://www.google.com/maps/embed?pb=!1m28!1m12!1m3!1d42533.999773346404!2d16.411988327113605!3d48.2186535328082!2m3!1f0!2f0!3f0!3m2!1i1024!2i768!4f13.1!4m13!3e0!4m5!1s0x476d015a39ef4d09%3A0x9517276e2c623b28!2sGunertweg%204%2C%201220%20Wien%2C%20%C3%96sterreich!3m2!1d48.249941799999995!2d16.4780513!4m5!1s0x476d00ab0878e79f%3A0x27ed9084b744849a!2sErdbergstra%C3%9Fe%20236%2C%20Wien!3m2!1d48.1851841!2d16.4259021!5e0!3m2!1sde!2sat!4v1581209652324!5m2!1sde!2sat",	
      				width: "100%", // Optional. Default: 400px
      				height: "400px", // Optional. Default: 800px
      				refreshInterval: 900  //Optional. Default: 3600 = 1 hour
      			}
      		},
      

      So this shows the way from my home to my office. To show a route of your own liking, process as follows:

      1. go to https://www.google.at/maps/
      2. search your destination in the left-hand google maps search box
      3. switch to navigation, enter your origin and let google calculate the route
      4. this is the important part: get the iFrame url: click the menu button on the left, select ‘share or embed map’ and select embed map.
      5. copy the iframe src into your clipboard, use the whole part between the double quotes including the https
      6. paste it in the url: part of your MMM-iFrameReload config.js

      Now you should see a colorful map after saving and restarting mm.
      If you want to have the dark-grey appearance, go into the MMM-iFrameReload.js in ~/MagicMirror/modules/MMM-iFrameReload/
      Find the line iframe.style = “border:0” and replace it with

      iframe.style = "border:0;filter: grayscale(95%) invert(100%);"
      

      Hope this helps, pls let me know if it worked!
      Cheers
      Markus

      posted in Show your Mirror
      Meidlmarkus
      Meidlmarkus
    • RE: Frameless Bathroom Mirror - Part 1: Software and Preparations

      @linsenpago The mirror has arrived like 2 weeks ago, and I have already finished the project, just preparing an update to my original post. Will describe everything there, how it worked, what I think about the glass etc (the glass is great by the way!)

      posted in Show your Mirror
      Meidlmarkus
      Meidlmarkus
    • RE: Frameless Bathroom Mirror - Part 1: Software and Preparations

      Hi @patrickgruber da hab ich eigentlich nix groß gemacht dran. Nur die Konfig angepasst.
      Probier mal diese aus:

      {
                              module: "MMM-WienerLinien",
                              position: "top_right",
                              config: {
                                  api_key: "",
                                  stations: ["941","3185"],
      			    shortenDestination: 20 
                              }
                      },
      

      Danke fürs Lob 🙂

      posted in Show your Mirror
      Meidlmarkus
      Meidlmarkus

    Latest posts made by Meidlmarkus

    • RE: Frameless Bathroom Mirror - Part 2: Hardware and Build

      Hallo @HansB
      danke fürs Lob, sorry für die superspäte Antwort…
      Ich verwende das MMM_Webradio Modul. Habe es ein wenig verändert, um die Logos für die Radiostationen anzuzeigen. Aber so wie es ist funktioniert es auch gut (habe ehrlich gesagt schon lange nicht mehr meine Module aktualisiert, weiß daher nicht, wie es aktuell tut)
      Viel Erfolg und liebe Grüße

      posted in Show your Mirror
      Meidlmarkus
      Meidlmarkus
    • RE: Frameless Bathroom Mirror - Part 2: Hardware and Build

      hi @bachoo786
      sorry for the late late reply, haven’t been on the forum for quite some time.
      Yes, I did have problems with dropping wifi. Not quite sure what it caused, might be the aluminium frame, maybe the mirror coating on the glass, idk. Had to replace the wifi module. Best of luck and cheers
      Markus

      posted in Show your Mirror
      Meidlmarkus
      Meidlmarkus
    • RE: Frameless Bathroom Mirror - Part 2: Hardware and Build

      Since my Magic Mirror went live, it received 2 major upgrades:

      The monitor died and was replaced

      Still not sure on how it died. I suspect that the button control caused a short circuit with the metal casing of the monitor control box. Or maybe it was moisture that got into it after all.
      Anyway, I replaced it with a much slimmer monitor of the same size. Another advantage was that it had a well sealed external power brick instead of the somewhat sketchily mounted power board of the original monitor.
      This is what I got:
      https://www.amazon.de/gp/product/B07C4B1ZXC/ref=ppx_yo_dt_b_asin_title_o02_s00?ie=UTF8&psc=1
      Very cheap, very slim, way lighter, way better sealed and brighter than the first monitor I head

      The Raspberry is now running from HDD

      The raspberry 2 kept crashing. All the time, every other day at least. Checked and changed power supply, no improvement. Re-wrote image on sd-card, no improvement. Updated os and mm, no improvement. I even set up a cron job to reboot once per night. Nothing helped.
      So I investigated and read a lot on how an sd card isn’t really suitable to run an os over a long time (at least that is what I made of it). So I decided to run it from a hdd. Was originally planning to go for an sdd, but decided well I don’t want to spend another 50-100 EUR, including an usb adapter. So I digged up a 2.5’’ HDD which I had laying around (to be precise: being uselessly sticked to the back of my tv). Looked up a bunch of tutorials on how to run a raspberry 2 from HDD. (Note: it actually still boots from sd, but hands over control to HDD immediately after startup). It involves:

      • burning a new raspberry os image on the HDD and on the sd card
      • attaching the HDD and starting up the pi
      • with sudo blkid getting and writing down the PARTUUID of the rootfs partition of the HDD
      • replacing the PARTUUID of the sd card with the one written down in the previous step in both:
      • the /boot/cmdline.txt, and also in the /etc/fstab

      After that you should expand the size of the filesystem on the HDD, since it has initially only the size of the image you burned on it. Note, this can’t be done with raspi-config, but with fdisk

      It looks like (and honestly is) quite some task to get it to run (at least it was for me, a half-experienced Linux user). I found it worth to investigate though, educate myself about Linux, the file system, and other aspects and spend some time with trial and error.
      You will find plenty of instructions on the internet, some more useful than others, but you will find your way through it, too.

      Finally it is running really fine now. I had no crashes since (and it is over a week running now), so I guess it is worth the effort. 🙂
      Sure, I could have thrown out the Raspberry pi 2 and replaced it with a 4, seeing if that helps, but I really wanted to see if I can make it work with the good old pi2.

      So I ended up installing the mm from scratch (now on HDD), thereby getting the latest version, fetching the latest versions of the modules I use, redoing the modifications I did to them, re- and re- and rearranging the modules until I finally had it running as I wanted it to.

      Here is a pic with the new monitor, the HDD and some cleaning up:
      back_medium.jpg

      And here is the front, one more time:
      20201010_132227.jpg

      Here is a current snapshot from the browser (with the webradio running):
      2020-10-10-133211_1080x1920_scrot.png

      Cheers!

      posted in Show your Mirror
      Meidlmarkus
      Meidlmarkus
    • RE: Frameless Bathroom Mirror - Part 1: Software and Preparations

      @cyberphox sure, no problem, here you go:

      		{
      			module: 'MMM-Screencast',
      			position: 'bottom_right', // This position is for a hidden <div /> and not the screencast window
      			config: {
      				position: 'bottomCenter',
      				height: 800,
      				width: 1200,
      			}
              	},


      cheers
      Markus

      posted in Show your Mirror
      Meidlmarkus
      Meidlmarkus
    • RE: MMM-GoogleFit

      @banbutcher cool that you got it to work 🙂
      About weight graph: Well the GoogleFit module would have to be extended with this functionality, it would have to be coded (nothing that could be done with a quick fix, I’m afraid 😉 )

      posted in Health
      Meidlmarkus
      Meidlmarkus
    • RE: Frameless Bathroom Mirror - Part 1: Software and Preparations

      Hi @patrickgruber da hab ich eigentlich nix groß gemacht dran. Nur die Konfig angepasst.
      Probier mal diese aus:

      {
                              module: "MMM-WienerLinien",
                              position: "top_right",
                              config: {
                                  api_key: "",
                                  stations: ["941","3185"],
      			    shortenDestination: 20 
                              }
                      },
      

      Danke fürs Lob 🙂

      posted in Show your Mirror
      Meidlmarkus
      Meidlmarkus
    • RE: MMM-GoogleFit

      Hi,
      open: /home/pi/MagicMirror/modules/MMM-GoogleFit/MMM-GoogleFit.js in a notepad.
      Change line 112 from
      total = total.toFixed(0);
      to
      total = total.toFixed(1);

      Just tried it out, it works (I also like it 😉 )
      But please note that any change in a module will be overwritten as soon as you do an update of the module.

      Cheers
      Markus

      posted in Health
      Meidlmarkus
      Meidlmarkus
    • Frameless Bathroom Mirror - Part 2: Hardware and Build

      This is part 2 of my bathroom mirror build, part 1 is here:
      Frameless Bathroom Mirror - Part 1
      I hope it is ok to use 2 threads.

      First of all, here is me with the final product 🙂
      et voila

      Last month, the glass has arrived from https://www.glas-star.de/

      package

      The basis of this project was my original bathroom mirror. It consisted of a 110 x 80 cm frame of 2 x 4 cm aluminium profiles and the mirror glass glued to the frame with double-sided mirror tape. In the next picture I freed the frame from the old mirror.

      frame with shards
      and here cleaned and tidied up for the fitting of the spy glass. For this I used a hot air gun and a untility knife blade.
      clean frame
      You can see here that the old mirror had some electric wiring (for an in-built neon tube lighting), which I salvaged for the magic mirror project.

      After glueing the new glass to the frame with 2-K-epoxy-glue, I covered the parts of the mirror that would later not be covered by the monitor.
      I used black window film for this, here is an amazon link:
      https://www.amazon.de/gp/product/B0785D9LCM/ref=ppx_yo_dt_b_asin_title_o01_s00?ie=UTF8&psc=1
      glass covered

      Since the frame only leaves 4cm space, I had to disassemble the monitor, so that the display and the electronics would fit.
      I used tinsnips to dismantle the housing of the monitor’s electronics and soldered extensions to the led backlights.
      controls for monitor

      I screwed brackets for the display panel and the monitor electronics into the aluminum frame and used power tape to support. I used adhesive bases and zipties to tidy up the wirings. I used a junction box for the mains connections (to which I later added additional lighting)
      frame with display and mains box

      I have adapted the MMM-buttons module to read a toggle switch to switch on and off the MMM_Webradio module, 3 momentary switches are used to control the volume and select the next radio station, you can see them in the next picture, here is a link to the buttons that I used:
      https://www.amazon.de/gp/product/B07RXK544N/ref=ppx_yo_dt_b_asin_title_o02_s00?ie=UTF8&psc=1
      radio buttons
      You can also see the microwave sensor here, which I use to detect people in front of the mirror from behind the glass.

      Finally, I have added 2 additional LED lamps. The reason for this is that the original neon light was not strong enough to shine through the tinted glass. (For the neon light I had left out a stripe in the mirror foil, which I then covered with frosted glass film.)
      mirror with LED lamps

      Things I changed during the build:
      It turned out that the wlan dongle whith which I had tested was too weak and slow once the mirror was monted on the wall. Therefore I got a 5GHz Wlan dongle, which works fine, no drivers required for the raspberry:
      https://www.amazon.de/gp/product/B00LLIOT34/ref=ppx_yo_dt_b_asin_title_o08_s00?ie=UTF8&psc=1

      Behind the glass lamps are too weak to give proper light. Instead, I added these to the mirror:
      https://www.amazon.de/gp/product/B07YD5NGVJ/ref=ppx_yo_dt_b_asin_title_o07_s00?ie=UTF8&psc=1

      In addition to what I described in part 1 (link), I have added a bluetooth dongle to stream the webradio to a bluetooth speaker:
      https://www.amazon.de/gp/product/B0096Y2HFW/ref=ppx_yo_dt_b_asin_title_o02_s01?ie=UTF8&psc=1

      Final thoughts on the glass: The reflection is absolutely fine, albeit a little less bright and clear than a “real” mirror. The visibility of the text is ok, but you should set the monitor to the brightest level. The look and feel of the glass comes really close to an ordinary mirror.

      posted in Show your Mirror
      Meidlmarkus
      Meidlmarkus
    • RE: Frameless Bathroom Mirror - Part 1: Software and Preparations

      @linsenpago The mirror has arrived like 2 weeks ago, and I have already finished the project, just preparing an update to my original post. Will describe everything there, how it worked, what I think about the glass etc (the glass is great by the way!)

      posted in Show your Mirror
      Meidlmarkus
      Meidlmarkus
    • RE: Frameless Bathroom Mirror - Part 1: Software and Preparations

      @linsenpago
      Hi, no, unfortunately I’m still waiting… It’s been over a month now, and no news. I wrote a mail yesterday with no response yet 😞

      Nein, leider immer noch nicht da. Habe gestern mail geschrieben, bis jetzt noch keine Reaktion. Werde morgen mal anrufen…

      Grüße zurück aus Wien!

      Edit: it is announced to arrive tomorrow! Die Spedition kommt morgen 🙂 Yeeeyy!

      posted in Show your Mirror
      Meidlmarkus
      Meidlmarkus