Read the statement by Michael Teeuw here.
Prepping my first build. Care to check my work?
-
@3DPrintedWaffles It looks like you’re off to a good start. I do have a couple thoughts:
- If your monitor is going to be smaller than your glass, you’ll want black construction paper or felt to cover the area of the glass that are not covered by the monitor. This includes the edges of your internal framework.
- I would recommend wood screws for the internal framework. They don’t need to be large. 1.5" would probably do just fine.
- I don’t know about the Liquid Nails part. I’m not familiar with it enough to say whether or not it will keep your glass attached to monitor and/or framework. I would consult your local hardware store.
- Give a thought to power. Are you routing the power through the wall? Through a hole in your internal framework? Consider that at the moment, you have to power the Pi and the monitor, so that’s two cords.
IIRC, the people who apply window film a lot recommend using a spray bottle with water or windex on the glass and then applying the film over top. The liquid will let you slide the film a bit while you get it positioned properly. Once the liquid evaporates, the film should remain in position.
Bezel-free is certainly possible. It just requires slightly better construction skills and a bit more planning than your standard magic mirror. Normally, the bezel on the frame is what holds the glass up against the monitor face (and the monitor is usually the same size as the glass). Without that bezel, you’ll have to rely on the liquid adhesive. So long as you trust the Liquid Nails product, you should be good to go.
-
Just here to echo and add to the comments from @bhepler:
- Liquid nails can work, but you will need to clamp (or otherwise brace) the corners to let it dry. Usually for a wood joint you will use fasteners (nails, screws) and reinforce with glue. If not using fasteners, you can also use a biscuit or tongue to reinforce the joint.
- If you use screws, pre-drill the holes to avoid splitting your wood. You may also consider whether you want to create butt joints (square) or miter joints (angle).
- The bezel is also often what hides the electronics behind your mirror. Without the bezel, you may still want a skirt behind the mirror to conceal those elements.
- With bevel-less, you may want to find the most opaque material possible to prevent light entering the back of your mirror (that would otherwise be mostly blocked by the bezel/skirt).
- I have no experience with gluing to glass, but would worry about seeing the glue beneath your mirror.
- Also, given that your glass and display will be different sizes, if you mount the display in a corner of the glass you will need multiple mounting points for your mirror – it won’t hang level from a single point (as it won’t balance).
-
@bhepler said in Prepping my first build. Care to check my work?:
- Give a thought to power. Are you routing the power through the wall? Through a hole in your internal framework? Consider that at the moment, you have to power the Pi and the monitor, so that’s two cords.
That is a good keyword. If u just want one cord u can think about using a step-down converter.
Don’t know what Voltage your monitor will be using. In my case my monitor needs 12V and the RPi 5V as normal.So i choosed a big 12V power supply (5A or 60W) to power both.
Then i ordered a DC-DC Step Down converter: https://www.amazon.com/DROK-Converter-Step-down-Regulator-Stabilizer/dp/B019RKVMKU/ref=sr_1_5?ie=UTF8&qid=1516968110&sr=8-5&keywords=lm2596&th=1
connect the 12V output of the power supply to the converter input and parallel to your monitor.
adjust the converter output to 5 - 5.1V and connect it with your Pi :)You can see an example here: https://forum.magicmirror.builders/topic/6048/my-first-mirror-until-now/12
-
Or, you can do it the lazy old man’s way. :-)
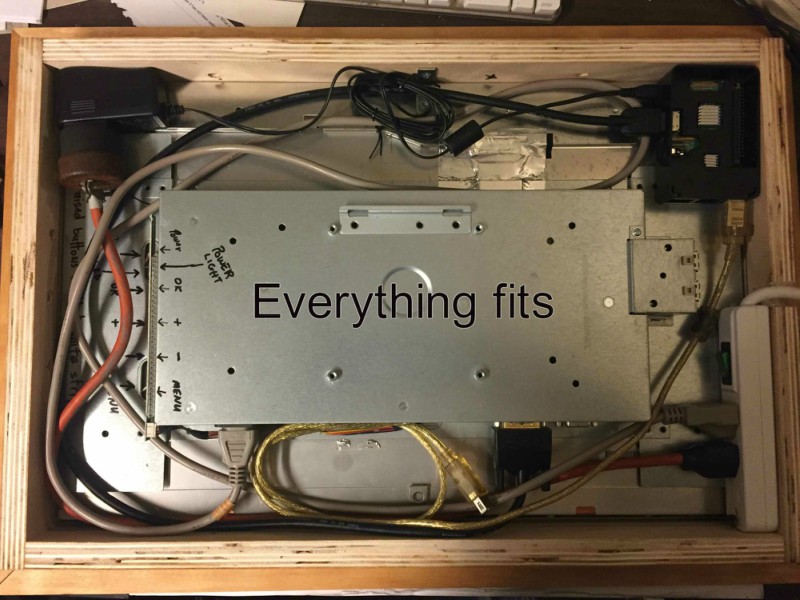
Mini power strip (inside mirror frame) your monitor and Pi both plug into and you still have an outlet available for something else. The power strip has an on/off switch which comes in very handy as a power switch for the Pi and only 1 wire comes out of the frame from the power strip.
Peace!
-
@Mykle1
Hmm I may go that route. I like how well contained everything sits in your rig.What I should have put in my original parts list is that I snagged one of these guys Cablelera Power Cord Extension and Splitter, NEMA 5-15P to NEMA 5-15R x 2, 16 AWG, 13A, 125V (ZWACPQAG-14) https://www.amazon.com/dp/B00FRODUR4/ref=cm_sw_r_cp_apa_Hh2AAbABEH35N (sorry, on mobile) to deal with the power issue, though it miiiight not be the most elegant solution.
-
@3DPrintedWaffles said in Prepping my first build. Care to check my work?:
Hmm I may go that route. I like how well contained everything sits in your rig.
Advantages:
When you shut down your Pi how will you turn it back on? Pull the plug and plug it back in? Hell no! A (mini) power strip with a breaker switch works perfectly. Turn the switch off (after shutting down your Pi) and simply turn it back on. Boom! The Pi now has an on/off switch.
Extra outlet. After you’ve plugged in your Pi and your monitor, what then? My mini power strip has three outlets. That’s all I needed, but as builds become more complicated and require power for other devices (LED’s etc) then a six outlet strip can be affixed to the wall of the mirror box. Mine is on the bottom.
Less cabling. With the power strip you can modify/make extensions of exact length so there’s less clutter behind your mirror. I made a short orange extension (see picture) because the power plug for the Pi “stood up” when plugged in. I couldn’t have that. Now it “lays down”. Yes, you could do that without a power strip but do you really want to splice all that wiring? And how would that look? Hell no! (I like saying that) :-)
This is just my opinion, and others may offer you better solutions, but I think this a very efficient and neat way of doing things, and you get the added benefit of an on/off switch.
P.S. At the time of this build the mini power strip was a $5 add on item at Amazon. You can’t beat that with a stick. :-)
Peace!
-
@Mykle1 Awesome, thanks for your thorough response!
I’ve hit a snag with the monitor, I don’t know how to get the bezel off. Videos online for this same model (but apparently different sub-model) have screws and clips in places where mine does not. I’ve got the Acer AL2216W sd. Would it be ideal to just use brute force on it? Hell no! There’s gotta be a better way, but I haven’t found it. I ordered a jimmy and may just wait for it to arrive to try and crank that thing open. Any advice would be much appreciated :-)
-
@3DPrintedWaffles said in Prepping my first build. Care to check my work?:
Would it be ideal to just use brute force on it? Hell no!
Ha ha! :-)
Any advice would be much appreciated :-)
I’ve never encountered a bezel that didn’t just snap off so be as careful as you can be. I know someone that cracked a 32 monitor while removing it from the casing. :-(
-
@cruunnerr said in Prepping my first build. Care to check my work?:
@bhepler said in Prepping my first build. Care to check my work?:
- Give a thought to power. Are you routing the power through the wall? Through a hole in your internal framework? Consider that at the moment, you have to power the Pi and the monitor, so that’s two cords.
That is a good keyword. If u just want one cord u can think about using a step-down converter.
Don’t know what Voltage your monitor will be using. In my case my monitor needs 12V and the RPi 5V as normal.So i choosed a big 12V power supply (5A or 60W) to power both.
Then i ordered a DC-DC Step Down converter: https://www.amazon.com/DROK-Converter-Step-down-Regulator-Stabilizer/dp/B019RKVMKU/ref=sr_1_5?ie=UTF8&qid=1516968110&sr=8-5&keywords=lm2596&th=1
connect the 12V output of the power supply to the converter input and parallel to your monitor.
adjust the converter output to 5 - 5.1V and connect it with your Pi :)You can see an example here: https://forum.magicmirror.builders/topic/6048/my-first-mirror-until-now/12
This looks like the way to go, though perhaps a bit more advanced than I am. I think I’ll give this a go when I build my second mirror :-)
-
a last hint, which is more software suggest:
https://github.com/gilyes/pi-shutdown
order one push button more (if u tough about before), so this is nice to shutdown and boot up your Pi safely :)
-
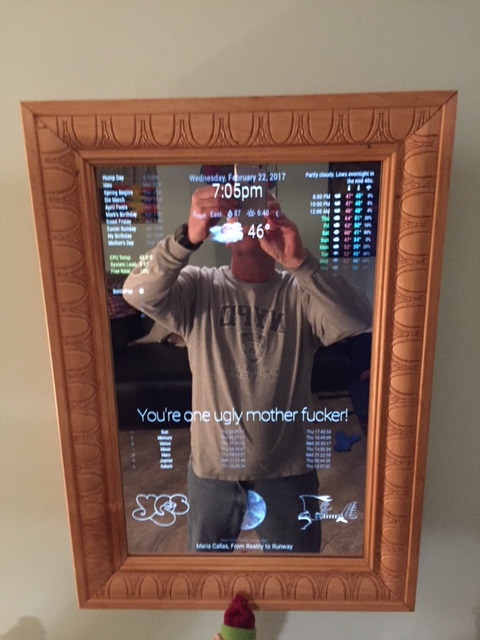
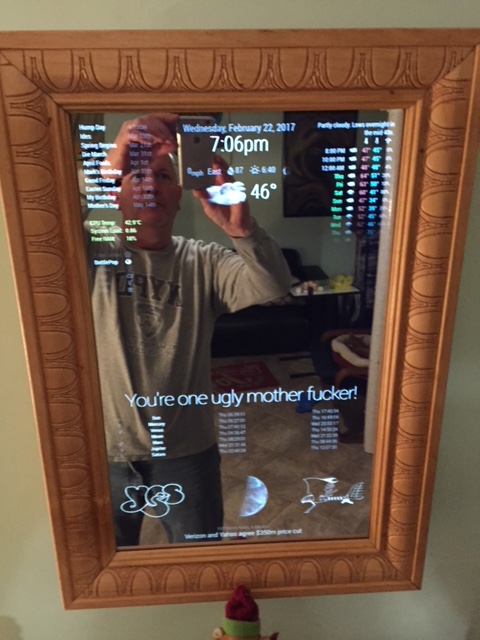
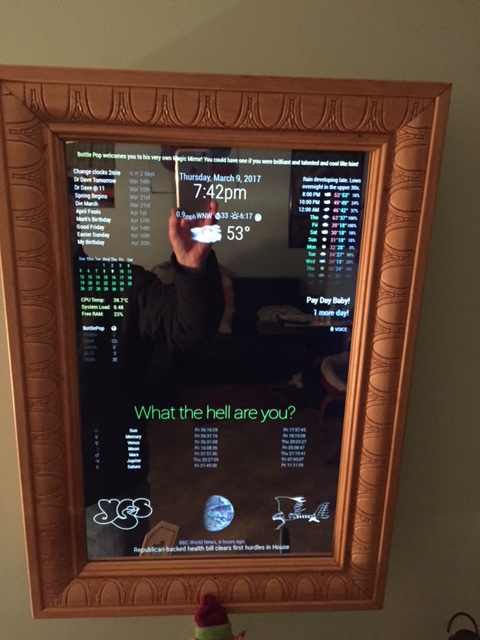
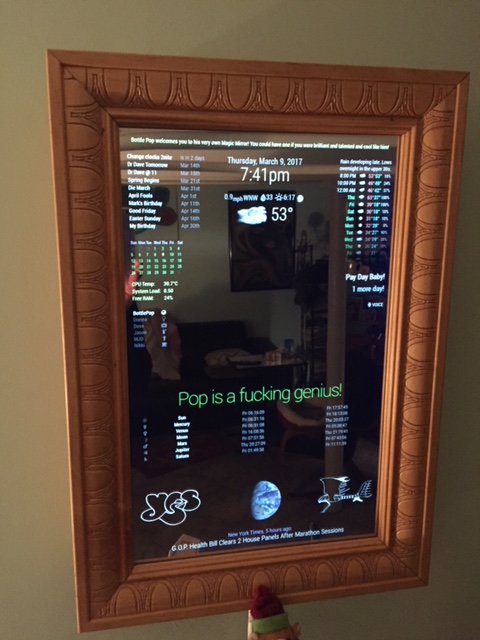
@Mykle1 Could you show me how this mirror looks from the front? Do you have it vertical or horizontal?
-
@3DPrintedWaffles said in Prepping my first build. Care to check my work?:
Could you show me how this mirror looks from the front?
-
@Mykle1 Dang, that’s pretty good lookin’. I especially like your frame. I think in some ways the frame makes or breaks it. With a poor/ugly frame it loses it’s “future tech” feel and instead looks tacky. But what you’ve done with a high quality frame keeps the mirror crisp and communicates that it’s not some poorly thrown together novelty/oddity. I think it’s similar to when you see what was once a very nice car that’s been beaten up and not lookin’ good.
I’m probably not going to try to go bezel free for my first build, but as it happens my next door neighbor is a big wood working guy. I’m gonna ask for his help with that part of this. I just gotta think of some kind of gift I can give him in return…
-
Thanks for your kind words. Really, I made that frame from a $12 piece of molding from the local Home Depot. Hell, you could buy a $6 miter box and do the same thing yourself.
You can see the whole build here
https://forum.magicmirror.builders/topic/1678/1-old-noob-1-rpi-i-can-t-believe-i-did-it-revisitedAnd you can see my use of a cheap miter box here.
https://forum.magicmirror.builders/topic/4930/vanity-mirror-thy-name-is-woman-using-laptop -
@3DPrintedWaffles said in Prepping my first build. Care to check my work?:
but as it happens my next door neighbor is a big wood working guy. I’m gonna ask for his help with that part of this. I just gotta think of some kind of gift I can give him in return…
Get him a six-pack of beer. It will take him less than five minutes to miter a frame. Or. get yourself the beer and make the frame yourself. Then you get all the glory. :-)
-
@Mykle1
Also you may have mentioned this earlier and I’ve forgotten, but what size is your monitor? I’m considering upping my size… =-/ -
@Mykle1 Heh I might do the woodwork on my next one. I plan to make at least a few of these.
He’s a very talented woodworker, he could make it look better than I ever could. Worth a few beers at the very least. I need both the rear frame and bezel cut, so maybe a 24 pack is in order :-)
-
That particular monitor is 22" diagonal. Sure, get him a case. Just don’t let him drink it until he is finished with your frame. ;-)
-
The Jimmy arrives today and unless I can come up with a better idea I’ll just be trying to crack this thing open like a monkey with a rock.
I got it for just $25 and could probably find another use for it, so I’m half tempted to look for another cheapo that may be easier to open. I dunno man. I dunno.
-
Heh! Go easy broze, go easy! :-)
Hello! It looks like you're interested in this conversation, but you don't have an account yet.
Getting fed up of having to scroll through the same posts each visit? When you register for an account, you'll always come back to exactly where you were before, and choose to be notified of new replies (either via email, or push notification). You'll also be able to save bookmarks and upvote posts to show your appreciation to other community members.
With your input, this post could be even better 💗
Register Login