Read the statement by Michael Teeuw here.
{HowTo} turn on/off your monitor (Time based, PIR/Button, App)
-
Ah I see…
I will write u this evening. We will get it working ;) -
Thank you so much!
-
@MadScientist
Alright…Because your relay turns on i think you did everything right. Probably there is a problem with your Module installation… but thats just a guess. Maybe u didn’t give the module the rights to turn on gpio’s?
sudo usermod -a -G gpio pi(the „pi“ at the end stands for your username)If u did that and it doesn’t work at all you can try to do it with an external script. Follow these steps:
cd
nano monitor_on.shput in this:
gpio -g mode 27 out
sleep 0.2
gpio -g write 27 1
save with “ctrl+x” and “y”
nano monitor_off.shput in this:
gpio -g mode 27 out
sleep 0.2
gpio -g write 27 0
save with “ctrl+x” and “y”
chmod +x monitor_on.sh(to make it executable)
chmod +x monitor_off.shnano pir.pyput in this:
#!/usr/bin/env python

import sys
import time
import RPi.GPIO as io
import subprocess

io.setmode(io.BCM)
SHUTOFF_DELAY = 120 # in seconds, how long the monitor will be on until next button press or PIR detection
PIR_PIN = 22       # 15 on the board (this needn't to be a PIR. Can be a button also)
LED_PIN = 16      # optional

def main():
    io.setup(PIR_PIN, io.IN)
    io.setup(LED_PIN, io.OUT)
    turned_off = False
    last_motion_time = time.time()

    while True:
        if io.input(PIR_PIN):
            last_motion_time = time.time()
            io.output(LED_PIN, io.LOW)
            print ".",
            sys.stdout.flush()
            if turned_off:
                turned_off = False
                turn_on()
        else:
            if not turned_off and time.time() > (last_motion_time +
                                                 SHUTOFF_DELAY):
                turned_off = True
                turn_off()
            if not turned_off and time.time() > (last_motion_time + 1):
                io.output(LED_PIN, io.HIGH)
        time.sleep(.1)

def turn_on():
	subprocess.call("sh /home/pi/monitor_on.sh", shell=True)

def turn_off():
	subprocess.call("sh /home/pi/monitor_off.sh", shell=True)

if __name__ == '__main__':
    try:
        main()
    except KeyboardInterrupt:
        io.cleanup()
save with “ctrl+x” and “y”
chmod +x pir.pyYou can check if your button works by simply typing python pir.py. Every time u move through the PIR or press the button it will show you several …
End the test with “ctrl+c”The Shutoff delay in the script defines how long the relay will be turned on after detection through the pir.
If that works u can add the script to the rc.local to start it automatically when booting up.
-
Ok, I did all that and I do get the “…” when I run the pir.py, but the relay doesn’t get triggered. Tried the monitor_oX.sh with and without sudo. Maybe I should just start all over new. Everything seems to be a bit messed up. I reverted back to motion detector only and also that isn’t working anymore in MM.
Edit: Started a new thread here.
-
@MadScientist
sorry, did a mistake. I edited my post above. just edit the *.sh files. -
Thanks a lot to cruunnerr, who has the patience of an angel!
I think there were two problems in my case and I write them here in case someone else has trouble getting the PIR+relay to work.
First: By installing the MMM-PIR-sensor module I used the wrong wiring-pi.
npm install wiring-piinstalls an old version (2.25) which - so I’ve read - doesn’t work with the Raspberyy Pi 3. It’s best to install wiringpi according to this site.Second: I used a relay which was supposed to run on 3V to 7V, but apparently that’s not the case. I guess the seller shipped the wrong relay. So I had an old relay lying around which should only run on 5V but it works nicely on my RPi.
Now everything is working, except I get some phantom triggers of the relay every couple of minutes. But I will look into it once everything is set up completely. Maybe I have something around here that can trigger the PIR sensor even if it’s covered by a cloth.
-
that is nice to know… So wiring-pi installs an old version?! Than i need to update my tutorial ^^Thanks mate
And how do you connect the relay? What relay do u use? is it active low or active high? U can try to connect a transistor or an pull up/down resistor to it, so that should disable the trigger from it. If u want to try i can send an image how to connect. It can also be, that your Power supply of the RPi is to small…
-
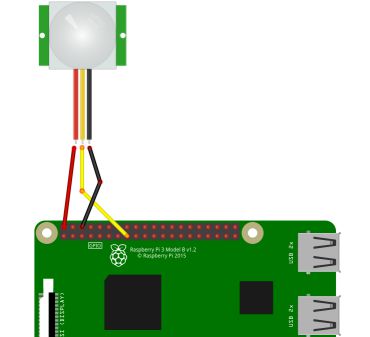
The is connected to pin 15 (GPIO 27), 17 (3.3V), and 20 (GND). I tried to post a link to the it, but then this post is flagged as spam. It’s just a cheap relay from Aliexpress.
No idea if that relay is active high or low, but does it matter? It just switches between to connections, so if the relay port 1-2 or 2-3 are active shouldn’t matter, right?
I am using a 3.1A power supply for the Pi. Later I will connected it via a 8A buck-boost-module to a 12V/5A power supply that will power the screen. The Pi will get the power from before the relay so it won’t switch itself off ;-)
Please send a picture, I will gladly try, once I have the extra party I might need (transistor or resistor).
-
I am sorry bro, but u did it wrong :(
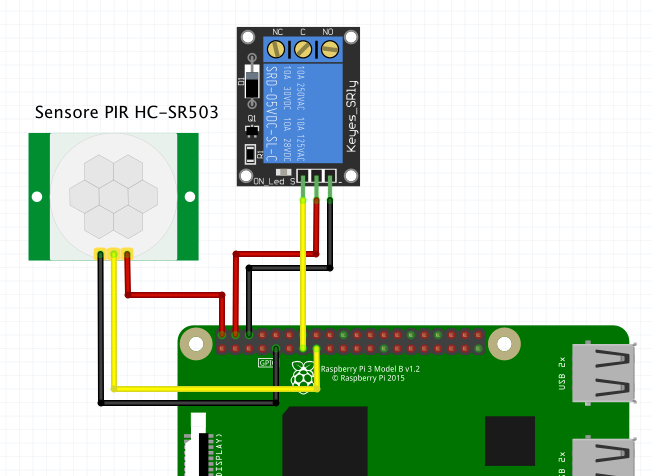
U need to connect the relay with the 5v pin! Look at my tutorial at around Point 5. There is a picture how to connect. Just leave the button away
Relay Raspberry + Pin 2 or 4 (5V) - Pin 6 or any other GND (GND) in PIN 13 (GPIO 27) -
I did that in the very beginning but then relay isn’t working at all. It only works with 3.3V. No idea why.
-
Now everything is working, except I get some phantom triggers of the relay every couple of minutes. But I will look into it once everything is set up completely. Maybe I have something around here that can trigger the PIR sensor even if it’s covered by a cloth.
That pretty much sums up my experience as well… I used to have the pir module working great (I didn’t use a relay, just screen off/on). It started acting up so I tried all of the following:
Using script
Putting pir sensor in a box to avoid trigger sources
A different pir sensor (same type as I had previously working)
Completely different type of pir sensor
Complete rebuild of pi from scratch & reinstall mm.
An acoustic noise driven sensor.No matter what I did I get random triggers usually every couple of mins. All I can think is its either an issue with the input ‘floating’ and being pulled down (all though tried pull up & pull down option in wiring pi).
Only thing I can think is that I’ve possibly fried my gpio somehow.
Anyway I went with a pir / relay which is stand alone so doesn’t use the pi to turn monitor on / off.
Be interested if you ever manage to resolve the random triggers.
-
What independent PIR are using now? Can give me link? I was looking into it too, but couldn’t find one that runs on 12V only. They all have 230V input and 12V output. That’s not working for me.
When you used the PIR with the GPIO pins, did you use a ferrit ring with it? Apparently that can help. I also had phantom triggers when I only used the PIR (without relay) and the MMM-PIR-sensor module. The ferrit ring resolved the phantom triggers for me 100%. Just now with the python script and the relay I get them very randomly. Sometimes after 2 minutes, sometimes after 2 hours. -
Thats how i tested and it works like a charm. I just set up a fresh raspbian stretch Desktop.
There was no need to install wiring-pi! the scripts just ran “out of the box”.PIR: https://www.amazon.de/Aukru-HC-SR501-Menschliche-Pyroelektrizität-Bewegungssensor/dp/B00R2U8LLG
-
@MadScientist I went with this one. Only thing is it ain’t pretty so I’m looking to build it in to a nicer enclosure to increase the WAF.
I didn’t try using a ferrite ring, but I’ve got a few kicking around. Maybe worth a go.
-
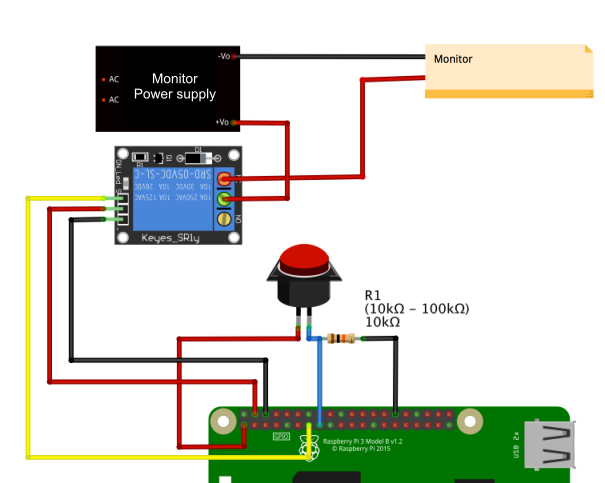
Should say, I’m just switching the ac in for monitor power directly…
-
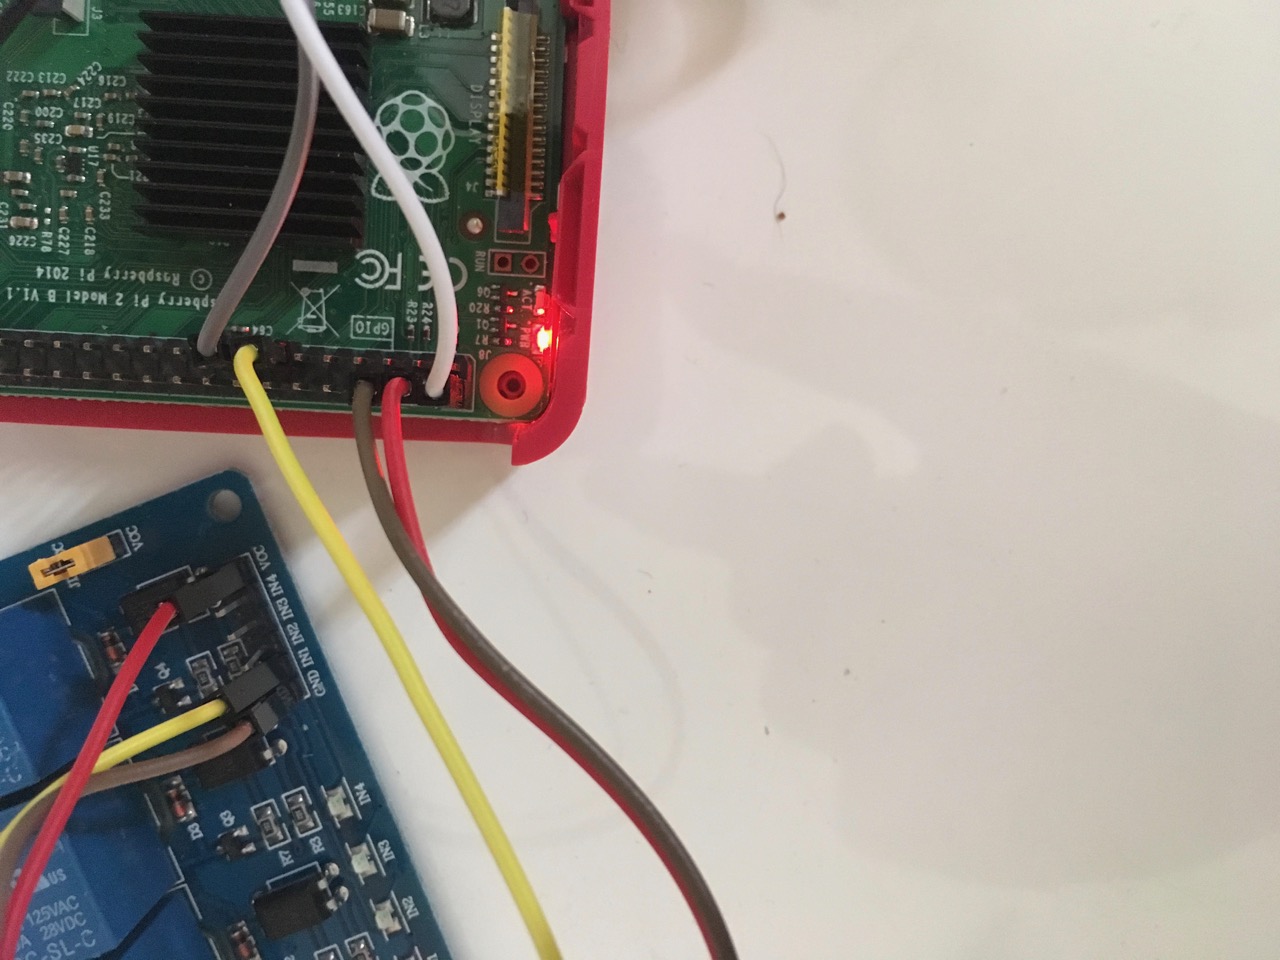
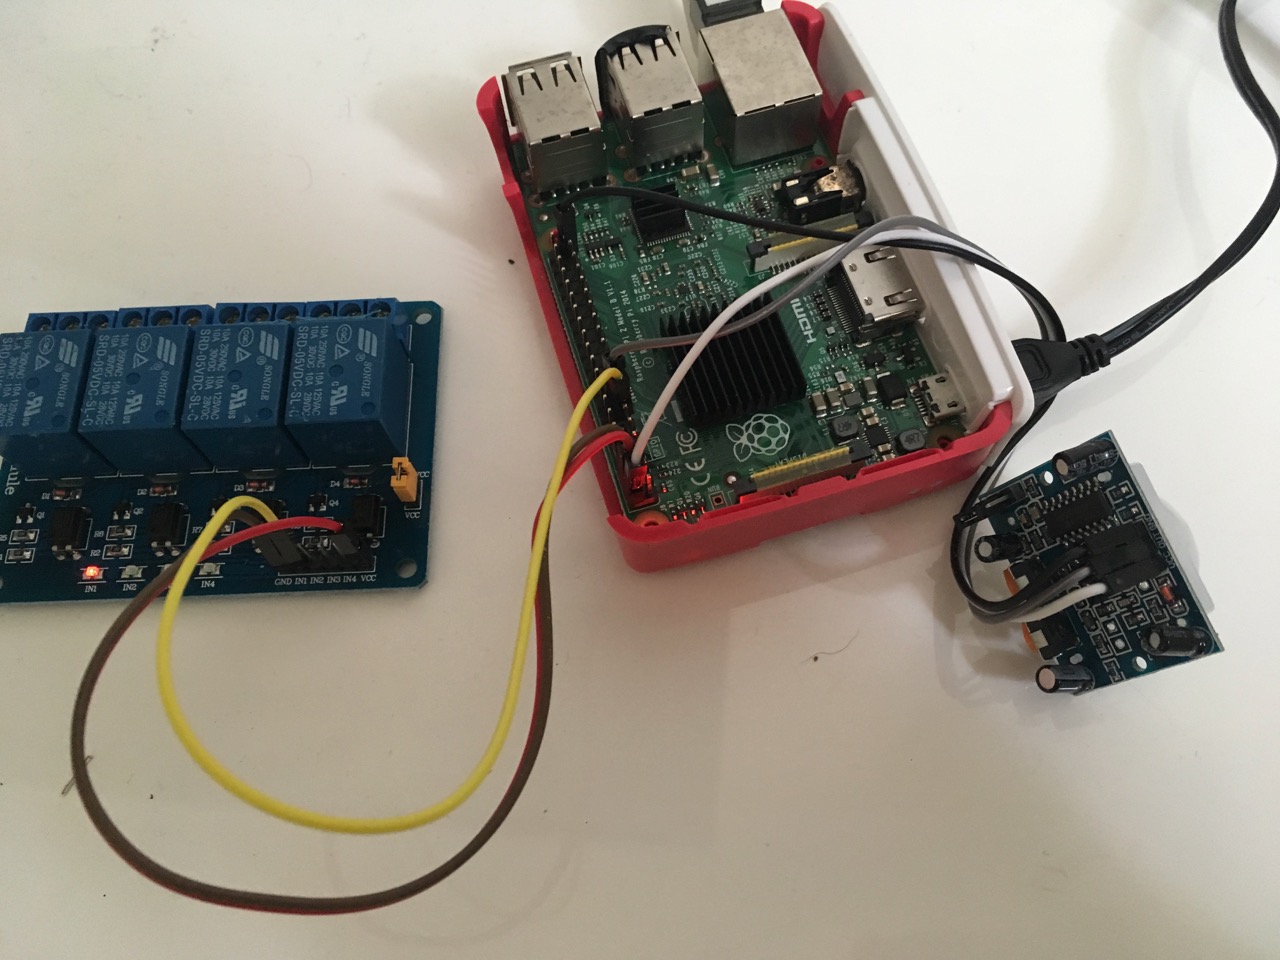
This is how my setup looks like at the moment:

Relay: Black = GND, white = Vcc 3.3V, green = IN
PIR: Black = GND, red = Vcc, green = outGray, blue, puple = ds18b20 temperature sensor.
I actually haven’t had a false trigger yet and the Pi is running for more than an hour now. I will keep it running the whole day. Have a multimeter connected to the relay, set to continuity test, so I should hear a beeping sound every time the relay gets triggered.
-
sounds like a good plan :)
edit:
i also made changes to the scripts so now u were able to end them via “ctrl+c”.
Don’t know if i did everything correct but it works here. :)
I am just electronics technician and no programer ^^ -
I got really excited to see this post when it was shared a few weeks ago. Unfortunately, I have yet to get it to work. I am using a PIR sensor along with Paviro’s module. My issue is that I am using an LG TV which, when the signal is no longer received from the HDMI port, a “no signal” screensaver bounces around. So my goal is to get the screen to just go to black while the raspberry pi does not enter a power-save mode.
I have attempted to use the “screen_off/on” option original provided instead of the “monitor_on/off” but it doesn’t seem to be working properly.
I have tested that the PIR is connected but in my test it keeps teling me that motion is detected when there is no movement. I am doing this through a python script. I am fairly new at this so if anyone can please let me know what else I can provide you to help me get this thing working with the PIR sensor. Thanks.
-
@hoofta Couldn’t you use a relay (like me) but instead of disconnecting the power you just trigger the power on/off button?
-
@MadScientist I am not sure if I could or not. Could you elaborate on how you have yours setup?
Hello! It looks like you're interested in this conversation, but you don't have an account yet.
Getting fed up of having to scroll through the same posts each visit? When you register for an account, you'll always come back to exactly where you were before, and choose to be notified of new replies (either via email, or push notification). You'll also be able to save bookmarks and upvote posts to show your appreciation to other community members.
With your input, this post could be even better 💗
Register Login