@ewingfox said in Happy wife is a happy life!:
So far, my wife is really happy with it, and is eagerly submitting feature requests. Ok, sigh, that part might get a little tiring!!!
No good deed goes unpunished !
Looks great :)
@ewingfox said in Happy wife is a happy life!:
So far, my wife is really happy with it, and is eagerly submitting feature requests. Ok, sigh, that part might get a little tiring!!!
No good deed goes unpunished !
Looks great :)
If your iFrame doesn’t render, in your HA configuration.yaml file, include the following :
http:
  use_x_frame_options: false
Restart HA first, wait for it to finish, then restart your MM instance to see if the iFrame shows.
I use this older MM iFrame module as it’s straight forward.
Within HA, you can also make use of the Kiosk Mode HACS add-on to hide the header and/or sidebars. Once installed, you simply add the following at the top of your dashboard YAML using the Raw configuration editor ( this step is shown in the vid ).
kiosk_mode:
  non_admin_settings:
    kiosk: true
    ignore_entity_settings: true
If you have solar power or another view of your household electricity use via HA, there’s a super funky card that’s been released : https://github.com/Giorgio866/lumina-energy-card. It can show the flow of power around the house as well as what’s going into the EV. Feel the love for Tron !
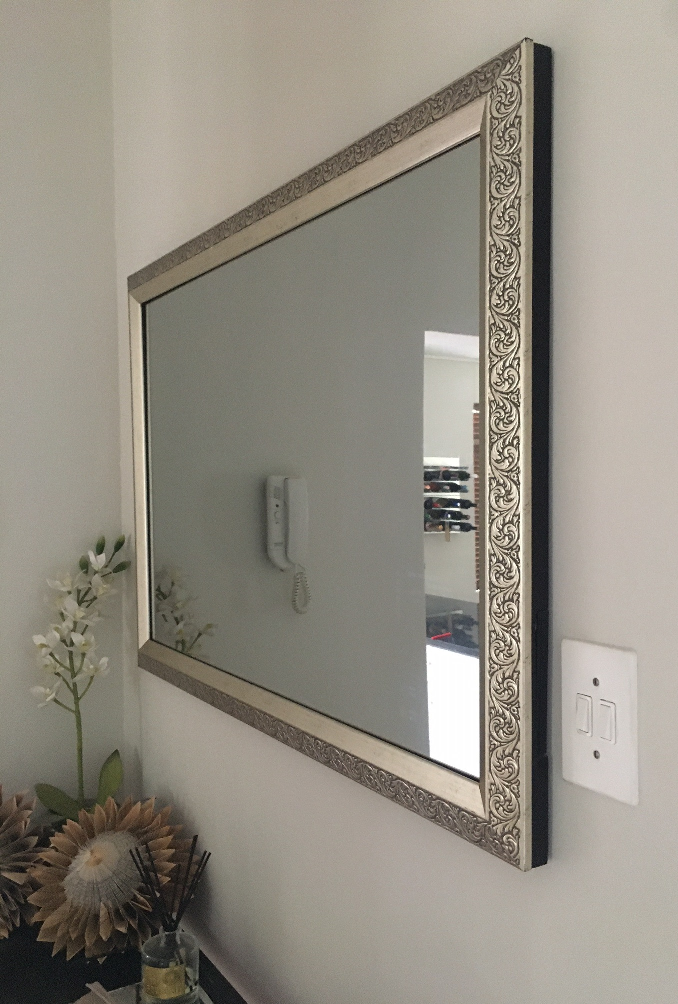
It was a regular off the shelf mirror in a frame. I just removed the actual mirror portion from the frame and replaced it with 4mm tinted glass.
You can also try placing it bottom right and sizing by pixel count, increasing gradually until you reach your monitors full(ish) resolution
I haven’t tried full screen. But one of my configs looks like this :
                {
                        module: "iFrame",
                        position: "bottom_right",
                        header: "HOUSE STATISTICS",
                        config: {
                                url: "http://192.168.1.4:8123/mm-dash-right",
                                        width: "410px",
                                        height: "215px"
                }
                },
If I increase width, the iframe expands to the left. If I increase height, it expands up. Worth a shot.
Try the following :
In your HA configuration.yaml file, include the following
http:
  use_x_frame_options: false
Restart HA first, wait for it to finish, then restart your MM instance to see if the iFrame shows.
If not, give this this older MM module a shot. It’s more straight forward than iFrame Ping and it works with custom button cards ( i use them in my notification area ).
Within HA, you can also make use of the Kiosk Mode HACS add-on to hide the header and/or sidebars. Once installed, you simply add the following at the top of your dashboard YAML using the Raw configuration editor ( this step is shown in the vid ).
kiosk_mode:
  non_admin_settings:
    kiosk: true
    ignore_entity_settings: true
I too use HA in a container on Synology. I make the dashboards within HA and use iFrame’s to display them on the MagicMirror. This way you can make the dashboards as pretty as you like. You really don’t have limits.
To get some idea :
https://forum.magicmirror.builders/topic/19738/home-dashboard?page=1
Initially I was running an older version of MagicMirror and I had to add the following in the configuration.yaml file of Home Assistant to have them to display :
http:
  use_x_frame_options: false
To be fair, I haven’t tried excluding this since I rebuilt the MagicMirror using the latest build at the time. But it’s still in there today and isn’t causing any harm. It was more a HA workaround in any case
Many thanks for the input. I’ll have a tinker when I find a gap and explore the commands and their respective soft switches. Just so that I’m future proof !
Thanks for the heads up Sam.
I’m currently running Bullseye with kernel 6.1.21-v7+ and it still works in this revision. Admittedly I didn’t try with Bookworm as when I originally tried it ( Bookworm ) at launch, the VNC server had gone away on account of Wayland and alternatives were…interesting back then ( didn’t do too much research at the time to be fair ). So for this rebuild I just stuck with Bullseye.
2 quick questions for my own edification :
For Bookworm. Could the commands I listed for vcgencmd simply be replaced with wlr-randr --output HDMI-A-1 --on and wlr-randr --output HDMI-A-1 --off ( assuming HDMI port 1 ) for the same result ?
Another option according the the almighty but not always correct ChatGPT is to switch to X11 and then vcgencmd would work as expected ?
I have a spare Pi I could test on. I won’t however have time to tinker in the next few weeks. Curse having to adult !!
Really appreciate your input
What you’re describing in Home Assistant sounds like a switch, not a button. They have different behaviours. This is important for what follows.
Initially I had our mirror turning on/off on a schedule using crontab. But when I rebuilt it recently, I too wanted some Home Assistant integration to make this a little more intelligent ( turn on/off with the alarm system for e.g. )
I went a different route and installed an SSH integration in Home Assistant ( there are enough modules on the long suffering Pi 3B+ ! )
Using this integration, any SSH command can be turned into button like so :
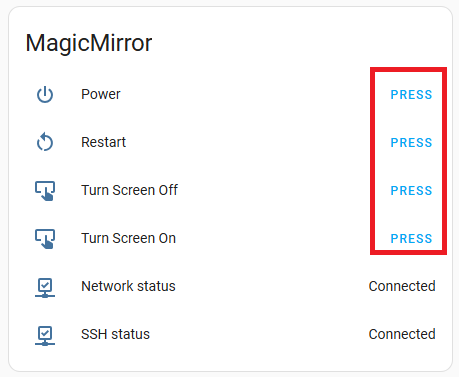
If you’re using a Pi, you can use the following in the configuration options of the integration :
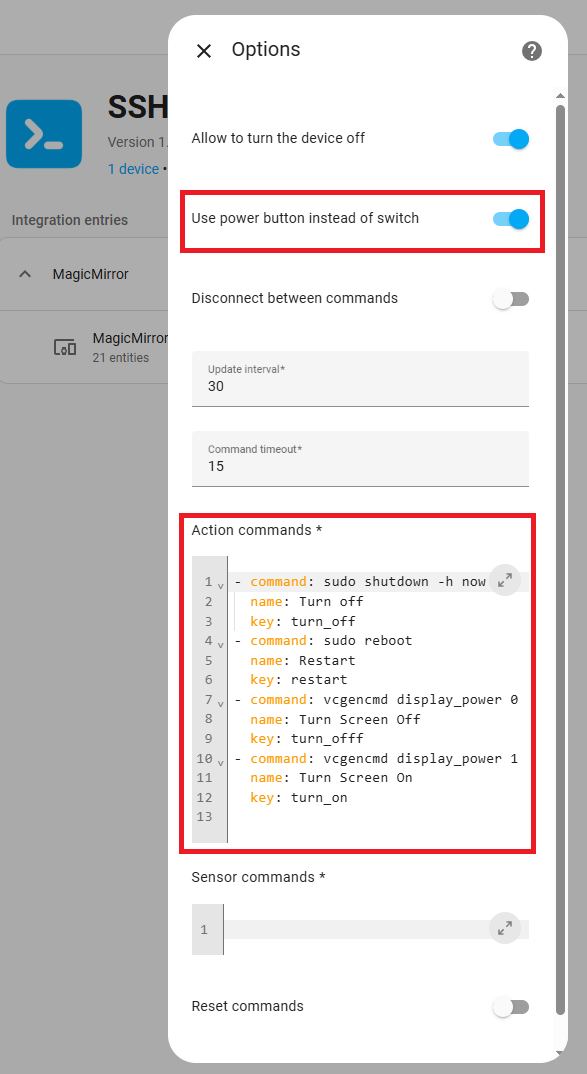
The actual code for your ease of use :
- command: sudo shutdown -h now
  name: Turn off
  key: turn_off
- command: sudo reboot
  name: Restart
  key: restart
- command: vcgencmd display_power 0
  name: Turn Screen Off
  key: turn_offf
- command: vcgencmd display_power 1
  name: Turn Screen On
  key: turn_on
That vcgencmd display_power command should work on pretty much an HDMI monitor
This results in a bunch of buttons that you can use in your Home Assistant automations

Howdy !
Initially I looked into real 1-way mirror. But it was just too expensive for the size that I needed in our fair country.
So ! First I tried the DIY route. Picked up some 4mm glass, found some mirror tint film online and gave it a bash ! That film promptly ended up in a ball in the bin :S. It’s clear ( vicious pun ) that I’m handy with woodwork but suck at tinting.
I then took my sheet of glass to a car window tint business and they did a great job. I ended up going with the most reflective film they had as one step down just looked milky. Sadly that business is no longer in operation. But any car tint spot should do.
@seabass Thank you !
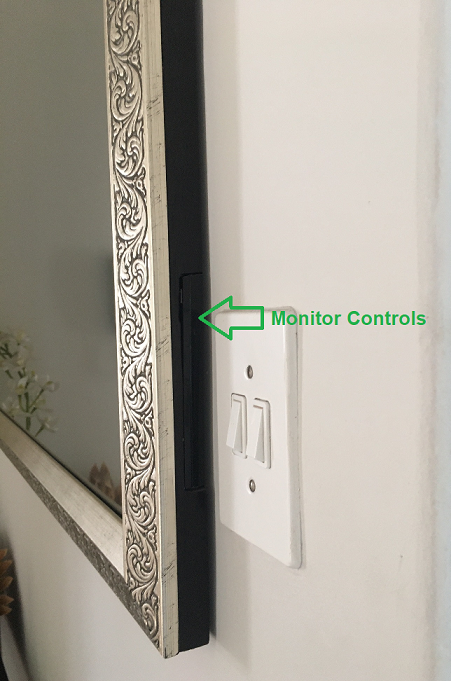
I used an old Samsung BX2031.
The secret sauce here is that this particular monitor uses an external AC adapter / power brick. That’s how I could keep everything so thin. The AC adapter sits in the cupboard with the Pi . I simply extended the barrel jack side to reach the monitor through the conduit.
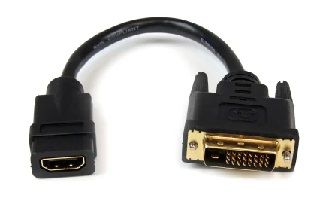
For video signal, I used a DVI to HDMI converter ( similar to pic below ) on the monitor side , and a 5m HDMI cable back to the Pi.
To make space for the power and video connectors, I recessed a wall box ( like those used for your bog standard light switch ) at the end of the cable conduit and lined it all up. So said connectors actually poke back into the wall a fair bit. But the wall box hides that nicely.
I put it here in config.js
			module: "calendar",
			header: "Our Calendar",
			position: "bottom_right",
			config: {
				mmFetchTimeout: 60000,
				calendars: [
Hi all
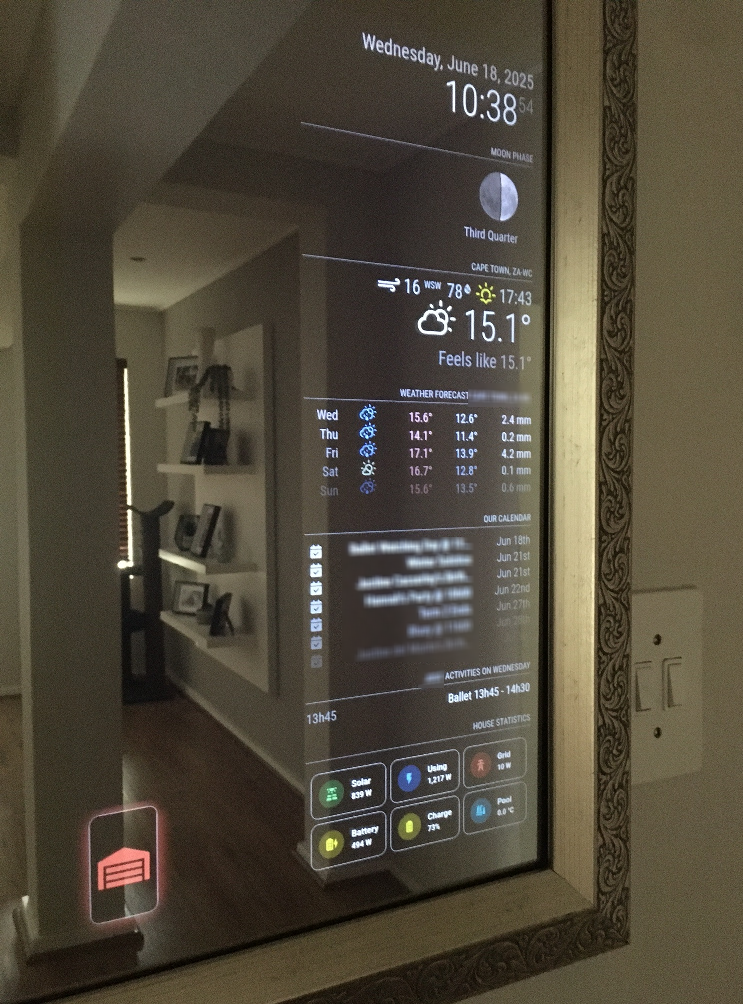
Built our first Magic Mirror in 2019. Recently did a complete software rebuild and thought I’d share.
The original Mirror was standalone. This version is integrated with Home Assistant ( HA ).
Some of the cool stuff :
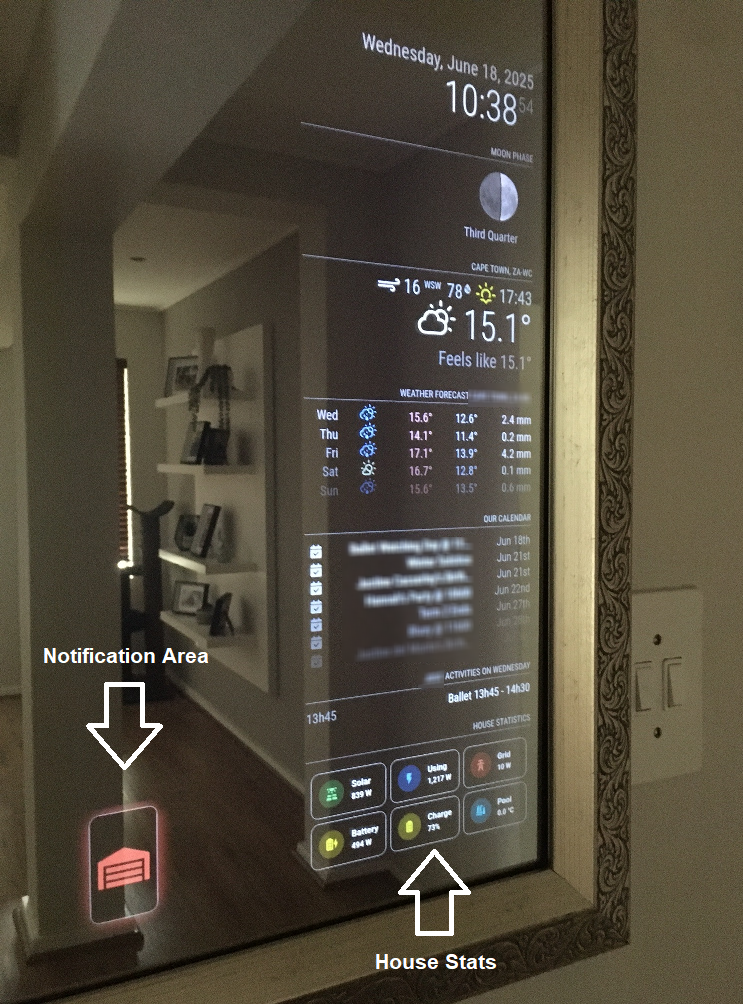
The Mirror renders an HA dashboard via an iFrame to show our house stats. Some of the figures you see there alternate every 15 seconds to display different stats with no visible refresh
Has a notification area ( another iFrame ) to alert you to things like the garage door is open, the hob gas is running low, etc. Notifications come and go i.e. you only see them when they need to be there
Uses HA for power saving. HA will turn the Mirror on or off using whose cell phone is in the house, if the alarm is on etc.
The physical mirror measures 1025mm x 720mm. But the 20" de-cased monitor that is the Magic Mirror only occupies the bottom right. The Pi 3B+ sits 5m away in cupboard. The cabling is routed through conduits in the wall. Much grinding, much dust ! The idea was to keep the profile super low so that it looks pretty much like an ordinary mirror
Thanks so much for the response. That syntax/config was the latest version ( of sooo many ) I tried where I just couldn’t get it to work
I have since taken another route. I’m running Home Assistant and MQTT Docker containers on a Synology NAS. Home Assistant displays the info I need via a simple custom dashboard. I then use an iFrame on the Magic Mirror to display said data. Works a treat
Hi all
I’m trying to display MQTT data from my solar system battery logger so that a simple capacity percentage will display on the MagicMirror. I’m using the MMM-MQTT module. While the module loads up fine, it doesn’t seem to interpret the data and simply displays " Loading "
I need to retrieve a particular value within the topic. That value has a label of capacityP. The Pi running MagicMirror has a Mosquitto broker installed natively. And if I query the MQTT topic, it’s receiving data correctly. I think where I’m falling short is the syntax around retrieving the capacityP value from the topic. Any ideas ? I’ve tried so many different options. But I just can’t get it right!
	*{
		module: 'MMM-MQTT',
		position: 'bottom_left',
		header: 'SolarMD Battery',
		config: {
			mqttServer: 'mqtt://localhost',
			port: '1883',
			label: 'Charge Level',
			decimals: 1,
			topic: 'solarmd/energy/outputEnergy/bank1',
			jsonpointer: '{"solarmd": {"energy": {"outputEnergy": {"bank1": {"capacityP"}}}}}',
			suffix: '%'*

