Read the statement by Michael Teeuw here.
PIR sensor behind glass?
-
I used some cardboard and then made a little housing for my PIR under the bottom of the mirror. It is a little ugly, but hey this whole project for me was to make something cool (not necessarily beautiful)!
I did a few layers of cardboard between the sensor and the front to limit the viewing angles and for my needs it is perfect :)
-
@dmcinnes Would you mind share some code? :)
-
@Cato just the regular PIR sensor mirror code works fine! The data pin triggers in the same way as a PIR sensor.
-
@Cato said in PIR sensor behind glass?:
@dmcinnes Would you mind share some code? :)
-
hmm… some questions if you would not mind.
Ive just ordered 2 sensors .
I need to know what plugs in to what to feed in to the chips (im guessing the sensors i need? please explain what i am missing… and what connects in to the Raspberry PI.
Also note the second i want to have outside the home and set up to a facial recog module, and comand it to open the door via face and voice confirm if possibl.
And how this connects to the a
-
If you want a very simple solution (independent of MM completely), check out this script. This is what I am using, it is a very simple python script that reads the value of a PIR and then selectively turns on / off the monitor. You will need to change things up a bit as I wrote it for a C.H.I.P. but the GPIO library is the same.
-
@wjdw87 cool! The connection is basicly the same as a PIR sensor. It has three wires, ground, vcc, and data which goes high when it senses motion. I plugged it into the PI’s 3.3v, ground and I believe gpio 22 (whichever is the default for the module).
Since the wire comes out as a three pin JST I split it into individual header connectors because all the pins are not next to one another on the PI.Hope that helps!
-
Can anyone of you please share a picture of how you’ve connected the microwave sensor to the Pi pins?
I know this sounds dumb, but I can’t seem to find out what pin connects to what, as I don’t know what pin is ground and what pins is (data) out…Thanks!
-
@amcolash said in PIR sensor behind glass?:
If you want a very simple solution (independent of MM completely), check out this script. This is what I am using, it is a very simple python script that reads the value of a PIR and then selectively turns on / off the monitor. You will need to change things up a bit as I wrote it for a C.H.I.P. but the GPIO library is the same.
VERY good choice! Mine also works independent… but I really like your idea!
-
@cowboysdude I recently picked up these microwave sensor modules to use in conjunction with the code you posted for PIR Sensor. I’m pretty new to all this, and I can’t get any function out of the sensor. Do you have some advice on how to troubleshoot this? It could be an error on my part in implementing the code, wiring it incorrectly, or something else, but I’m just not sure how to figure out what the issue is.
-
@Nususu I would go online and lookup ‘wiring pir sensor raspberry pi’ there are TONS of things out there. Your issue could be one of any or a combination of things… I did that using a PIR sensor so I have no idea how it would act with microwave sensors… good I’m hoping because I want to get some… BUT let me know if you need anymore help, not that I helped you now but I will do what I can!
-
-
@cowboysdude thanks, I’ll check that out and let you know how it goes!
-
@cowboysdude I got it working using this code:
https://github.com/paviro/MMM-PIR-Sensor
With this code, I’ve got a problem where the screen only stays on for about 1 second after motion detection. Now I need to modify the code somehow to allow me to tell the mirror to stay on for a set amount of time after detecting motion, i.e. only go dark once no motion has been detected for x seconds. Problem is I don’t know where to start with that. Will let you know if I figure anything out. Any ideas?
-
@Nususu try adding the powerSaving to your config…
{
        module: 'MMM-PIR-Sensor',
        config: {
            powerSaving: false
        }
    }
See what that does :) PLUS there’s also an adjustment on your PIR sensor itself… which one and I don’t know … do a google search for adjustments :)
-
@Nususu - same here
Perhaps, with a resistor?
-
@Aly I found documentation for the sensor that a resistor would indeed solve the issue here. I can set the delay up to 200 seconds with a 250k resistor, so I ordered one and will report back how it went.
-
@Nususu - great !!
Can you post the doc. ?
-
@Aly I misspoke, shouldn’t have called it documentation. Rather, it was this picture:
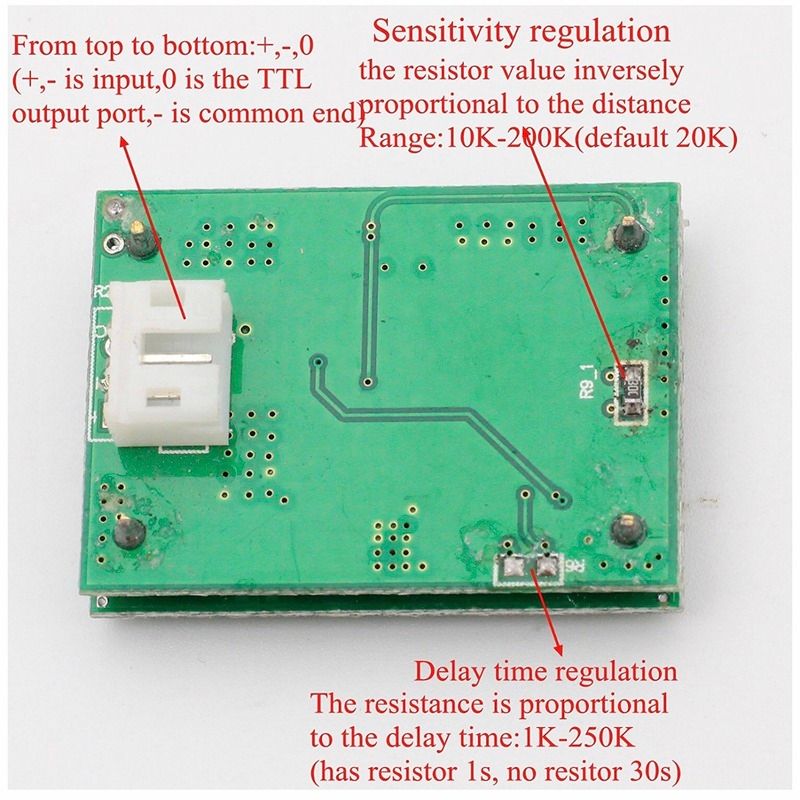
Which appears to be a translation from the Chinese original picture.
-
so if we remove the R6 resistor the delay would be 30s ?
Hello! It looks like you're interested in this conversation, but you don't have an account yet.
Getting fed up of having to scroll through the same posts each visit? When you register for an account, you'll always come back to exactly where you were before, and choose to be notified of new replies (either via email, or push notification). You'll also be able to save bookmarks and upvote posts to show your appreciation to other community members.
With your input, this post could be even better 💗
Register Login