Read the statement by Michael Teeuw here.
My First Mirror... until now ^^
-
Hey all,
first i want to say, that this is a great community and it makes fun to be a part of it.
Since i decided to build a MagicMirror i was more and more interested what you can do with it. So now i want to show you my first exemplar. At least one more is in planning.
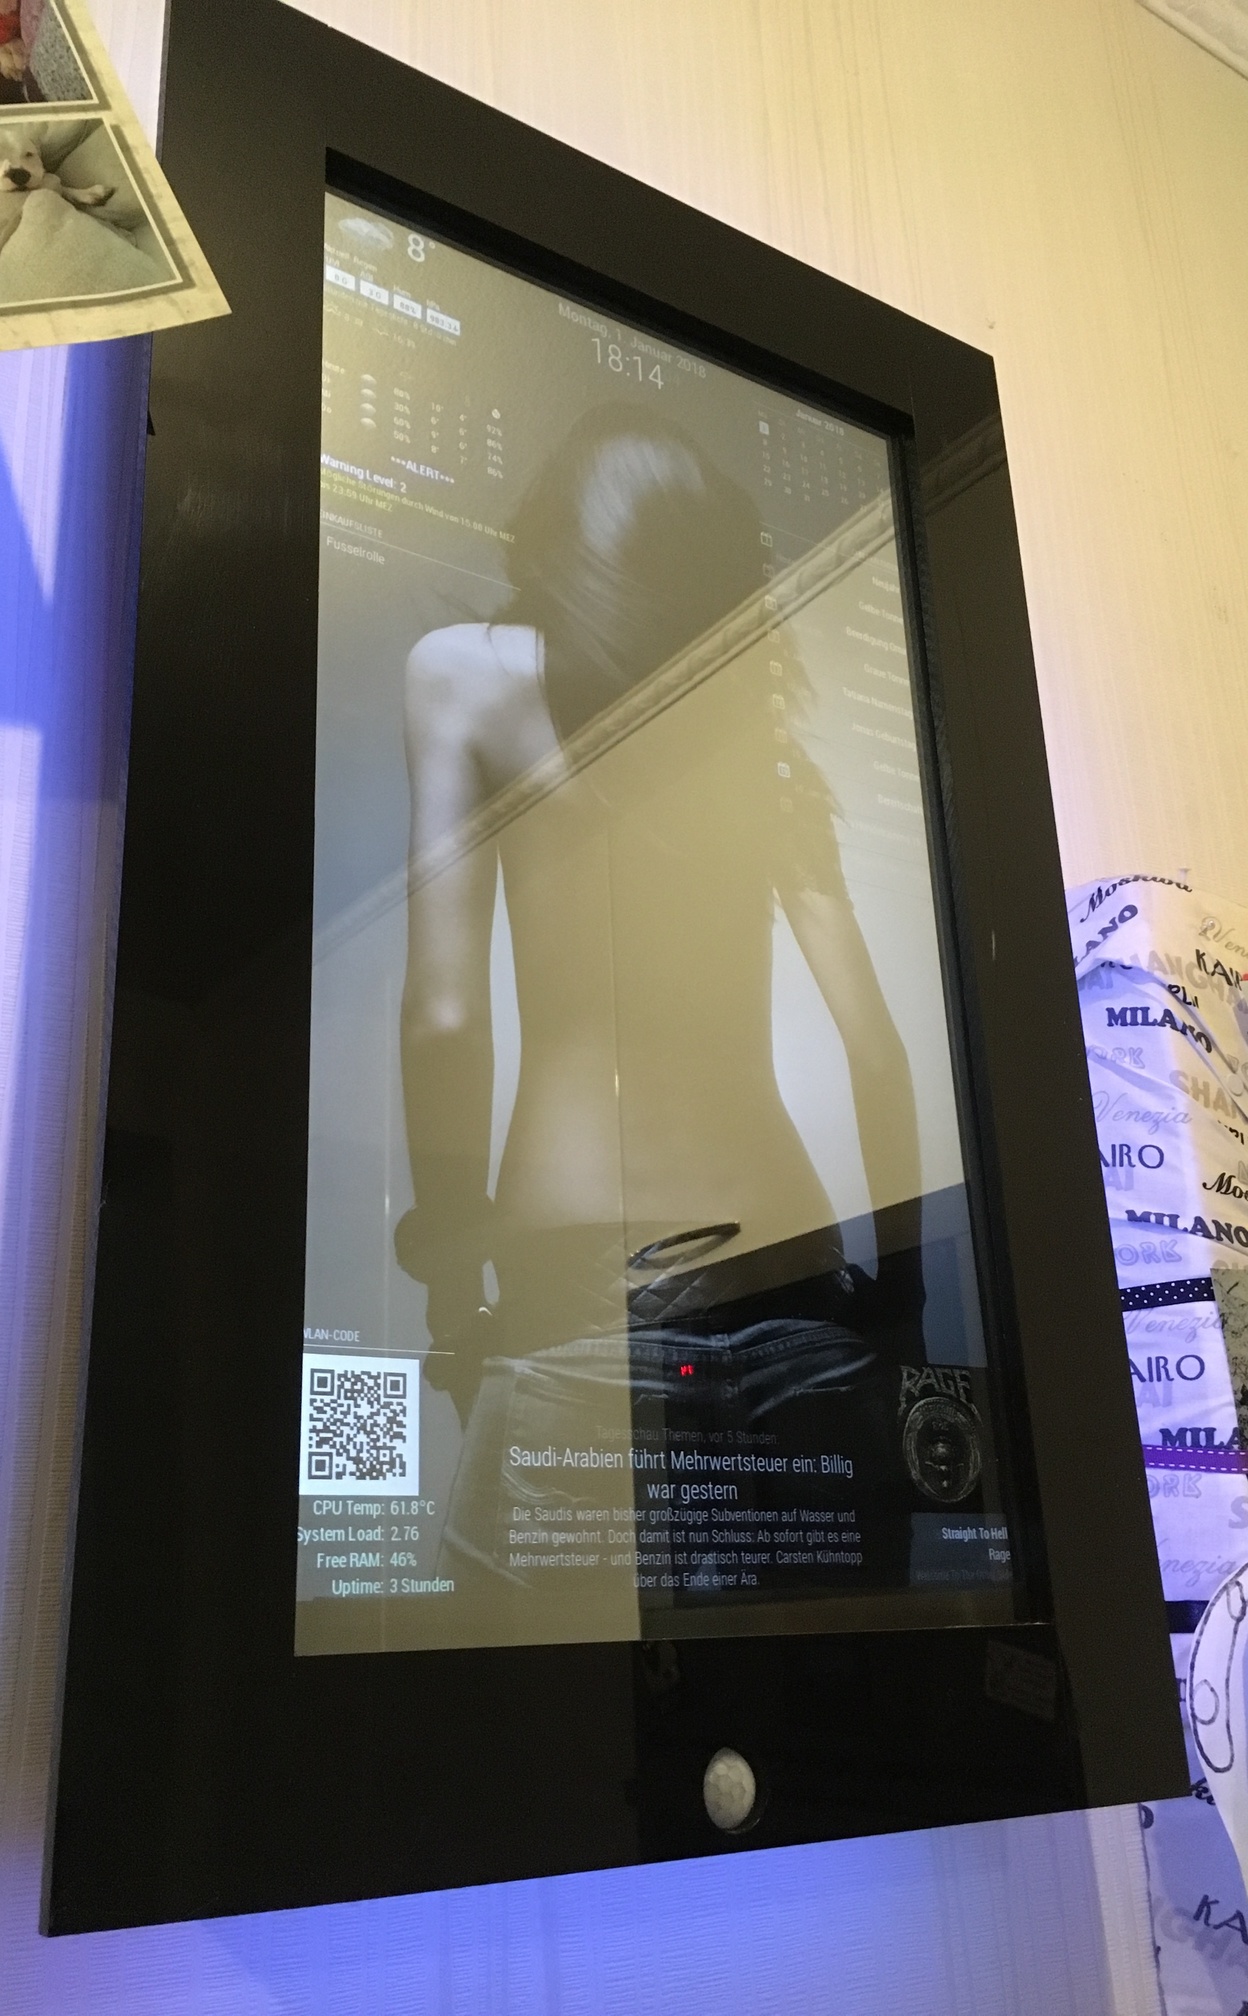
The original plan was to install the mirror, so that you can only see the front frame. I had to postpone that later. That’s why he’s hanging on the wall now.
I build the frame with wood, but i put some acrylic glass on the front and on the sides.
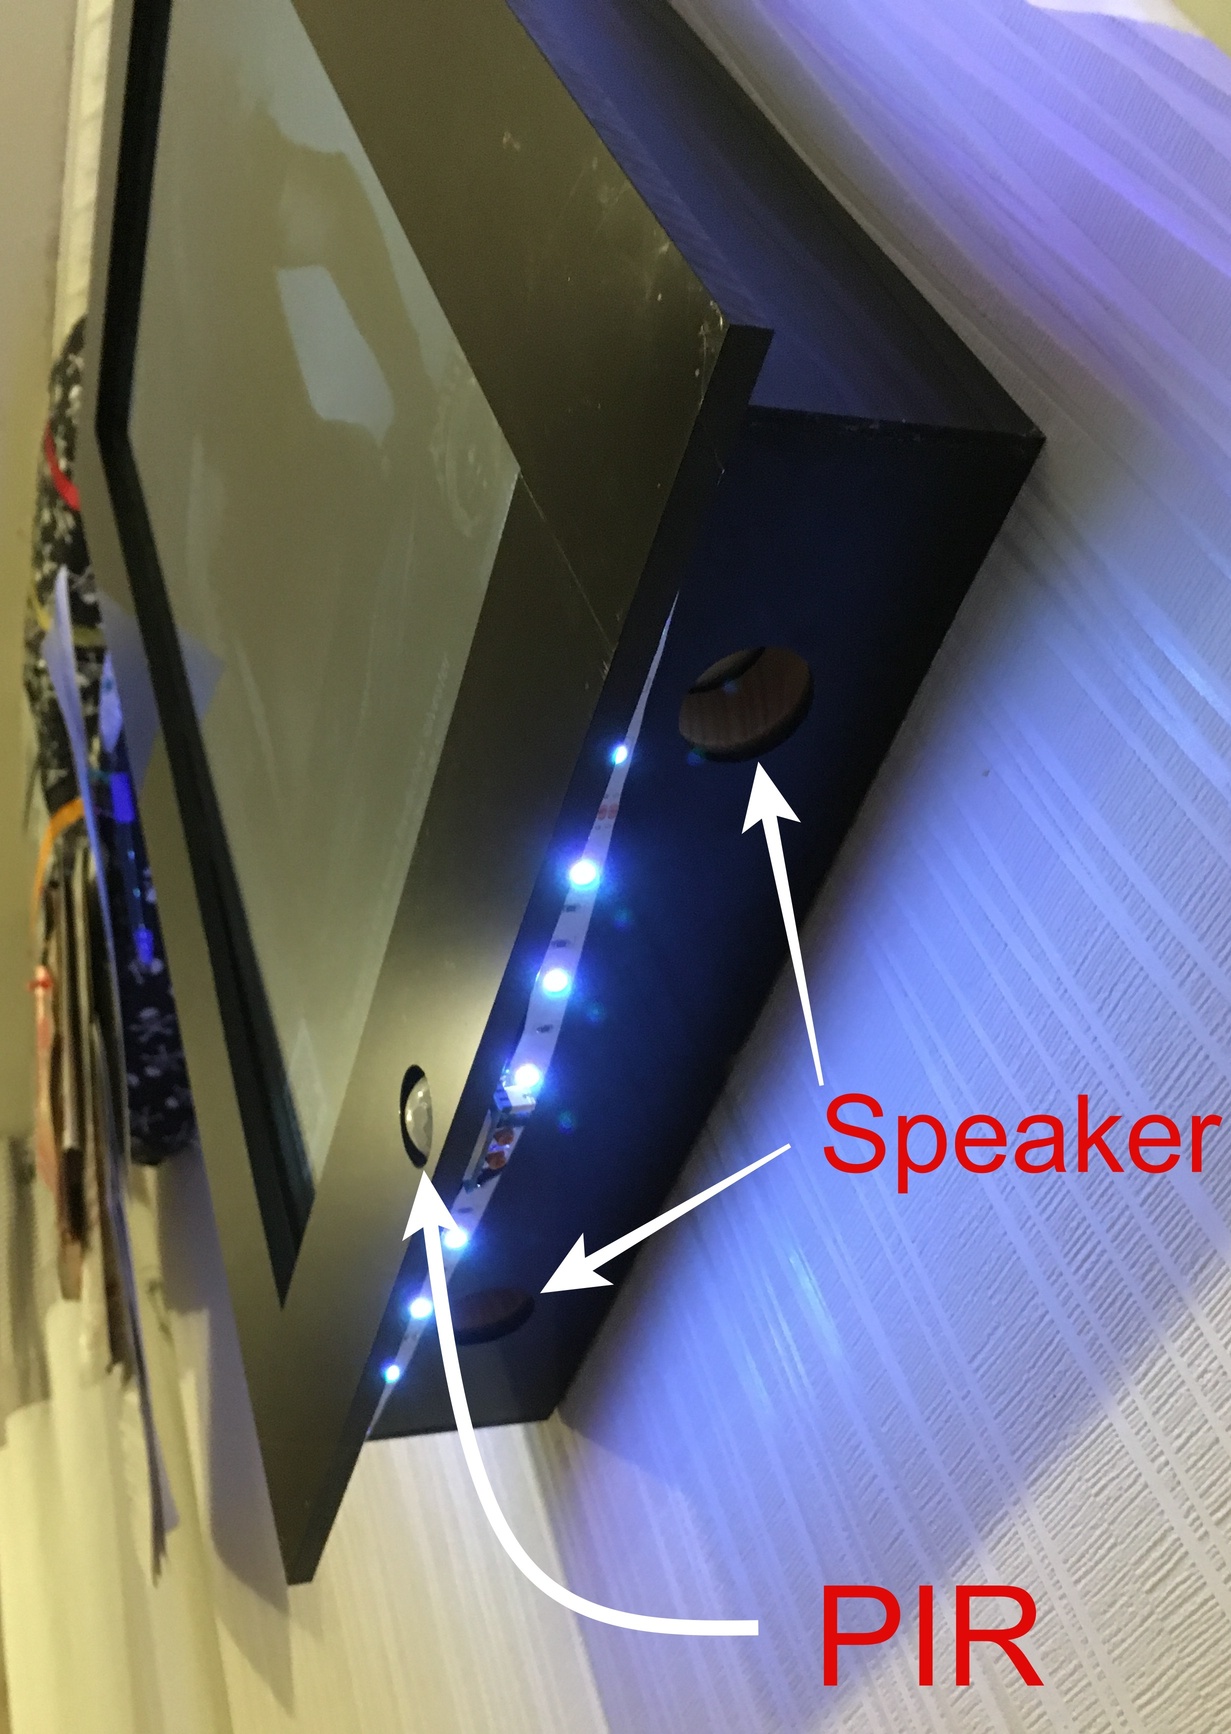
I drilled a hole in the middle for the PIR.
In addition, speakers are installed, but are not yet in operation (I still explore the applications / modules and think about what I still want to process)Fun fact: Because the PIR always detected the movement of my dog i put some clear nail polish on the lower half of the PIR :) Works great.
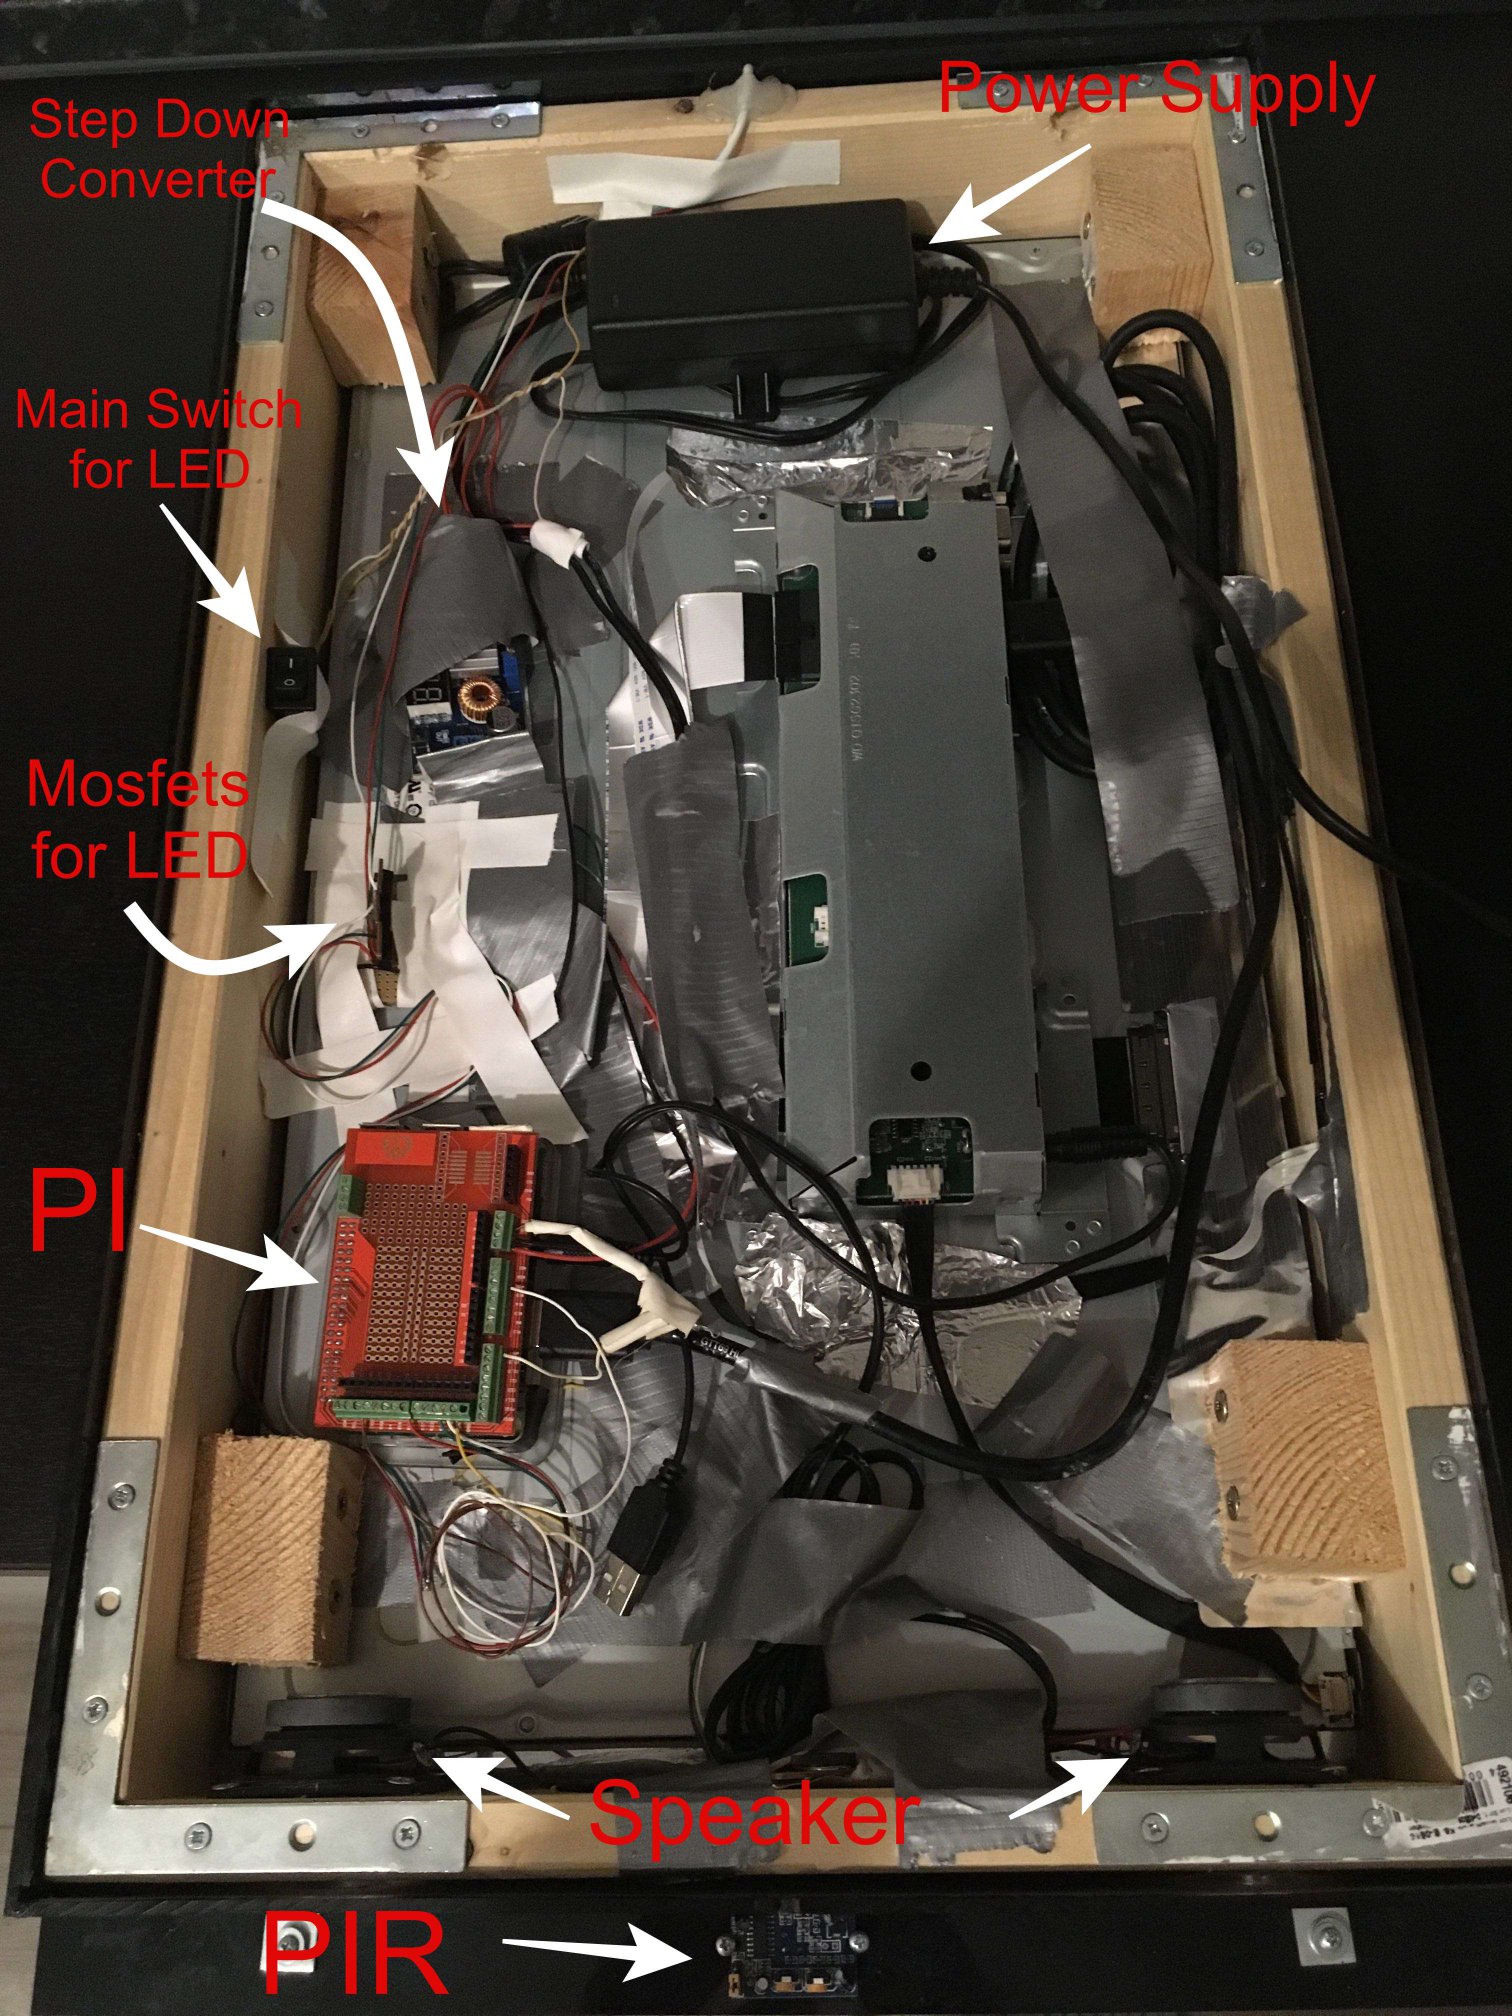
I just used one 12V / 5A power supply. The 12V is used for the 23" Monitor and the LED Stripe. For the rPi i used a Step Down Converter and put it to 5.1V
Next time i hang the mirror up, i will take some pics from behind ;)
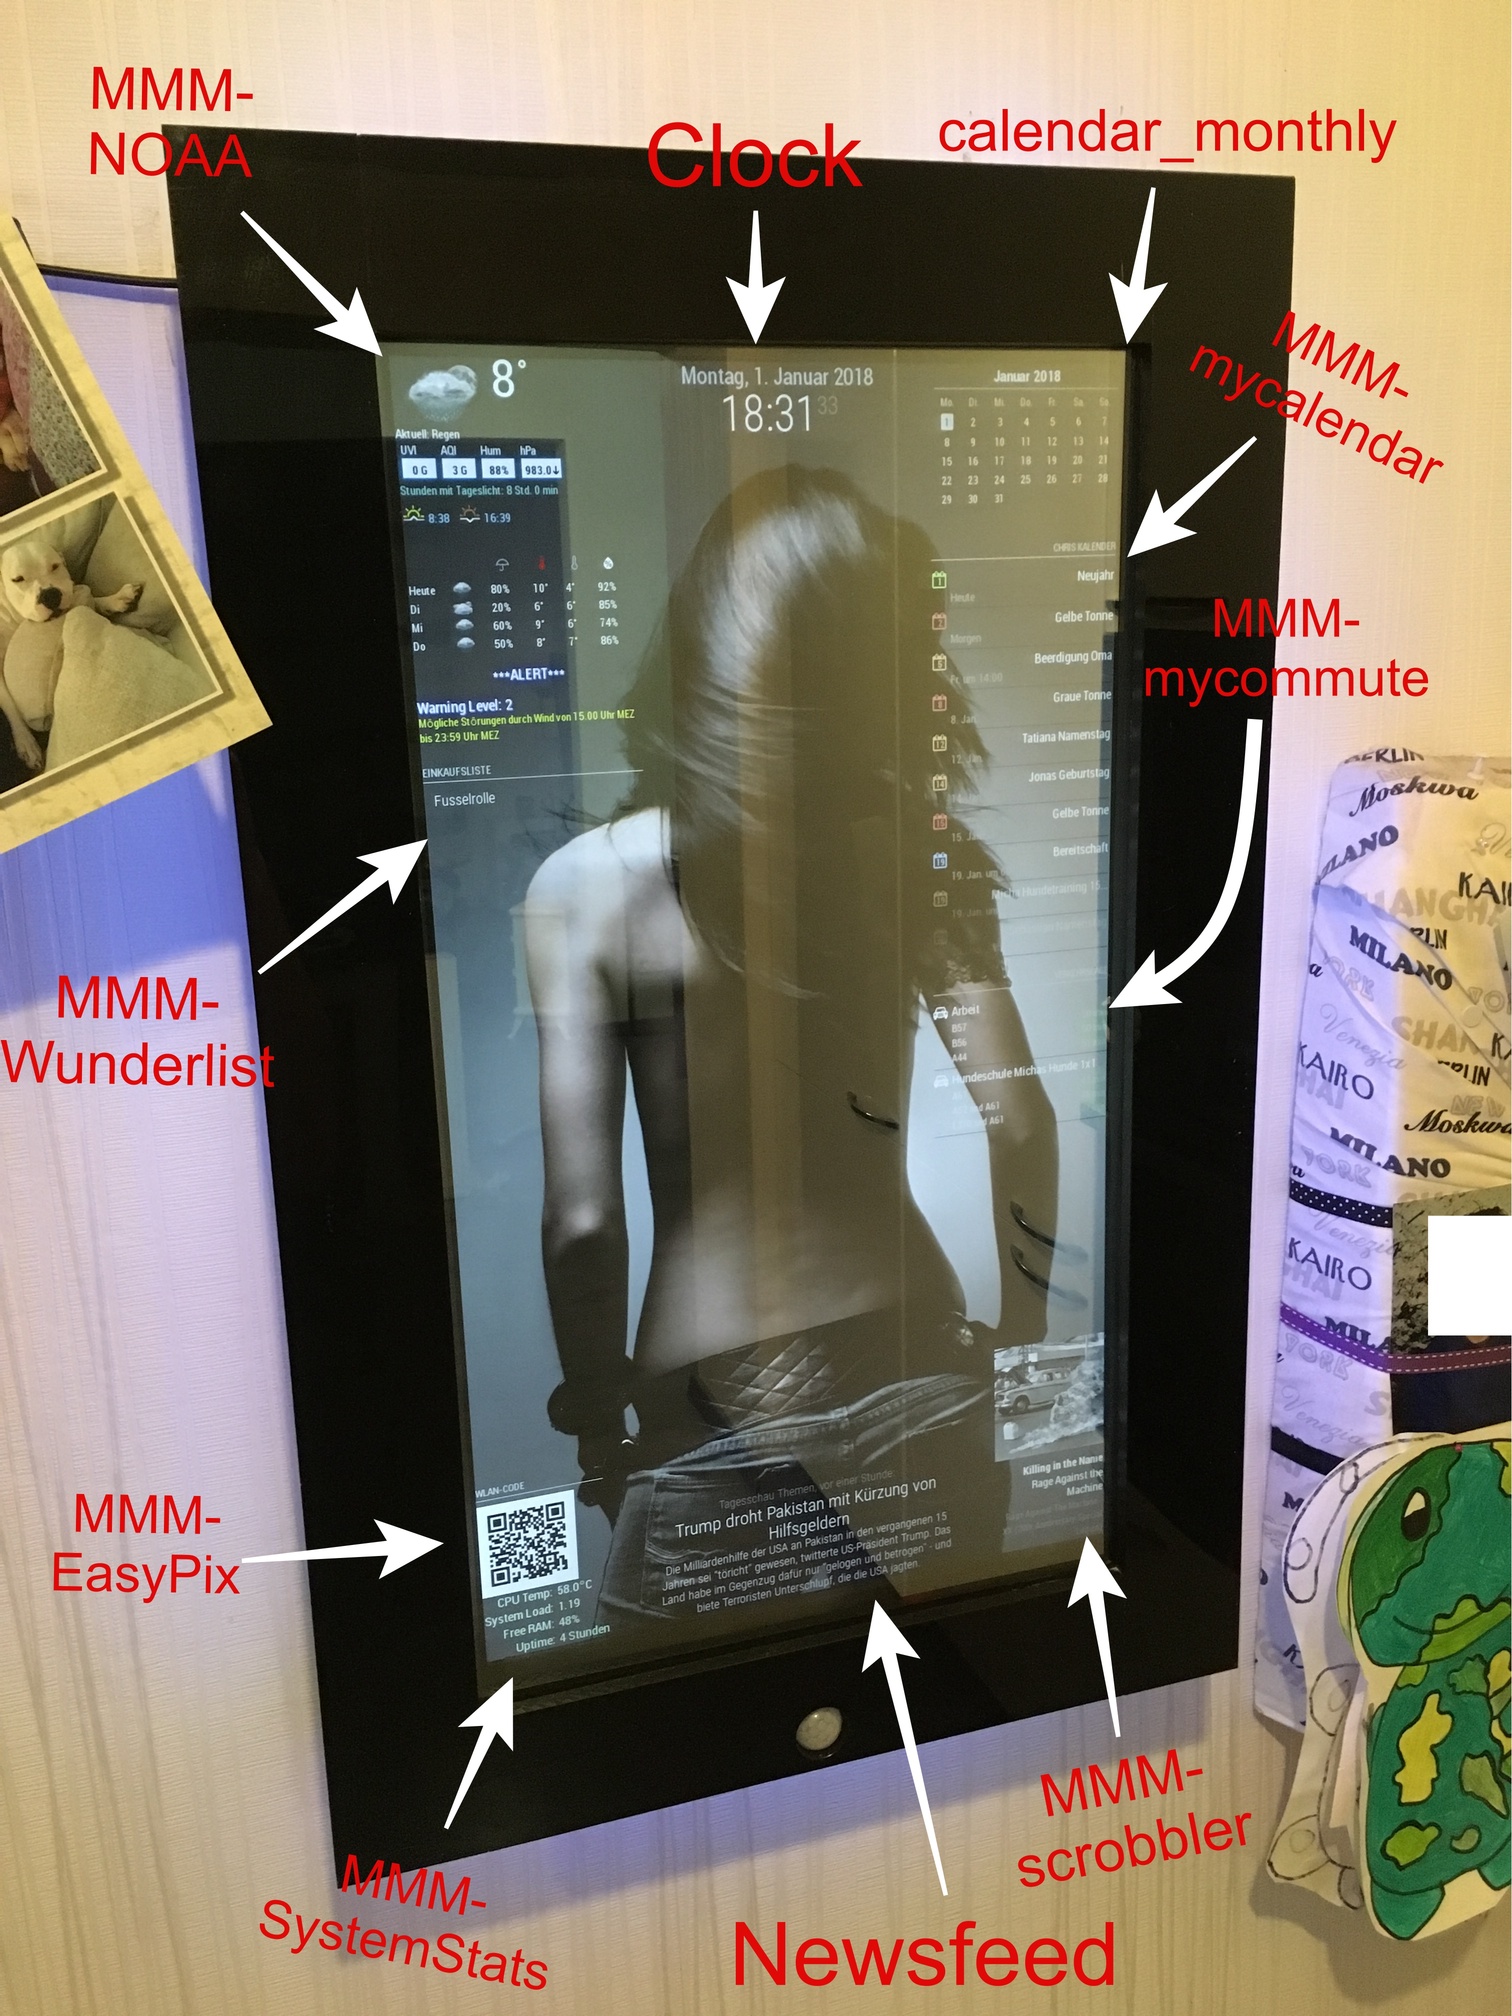
Installed modules:
calendar_monthly
MMM-EasyPix (for Wifi-QR-Code)
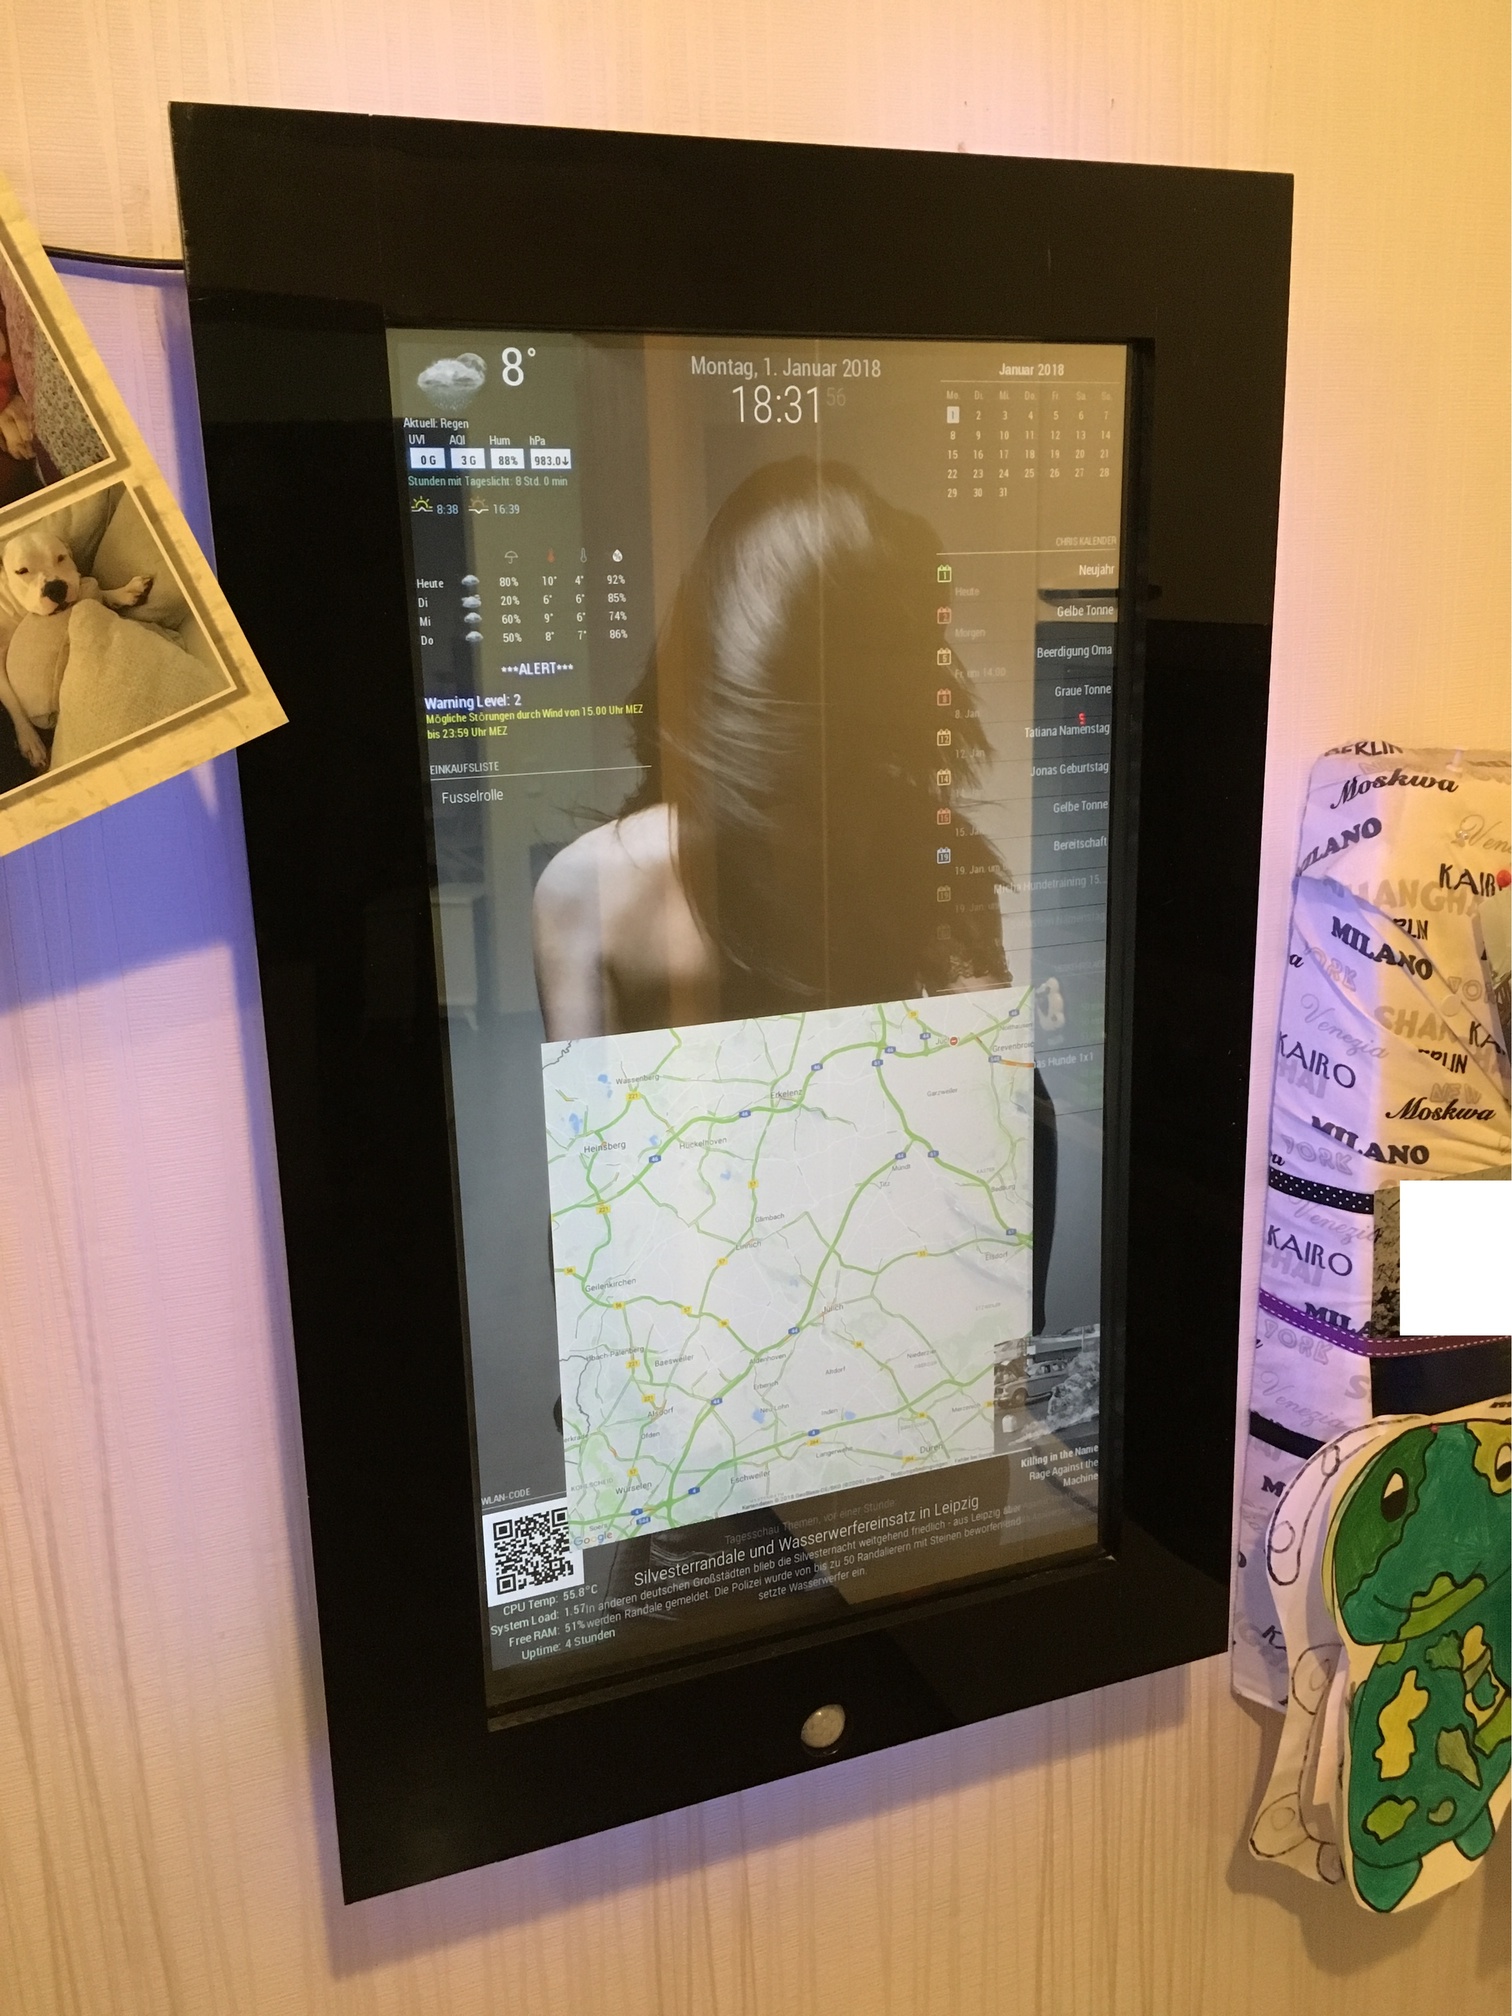
MMM-GoogleMapsTraffic
MMM-MyCalendar
MMM-PIR-Sensor
MMM-MyCommute
MMM-NOAA
MMM-Scrobbler
MMM-Remote-Control
MMM-Remote-Control-Repository
MMM-SystemStats
MMM-Watchdog
MMM-Wunderlist
MMM-internet-monitor (not visible)I also have a wifi watchdog installed because my wifi connection sometimes breaks off.
It automatically turn the wifi controller off and on again, when the pi can’t ping my router.I found the LED Stripe somewhere in my house. It is a RGB Stripe 5050.
Since there is no Module for this Stripe i used some mosfet’s and an external Application and wrote a script to turn it slowly on and off when movement is detected by the PIR.For the Wifi-QR code i used this guide and let the picture show via MMM-EasyPix (thanks to @mykle1 ;) ).
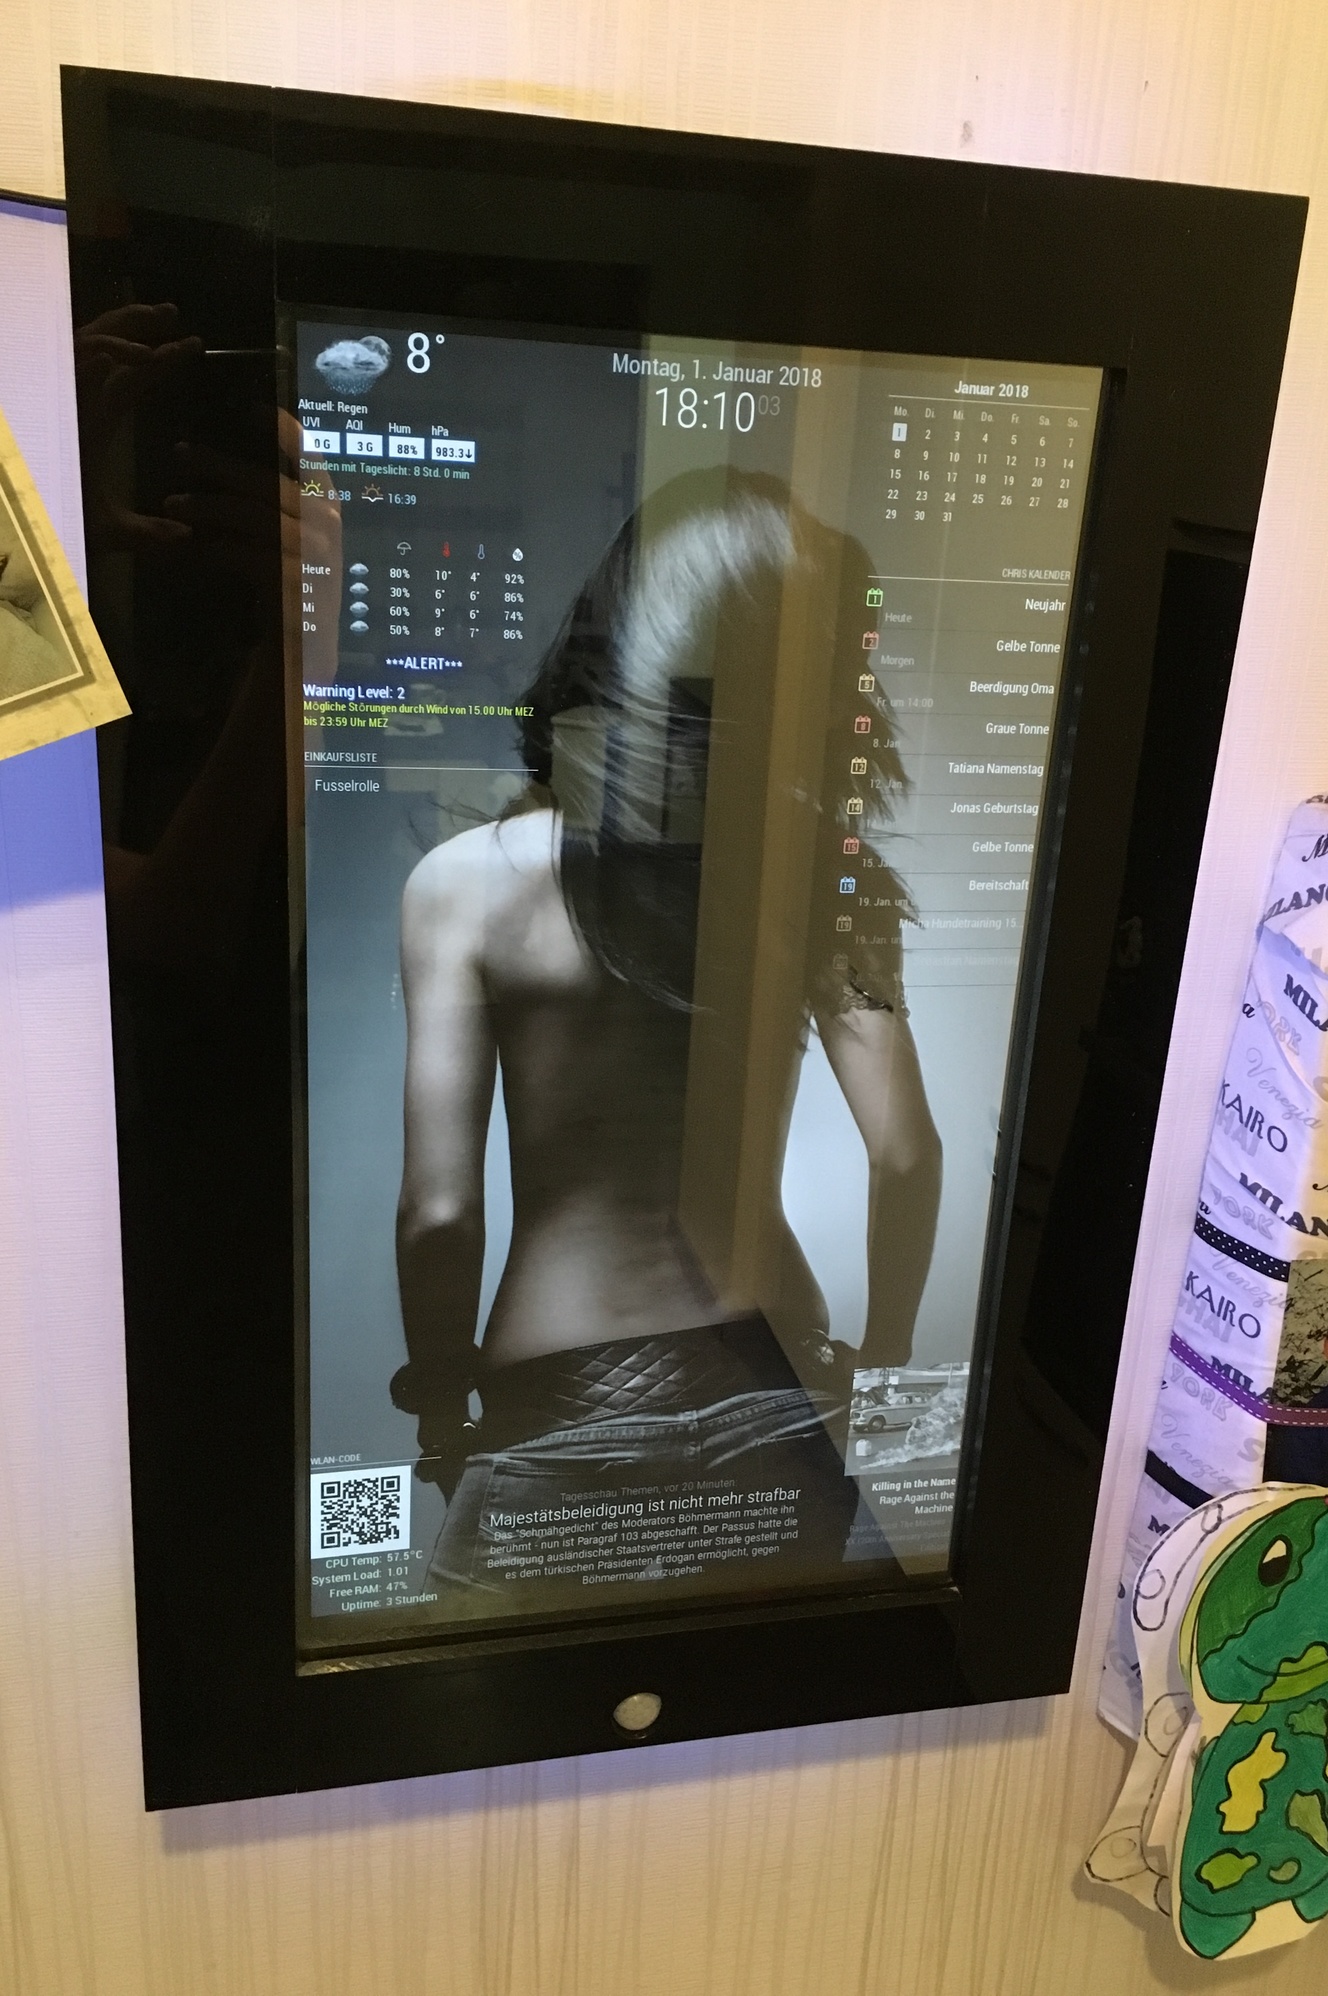
For the background image i used the custom.css
Hope you enjoy :)
-
Very well done, mate!
Now, ask your desktop picture to turn around. ;-)
-
WOW that really looks awesome!! I love the LED lights!!!
-
Looks Fantastic! i have a couple questions though, how did you add the backround (THE GIRL)?, how is your PIR setup, i want to add one for mine but have been trying to figure out how to make the screen just turn black instead of shutting off completely , and last one is how did you get scrobbler to work? I installed scrobbler on my mirror but it only worked if i had last.fm running on a computer within my network and half the time it was’nt “seeing” what i was playing. any insight to those questions would be great, feel free to message me directly so you thread doesnt get packed with a bunch of non-essential post. thanks
-
@nikobelohlav said in My First Mirror... until now ^^:
how did you add the backround (THE GIRL)?
Like this: https://forum.magicmirror.builders/topic/351/add-a-background-image
-
Sieht super aus!
Vergess bloß nicht die Fusselrolle zu kaufen ;) -
Thanks for the compliments.
You can add a background with your custom.css like the link u posted, yawns.
My custom.css looks like this:
/*****************************************************
 * Magic Mirror                                      *
 * Custom CSS                                        *
 *                                                   *
 * By Michael Teeuw http://michaelteeuw.nl           *
 * MIT Licensed.                                     *
 *                                                   *
 * Add any custom CSS below.                         *
 * Changes to this files will be ignored by GIT. *
 *****************************************************/

 body {
	background-image: url("background9.jpg");
	background-size: cover;
	margin-left: 0px;
	margin-right: 30px;
	margin-top: 15px;
	margin-bottom: 15px;
  	position: absolute;
  	height: calc(100% - 28px);
  	width: calc(100% - 22px);
}
.MMM-SystemStats  {
        color: #CEF6CE;
        }
.MMM-MyCalendar {
  max-width: 300px;
}
The image is called “background9.jpg” and has been placed in the “home/pi/MagicMirror/css” folder.
I needed to play a little bit with the margin’s, until it fits perfect. Keep in mind that your picture should fit the screen resolution. It shouldn’t be smaller. if it is, you should take a look at the MMM-ProfilePicture module.
@nikobelohlav
I just used the MMM-PIR module for it. It turns the HDMI signal off, and my monitor recognized that via HDMI-CEC/ARC and turns off. When the signal comes back the motor turns on within 2 seconds. thats quick enough i think.
I don’t know if it is possible to change the MMM-Pir-Sensor.js so that not the command “tvservice …” is executed, but a notification will be sent to other modules like the profile-switcher. Maybe you should open a new thread, even if I don’t quite understand why you don’t want to turn off your monitor.The scrobbler module was a little bit tricky. First you need to register your apps, to share the current playing music with last.fm.
I actually just use Spotify, so in the Spotify-settings of my phone, tablet and macbook i needed to login to last.fm via the Spotify app.
Sometimes i got the same problem as you, but its not a failure of the module. I played music and checked on last.fm if there is actually scribbling something, but there wasn’t. Then i turn back to my Spotify app and just log out and log in again (to last.fm in the Spotify settings) and that brings the scrobbling back.
So its more a bug, that happens sometimes, cause Spotify didn’t correctly streams to last.fm i think.
When u don’t pause the music it should scrobble continuous.Also keep in mind:
When is a scrobble a scrobble?
A track should only be scrobbled when the following conditions have been met:The track must be longer than 30 seconds.
And the track has been played for at least half its duration, or for 4 minutes (whichever occurs earlier.)
As soon as these conditions have been met, the scrobble request may be sent at any time. It is often most convenient to send a scrobble request when a track has finished playing.@barnosch
Ja im Winter ist es manchmal schlimm mit den Hundis ^^ -
I really like how you integrated the motion sensor! The rest is a little bit too much “screen” (as opposed to mirror) for me, but I can see the appeal. I like it.
-
@doubleT said in My First Mirror... until now ^^:
The rest is a little bit too much “screen” (as opposed to mirror) for me, but I can see the appeal.
i know what you mean ^^
But since i found out how many things can be shown with the MM, i couldn’t let it be :D
Maybe the background is “too much”, but i like it anyhow XD
but if i turn on the room lights, its bright enough to use it as a mirror :P -
@cruunnerr said in My First Mirror... until now ^^:
Maybe the background is “too much”, but i like it anyhow XD
Whatever you like is how your mirror should be.
Again, well done, mate. :-)
Peace
-
Very tinkered cause i am experimenting a lot ^^
-
Hello, is a really awesome mirror really!!!
one question, how can i get the header over the qr code picture?
thanks
-
Just type a header in the config:
{ module: "MMM-EasyPix", header: "WLAN-Code", position: "bottom_left", config: { picName: "guest_wifi_config.png", // Enter the picture file name. maxWidth: "150px", // Size picture precisely. Retains aspect ratio. } }, -
ah yes alright, thanks
-
hi… i have motion detector pir. and a led5050 strip.
can you please provide the software part between pir and led… for dimming and on off feature … pleeeese
thx -
Hey @metalldetector
I already did somewhere in the forum ^^
You need to install PIGPIOD.
sudo apt-get install build-essential python-dev unzip wgetwget http://abyz.me.uk/rpi/pigpio/pigpio.zip && unzip pigpio.zip && cd PIGPIO && sudo make installConnect the PIR like shown at Part 2.2 and follow the guide:
https://forum.magicmirror.builders/topic/6291/howto-turn-on-off-your-monitor-time-based-pir-button-app?page=1When creating the pir.py and fill ist with this code:
#!/usr/bin/env python

import sys
import time
import RPi.GPIO as io
import subprocess
import pigpio

io.setmode(io.BCM)
SHUTOFF_DELAY = 119 # seconds
PIR_PIN = 25       # 22 on the board
LED_PIN = 16

def main():
    io.setup(PIR_PIN, io.IN)
    io.setup(LED_PIN, io.OUT)
    turned_off = False
    last_motion_time = time.time()

    while True:
        if io.input(PIR_PIN):
            last_motion_time = time.time()
            io.output(LED_PIN, io.LOW)
            print ".",
            sys.stdout.flush()
            if turned_off:
                turned_off = False
                turn_on()
        else:
            if not turned_off and time.time() > (last_motion_time +
                                                 SHUTOFF_DELAY):
                turned_off = True
                turn_off()
            if not turned_off and time.time() > (last_motion_time + 1):
                io.output(LED_PIN, io.HIGH)
        time.sleep(.1)

def turn_on():
	subprocess.call("sh /home/pi/monitor_on.sh", shell=True)

def turn_off():
	subprocess.call("sh /home/pi/monitor_off.sh", shell=True)

if __name__ == '__main__':
    try:
        main()
    except KeyboardInterrupt:
        io.cleanup()
For the monitor_on.sh use this:
vcgencmd display_power 1

pigs p 17 1
pigs p 22 1
pigs p 24 1

sleep 0.06s

pigs p 17 2
pigs p 22 2
pigs p 24 2

sleep 0.06s

pigs p 17 3
pigs p 22 3
pigs p 24 3

sleep 0.06s

pigs p 17 4
pigs p 22 4
pigs p 24 4

sleep 0.06s

pigs p 17 5
pigs p 22 5
pigs p 24 5

sleep 0.06s

pigs p 17 6
pigs p 22 6
pigs p 24 5

sleep 0.06s

pigs p 17 7
pigs p 22 7
pigs p 24 6

sleep 0.06s

pigs p 17 8
pigs p 22 8
pigs p 24 7

sleep 0.06s

pigs p 17 9
pigs p 22 9
pigs p 24 8

sleep 0.06s

pigs p 17 10
pigs p 22 10
pigs p 24 9

sleep 0.06s

pigs p 17 11
pigs p 22 11
pigs p 24 10

sleep 0.06s

pigs p 17 12
pigs p 22 12
pigs p 24 11
For monitor_off.sh use this:
pigs p 17 12
pigs p 22 12
pigs p 24 11

sleep 0.06s

pigs p 17 11
pigs p 22 11
pigs p 24 10

sleep 0.06s

pigs p 17 10
pigs p 22 10
pigs p 24 9

sleep 0.06s

pigs p 17 9
pigs p 22 9
pigs p 24 8

sleep 0.06s

pigs p 17 8
pigs p 22 8
pigs p 24 7

sleep 0.06s

pigs p 17 7
pigs p 22 7
pigs p 24 6

sleep 0.06s

pigs p 17 6
pigs p 22 6
pigs p 24 5

sleep 0.06s

pigs p 17 5
pigs p 22 5
pigs p 24 5

sleep 0.06s

pigs p 17 4
pigs p 22 4
pigs p 24 4

sleep 0.06s

pigs p 17 4
pigs p 22 4
pigs p 24 4

sleep 0.06s

pigs p 17 3
pigs p 22 3
pigs p 24 3

sleep 0.06s

pigs p 17 2
pigs p 22 2
pigs p 24 2

vcgencmd display_power 0

sleep 0.06s

pigs p 17 1
pigs p 22 1
pigs p 24 1

sleep 0.06s

pigs p 17 0
pigs p 22 0
pigs p 24 0
Hope that helps. Try to find your best way and ask, if u need more help :)
Edit:
Oh and u need to start Pigpio on reboot with rc.local. ;) -
If you told me that your background wasn’t a stock photo I would upvote this! Nice work!
-
Well, meanwhile i changed my background, but still love it :P
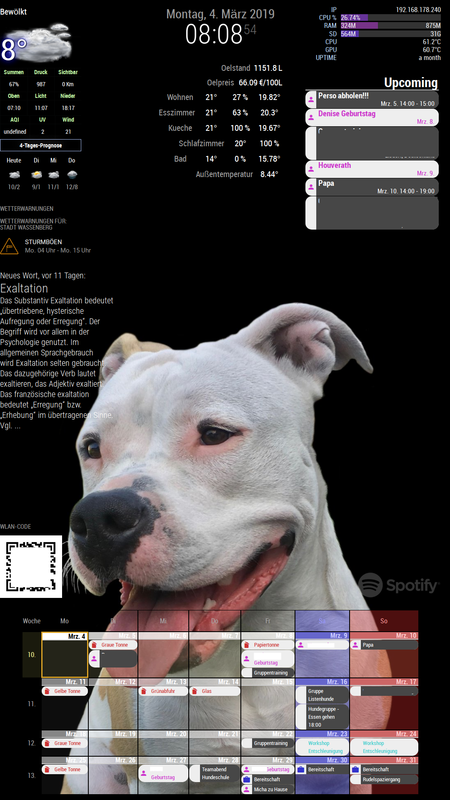
-
@c:face_with_steam_from_nose: ruunnerr ok that works…
-What ist the Funktion of LED_PIN = 16 .
Only one pin …
Do I need RGB pins in the script?-And then the led stripe start it’s flickering…
Thx4yourhelp -
LED-Pin just shows, if the PIR detects motion. You don’t need to use it.
The pir.py script starts the other shell scripts when motion is detected.
So all commands for the RGB-Stripe are within the shell scripts (monitor_on / off.sh).
And as u can see, i used GPIO 17,22 and 24.
17 = red
22 = green
24 = blueTo control the LEDs i used PIGPIOD and it’s commands, as i wrote.
So after installing PIGIOD u can start it with:
sudo pigpiodCommands like
pigs p 22 128will set green to 50%.
pigs p 24 255will set blue to 100%in the shell script i fade all colors from 1 to 12% with sleeps.
Edit:
As i wrote before u need to Autostart pigpiod via rc.local.
sudo nano /etc/rc.localMine looks like this:
#!/bin/sh -e
#
# rc.local
#
# This script is executed at the end of each multiuser runlevel.
# Make sure that the script will "exit 0" on success or any other
# value on error.
#
# In order to enable or disable this script just change the execution
# bits.
#
# By default this script does nothing.

# Print the IP address
_IP=$(hostname -I) || true
if [ "$_IP" ]; then
  printf "My IP address is %s\n" "$_IP"
fi

iwconfig wlan0 power off &

sleep 5 &

/usr/local/bin/pigpiod

sleep 10 &

/usr/bin/python /home/pi/pir.py &

exit 0
Hello! It looks like you're interested in this conversation, but you don't have an account yet.
Getting fed up of having to scroll through the same posts each visit? When you register for an account, you'll always come back to exactly where you were before, and choose to be notified of new replies (either via email, or push notification). You'll also be able to save bookmarks and upvote posts to show your appreciation to other community members.
With your input, this post could be even better 💗
Register Login